Peavey VB-3 Скачать руководство пользователя страница 11

NORWEGIAN

VIKTIGE SIKKERHETSINSTRUKSJONER

ADVARSEL: 

Ved bruk av et elektrisk apparat må grunnleggende forsiktighetsregler følges, inklusive de følgende:

1. 

Les disse instruksjonene. 

2. 

Ta vare på disse instruksjonene.

3. 

Følg alle advarslene.

4. 

Følg alle instruksjoner.

5. 

Ikke bruk apparatet i nærheten av vann. 

6. 

Rengjør bare med en tørr klut.

7. 

Ikke blokker noen av ventilasjonsåpningene. Installer i henhold til produsentens instruksjoner. 

8. 

Ikke installer i nærheten av en varmekilde som radiatorer, varmekanaler, ovn er eller andre apparater (inklusive forsterkere) som 

utvikler varme.

9. 

Ikke reduserer sikkerhetshensiktene med polariserte eller jordede støpsler. Et polarisert støpsel har to blader, der det ene er 

bredere enn det andre. Et støpsel med jording har to blader og en tredje jordingsplugg. Det brede bladet eller den tredje pluggen 

er der for å gi deg beskyttelse. Hvis det medfølgende støpslet ikke passer inn i den elektriske kontakten der du bor, kontakt en 

elektriker for å få støpslet skiftet. 

10. 

Beskytt den elektriske ledningen mot å bli trådt på eller klemt, spesielt ved støpslet, stikkontakten og punktet der den kommer ut 

av apparatet.

11. 

Bruk bare tilkoblinger/tilbehør som er levert av produsenten.

12. 

Bruk bare med vogn, stativ, tripod, brakett eller bord spesifisert av produsenten eller solgt sammen med apparatet. Når det be

-

nyttes en vogn, vis forsiktighet når vogn/apparat flyttes for å 

unngå skade som følge av et velt.

13. 

Trekk ut ledningen til apparatet under tordenvær eller når det skal stå ubrukt over en lengre periode.

14. 

Overlat servicearbeidet til kvalifisert servicepersonell. Servic

e er påkrevet når apparatet har vært utsatt for skade, som at den 

elektriske ledningen eller støpslet er skadet, væske er blitt sølt over apparatet eller en gjenstand har falt ned i apparatet, appara-

tet har vært utsatt for regn eller fuktighet, at det ikke virker normalt eller har falt i gulvet.

15. 

Bryt aldri av jordingspinnen. Skriv etter gratis hefte “Shock H

azard and Grounding” (Fare for elektrisk støt og jording). Tilkoble 

bare elektriske anlegg av den typen som er angitt på enheten ved siden av den elektriske ledningen.

16. 

Hvis dette produktet skal plasseres i en utstyrsreol må det etableres støtte på baksiden.

17. 

Note for UK only: If the colors of the wires in the mains lead of this unit do not correspond with the terminals in your plug‚

 pro-

ceed as follows: a) The wire that is colored green and yellow must be connected to the terminal that is marked by the letter E‚ the 

earth symbol‚ colored green or colored green and yellow. b) The wire that is colored blue must be connected to the terminal that 

is marked with the letter N or the color black. c) The wire that is colored brown must be connected to the terminal that is marked 

with the letter L or the color red.

18. 

Dette elektriske apparatet må ikke utsettes for drypp eller sprut fra væske, og det må utvises forsiktighet slik at det ikke plasseres 

gjenstander fylt med vann - som en vase - på apparatet.

19. 

På/av-bryteren på denne enheten bryter ikke begge sider av den 

primære strømkretsen. Farlig strøm kan finnes på innsiden av 

chassiset også når På/Av-bryteren er i posisjon Av. Det elektriske støpslet eller utstyrskoblingen brukes som frakoblingsutstyr, 

frakoblingsutstyret skal være lett å komme til og bruke.

20. 

Eksponering mot ekstremt høyt støynivå kan føre til permanent tap av hørsel. Det er betydelige individuelle forskjeller hva gjelder 

den enkeltes ømfintlighet hva gjelder støypåført tap av hørsel, 

men nesten alle vil tape noe hørsel dersom de utsettes for tilstrek-

kelig intens støy over en tilstrekkelig lang periode. U.S. Governments Occupational Safety and Health Administration (OSHA) har 

spesifisert følgende tillatte støynivåeksponeringer:

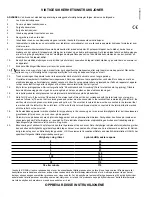
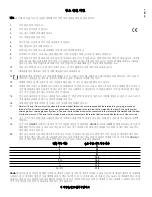
Varighet pr. dag i timer

Lydnivå dBA, sakte respons

8

90

6

92

4

95

3

97

2

100

1⁄2

102

1

105

1⁄2

110

1⁄4

 eller mindre

115

I henhold til OSHA vil enhver eksponering ut over de ovenstående tillatte grensene kunne føre til noe tap av hørsel. Ørepropper eller 

beskyttelse av ørekanalene eller over ørene må anvendes når dette forsterkersystemet brukes for å hindre permanent tap av hørsel 

dersom  eksponeringen overskrider grensene som vises ovenfor. For å beskytte mot potensielt farlig eksponering til høyt lydtrykknivåer 

anbefales det at alle personer som eksponeres mot utstyr som er i stand til å produsere høye lydtrykknivåer som dette forsterkersyste-

met må beskyttes av hørselsvern mens denne enheten er i bruk.

OPPBEVAR DISSE INSTRUKSJONENE

Содержание VB-3

Страница 1: ...www peavey com VB 3 300W all tube Bass Amplifier Operating Manual ...

Страница 2: ...rée par l utilisateur Confiez I entretien et la réparation de l appareil à un réparateur Peavey agréé AVIS Dans le but de reduire les risques d incendie ou de decharge electrique cet appareil ne doit pas etre expose a la pluie ou a l humidite et aucun objet rempli de liquide tel qu un vase ne doit etre pose sur celui ci Avant d utiliser de cet appareil lisez attentivement le guide fonctionnant pou...

Страница 3: ...DO Para evitar o risco de choque elétrico não remova a cobertura Contém peças não reparáveis pelo usuário Entregue todos os consertos apenas a pessoal qualificado ADVERTÊNCIA Para evitar choques elétricos ou perigo de incêndio este aparelho não deve ser exposto à chuva ou umidade e objetos cheios de líquidos tais como vasos não devem ser colocados sobre ele Antes de usar este aparelho leia o guia ...

Страница 4: ...ية المنتج هذا مع المرفق الكتيب داخل مهمة صيانة وصيانة تشغيل تعليمات لوجود المستخدم لتنبيه تشير تفتح ال كهربية لصدمة التعرض خطر تحذير على للحصول الصيانة إلى ارجع بالداخل للمستخدم لالستعمال قابلة أجزاء توجد ال الغطاء بإزالة تقم ال كهربية لصدمة التعرض مخاطر لتقليل تحذير المؤهلين الموظفين من خدمة مثل بالسوائل المملوءة األشياء وضع يجب وال الرطوبة أو للمطر الجهاز هذا تعريض يجب ال حريق مخاطر أو كهربية صد...

Страница 5: ...ack rear support should be provided 17 Note for UK only If the colors of the wires in the mains lead of this unit do not correspond with the terminals in your plug proceed as follows a The wire that is colored green and yellow must be connected to the terminal that is marked by the letter E the earth symbol colored green or colored green and yellow b The wire that is colored blue must be connected...

Страница 6: ...use algún tipo de apoyo trasero 17 Nota para el Reino Unido solamente Si los colores de los cables en el enchufe principal de esta unidad no corresponden con los terminales en su enchufe proceda de la siguiente manera a El cable de color verde y amarillo debe ser conectado al terminal que está marcado con la letra E el símbolo de Tierra earth coloreado en verde o en verde y amarillo b El cable col...

Страница 7: ... suit a Le connecteur vert et jaune doit être connectrer au terminal noté E indiquant la prise de terre ou correspondant aux couleurs verte ou verte et jaune du guide b Le connecteur Bleu doit être connectrer au terminal noté N correspondnat à la couleur noire du guide c Le connecteur marron doit être connectrer au terminal noté L correspondant à la couleur rouge du guide 18 Cet équipement électri...

Страница 8: ...ischen Schlag und Erdung zu Schließen Sie nur an die Stromversorgung der Art an die am Gerät neben dem Netzkabel angegeben ist 16 Wenn dieses Produkt in ein Geräte Rack eingebaut werden soll muss eine Versorgung über die Rückseite eingerichtet werden 17 Hinweis Nur für Großbritannien Sollte die Farbe der Drähte in der Netzleitung dieses Geräts nicht mit den Klemmen in Ihrem Stecker übereinstimmen ...

Страница 9: ...ee se tukea takaosastaan 17 Note for UK only If the colors of the wires in the mains lead of this unit do not correspond with the terminals in your plug proceed as follows a The wire that is colored green and yellow must be connected to the terminal that is marked by the letter E the earth symbol colored green or colored green and yellow b The wire that is colored blue must be connected to the ter...

Страница 10: ...the colors of the wires in the mains lead of this unit do not correspond with the terminals in your plug proceed as follows a The wire that is colored green and yellow must be connected to the terminal that is marked by the letter E the earth symbol colored green or colored green and yellow b The wire that is colored blue must be connected to the terminal that is marked with the letter N or the co...

Страница 11: ...Hvis dette produktet skal plasseres i en utstyrsreol må det etableres støtte på baksiden 17 Note for UK only If the colors of the wires in the mains lead of this unit do not correspond with the terminals in your plug pro ceed as follows a The wire that is colored green and yellow must be connected to the terminal that is marked by the letter E the earth symbol colored green or colored green and ye...

Страница 12: ...et netsnoer 16 Als dit product in een apparatuurrek gemonteerd moet worden moet voor achterondersteuning worden verzorgd 17 Note for UK only If the colors of the wires in the mains lead of this unit do not correspond with the terminals in your plug pro ceed as follows a The wire that is colored green and yellow must be connected to the terminal that is marked by the letter E the earth symbol color...

Страница 13: ...ta posta vicino al cavo di alimentazione 16 Se questo prodotto deve essere montato a rack è necessario sostenerlo anche nella parte posteriore 17 Nota per UK Se i colori dei fili nel cavo di alimentazione per questa unità non corrispondono con i terminali della vostra spina procedere come segue a Il filo di colore verde giallo deve essere collegato al terminale che marcato con lettera E o simbolo ...

Страница 14: ... do not correspond with the terminals in your plug proceed as follows a The wire that is colored green and yellow must be connected to the terminal that is marked by the letter E the earth symbol colored green or colored green and yellow b The wire that is colored blue must be connected to the terminal that is marked with the letter N or the color black c The wire that is colored brown must be con...

Страница 15: ...ly If the colors of the wires in the mains lead of this unit do not correspond with the terminals in your plug proceed as follows a The wire that is colored green and yellow must be connected to the terminal that is marked by the letter E the earth symbol colored green or colored green and yellow b The wire that is colored blue must be connected to the terminal that is marked with the letter N or ...

Страница 16: ...inals in your plug proceed as follows a The wire that is colored green and yellow must be connected to the terminal that is marked by the letter E the earth symbol colored green or colored green and yellow b The wire that is colored blue must be connected to the terminal that is marked with the letter N or the color black c The wire that is colored brown must be connected to the terminal that is m...

Страница 17: ... the mains lead of this unit do not correspond with the terminals in your plug proceed as follows a The wire that is colored green and yellow must be connected to the terminal that is marked by the letter E the earth symbol colored green or colored green and yellow b The wire that is colored blue must be connected to the terminal that is marked with the letter N or the color black c The wire that ...

Страница 18: ... ﻣﺎ ﺍﺗﺒﻊ ﺑﻚ ﺍﻟﺨﺎﺹ ﺍﻟﻤﻘﺒﺲ ﻓﻲ ﻟﻸﻃﺮﺍﻑ ﺍﻟﻤﺤﺪﺩﺓ ﺍﻟﻤﻠﻮﻧﺔ ﺍﻟﻌﻼﻣﺎﺕ ﻣﻊ ﺗﺘﻮﺍﻓﻖ ﻻ ﺍﻟﻮﺣﺪﺓ ﻟﻬﺬﻩ ﺍﻟﺮﺋﻴﺴﻴﺔ ﺍﻷﻃﺮﺍﻑ ﻓﻲ ﺍﻷﺳﻼﻙ ﺃﻟﻮﺍﻥ ﻛﺎﻧﺖ ﺇﺫﺍ ﻓﻘﻂ ﺍﻟﻤﺘﺤﺪﺓ ﻟﻠﻤﻤﻠﻜﺔ ﻣﻼﺣﻈﺔ 17 ﻭﺍﻷﺻﻔﺮ ﺍﻷﺧﻀﺮ ﺃﻭ ﺑﺎﻷﺧﻀﺮ ﺍﻟﻤﻠﻮﻥ ﺃﻭ ﺍﻷﺭﺿﻲ ﺭﻣﺰ ﺃﻭ E ﺑﺎﻟﺤﺮﻑ ﺍﻟﻤﻤﻴﺰ ﺑﺎﻟﻄﺮﻑ ﻭﺍﻷﺻﻔﺮ ﺑﺎﻷﺧﻀﺮ ﺍﻟﻤﻠﻮﻥ ﺍﻟﺴﻠﻚ ﺗﻮﺻﻴﻞ ﻳﺠﺐ ﺃ ﺍﻷﺳﻮﺩ ﺍﻟﻠﻮﻥ ﺫﻭ ﺃﻭ N ﺑﺎﻟﺤﺮﻑ ﺍﻟﻤﻤﻴﺰ ﺑﺎﻟﻄﺮﻑ ﺍﻷﺯﺭﻕ ﺑﺎﻟﻠﻮﻥ ﺍﻟﻤﻠﻮﻥ ﺍﻟﺴﻠﻚ ﺗﻮﺻﻴﻞ ﻳﺠﺐ ﺏ ﺍﻷﺣﻤﺮ ﺍﻟﻠﻮﻥ ﺫﻭ ﺃﻭ L ﺑﺎﻟﺤﺮﻑ ﺍﻟﻤﻤﻴﺰ ﺑﺎﻟﻄﺮﻑ ﺑﺎﻟﺒﻨﻲ ﺍﻟﻤﻠﻮﻥ ﺍﻟﺴﻠﻚ ...

Страница 19: ...te verwijdering van dit product Deze markering geeft aan dat dit product nergens in de Europese Unie met ander huishoudelijk afval mag worden afgevoerd Om mogelijke schade aan het milieu of gezondheid door ongecontroleerde afvalverwijdering te voorkomen recycle het op een verantwoorde wijze om het duurzame hergebruik van materiaalgrondstoffen te bevorderen Om uw gebruikte apparaat in te leveren ku...

Страница 20: ...d can radiate radio frequency energy and if not installed and used in accordance with the instructions may cause harmful interference to radio communications However there is no guarantee that interference will not occur in a particular installation If this equipment does cause harmful interference to radio or television reception which can be determined by turning the equipment off and on the use...

Страница 21: ...re are two channels to allow more or less preamp distortion Most ground breaking however is the introduction of a world compatible switching power supply that allows this 300 watt beast to weigh in at an extremely modest 37 pounds 17 kilograms This guide was written by bass players to help you understand the many features of the VB 3 and to aid you in getting the most out of your amp 300 watts rms...

Страница 22: ...st be depressed for the remote switch to operate Mute Switch Mutes the output of the amp but still allows use of the TUNER jack on the rear of the amp When en gaged blue LED above the MUTE switch flashes Note This switch must be depressed for the remote switch to operate Volume Controls the preamp input drive when CLEAN mode is active which is indicated by the green LED to the upper left of the VO...

Страница 23: ...requencies at the point set by the MID SHIFT switch 13 Flat mid response occurs at the maximum clockwise setting High Control Classic Baxandall shelving EQ control that cuts or boosts high frequencies Low Cut Switch This switch engages a passive low cut circuit to filter extreme low frequencies pre EQ to allow for more headroom at higher gain settings Mid Shift Switch Switches the center frequency...

Страница 24: ... being the ON position Caution The on off switch in this unit does not break both sides of the primary mains Hazardous energy can be present inside the chassis even when the on off switch is in the OFF position IEC Power Outlet Your AC mains cord plugs in here The VB 3 has a proprietary universal switch mode power supply that ac cepts AC line voltages from 100 VAC to 240 VAC at 50 60 Hz for correc...

Страница 25: ... fuse as it could be a sign something is seriously wrong with the amplifier Speaker Output Jacks These are the main outputs of the power amplifier These are combination jacks that will accept either Neutrik Speakon connectors OR standard 1 4 inch jacks Both outputs are in PARALLEL External wiring connected to the output jacks should be made by an instructed person or use UL approved ready made lea...

Страница 26: ... tube stage before the EQ When the switch is in the IN position the DI is driven from the output of the preamp after the graphic EQ Line Out This balanced XLR output provides a direct connection to a mixer or recording device Line Out Ground Lift Switch Sets the LINE OUT ground to be either common with the amplifier out or lifted from the amplifier in for the purpose of ground loop and hum elimina...

Страница 27: ...f you are having it re biased for use with 6L6GC power tubes you should expect to get about 240 W rms of clean power output instead of the 300 W with the standard EL34 tubes It is perfectly normal for power tubes like the EL34 type used in the VB 3 to emit a soft blue glow It is widely accepted that new old stock NOS vacuum tubes are superior but this is not always the case While there are fantast...

Страница 28: ...s were made at the following settings un less otherwise noted Volume 5 Overdrive 0 All front panel switches OUT Low Mid High 5 Mid Shift 450Hz Graphic Sliders 0 Master 5 Resonance 0 Presence 0 Preamp Input Sensitivity nominal 3 0V rms 10dBV 4 0Meg Ohms 0 18V rms 5 0dBV 100k Ohms 15dB pad engaged Compression Ratio Unity to XX XX variable Rotary Low Mid High EQ Low High shelving Baxandall circuit Lo...

Страница 29: ...SSION V2A TUBE GAIN TUBE GAIN TUBE GAIN V2B V3A V1A RETURN SEND PRE OUT POWER IN MASTER RESONANCE PRESENCE V3B V4B V4A V5A V5B 0dBV LOOP 10dBV LOOP INPUT w 15dB PAD 300W rms TUNER SEND XLR LEVEL GND LIFT XLR LINE OUT XLR PRE POST VB 3 FUNCTIONAL BLOCK DIAGRAM V6 V8 V10 V12 V7 V9 V11 V13 SPEAKER OUTPUTS 2 3 4 1 ...

Страница 30: ...Features and specifications subject to change without notice Peavey Electronics Corporation 5022 Hartley Peavey Drive Meridian MS 39305 601 483 5365 FAX 601 486 1278 www peavey com 2012 EX000151 ...

Страница 31: ...ow and serve you better To save time submit your warranty registration online at www peavey com support warrantyregistration Under 15 000 15 000 24 999 25 000 34 999 35 000 49 999 50 000 74 999 Television Radio Internet Newspaper Magazines Mail order catalogs Direct mail Literature from manufacturer Other 75 000 99 999 100 000 149 999 Over 150 000 13 What is your main motivation for buying new equ...

Страница 32: ...Peavey Electronics Corporation Attn Warranty Department P O Box 5108 Meridian Ms 39302 5108 FROM Place Postage Here ...

Отзывы: