

CHECK FREQUENTLY THAT THE HEAD IS EVENLY TENSIONED BY LOOKING ACROSS THE COUNTER HOOP.
ANY DISCREPANCIES WILL BE INDICATED BY THE HOOP BEING DISTORTED. THIS IS RECTIFIED BY ADJUST-
ING THE ROD TENSION AT THE POINT WHERE THE HOOP IS DISTORTED.
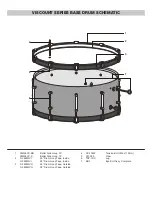
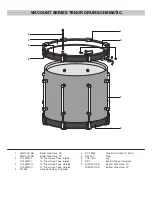
SIDE DRUM - INTERNAL & EXTERNAL SNARE MODEL
TENSIONING & TUNING
TUNING A VISCOUNT DRUM
The Pearl ‘Viscount’ single and double snare Military Pattern Side Drums
Warning
Under no circumstances should these Viscount drums be tensioned too high.
Over tensioning will invalidate any manufacturer’s or suppliers’ guarantees.
You are still entitled to your statutory rights under the Sale of Goods Act 1979.
BASIC CHECKS
1. Check both the top and bottom heads for any signs of damage during delivery.
2. With the Drum Key provided, check to make sure that all of the tension rod bolts are free from damage and turn easily
within the tensioning lug nuts. (Each time the head is replaced the threads on the tension rod bolts should be lightly
lubricated with grease to prevent them from corroding and seizing within the lug nuts).
TENSIONING THE BOTTOM (SNARE) HEAD
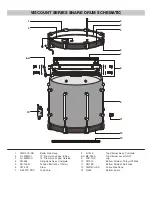
1. Place the drum upside down on a stand or hard surface.
2. Make sure the snares are set to the OFF position.
3. Number the tension bolts 1 to 8.
4. Press with your thumb into the Drum Head about ¼” in from the rim of the head at numbers 1 to 8.
(for guidance only, your thumb should be able to be pushed into the bottom head to a depth of around 3 to 8mm,
depending on how you wish your drum to sound). If the bottom head is at the required tension, then please move to the
section for tuning the top head, if not move on to step 5.
5. Starting at tension bolt number 1. Using the drum key provided, turn the tension bolt clockwise, a ¼ of a turn.
6. Repeat step at tension bolt number 5
7. Repeat step at tension bolt number 6
8. Repeat step at tension bolt number 2
9. Repeat step at tension bolt number 3
10. Repeat step at tension bolt number 7
11. Repeat step at tension bolt number 8
12. Repeat step at tension bolt number 4
13. Repeat steps 4 to 11 until the required tension is reached. By tapping the drum at each stage, you should be able to
hear the pitch of the drum getting higher as the bolts are tightened.


