Fig.3 /
図3
Fig.3-A /
図3-A
Fig.3-B /
図3-B
Fig.4 /
図4
Fig.4-A /
図4-A
Fig.5 /
図5
Tip
/
注意
Once assembly is final, adjust the Accessory Post to your
desired playing position using one of the six-hole positions for
the instrument(s) attached (FIG.3-B).
組み立てが完了しましたら、6つの穴のうちの1つを使用して、アク
セサリーポストをご希望の演奏位置に調整してください(図3-B)。
Flat Washer
ワッシャー
Flat Washer
ワッシャー
13mm Lock-Nut
ロックナット(13mm)
Accessory Post
アクセサリーポスト
Accessory Post
アクセサリーポスト
13mm Wrench
レンチ(13mm)
Guide Hooks
ガイドフック
Hook
ガイドフック
Hasp
レバー
Hook
ガイドフック
Handle
/
ハンドル
Hasp
レバー
Hinge Bracket edge into the Guide Hooks
ヒンジ・ブラケットの端をガイド・フックへ
Step 3.
Stand Assembly
スタンドの組み立て
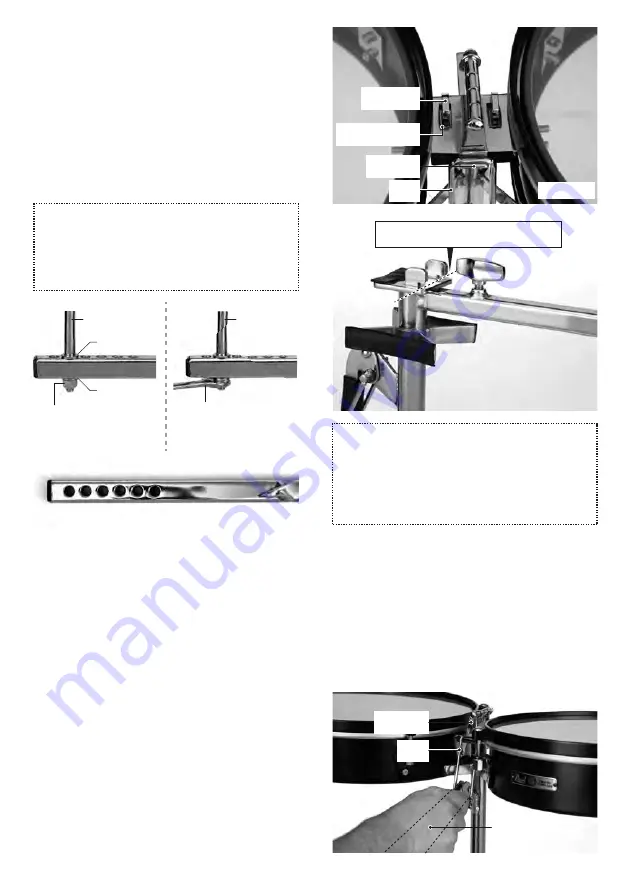
Insert the Accessory Post into one of the six-hole
positions as shown in (Fig.3). Using the 13mm Wrench
supplied, tighten the Lock-Nut located on the bottom of
the post to secure it into place (Fig.3-A).
アクセサリー・ポストを 6 つの穴のいずれかに挿入し、ポ
ストの底部にあるロックナットを付属のレンチ(13mm)で
締め所定の位置に固定します(図 3、3-A)。
Step 4.
Timbales to Stand Attachment
トラベルティンバレスの設置
Unfold the Travel Timbales and place them onto the top
of the stand with the hook toward the Hasp. Ensure the
slots of the Hinge Bracket mate with the Guide Hooks of
the Upper Tube Assembly. Slide the Travel Timbales
toward the player inserting the Hinge Bracket edge into
the Guide Hooks as shown in (Fig.4) and (Fig.4-A).
2 つのトラベルティンバレスを広げ、スタンドの上に置きま
す。 ヒンジ・ブラケットのスロットがアッパー・チューブ・
アセンブリーのガイド・フックに合っていることを確認しま
す。 ヒンジ・ブラケットの端をガイド・フックに挿入して、ト
ラベル・ティンバーレをプレーヤーに向かってスライドさ
せます(図 4, 4-A)。
Step 5.
Timbales to Stand Attachment
トラベルティンバレスの設置
Lift the Handle to place the Hasp onto the Hook of the
Hinge Bracket (Fig.5).
ハンドルを持ち上げて、レバーをヒンジブラケットのフック
に取り付けます(図 5)。
CAUTION
/
注意
Failure to fully insert the Hinge Bracket into the Guide Hooks
may cause the Travel Timbales to fall off the stand resulting in
damage or personal injury.
ヒンジブラケットをガイドフックに完全に挿入しないと、トラベ
ルティンバレスがスタンドから落下し、破損や人身事故の原因に
なることがあります。
Hinge Bracket Slots
ガイドフック


