
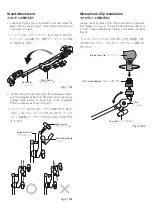


Fig.1 /
図1
Fig.2 /
図2
1. Loosen Wing Nut (A) on the Boom Tilter and rotate the
Boom Arm as shown (Fig.1.) then tighten Wing Nut (A)
to secure it in place.
1. ブームティルターのウイングナット (A) をゆるめ、図のよう
にブームアームを回転させ、再度ウイングナット (A) を締
めて固定します(図 1)。
2. Loosen Wing Nut (B) and open the Adjustable Clamp.
Set the Adjustment Nut and Wing Nut (B) to clamp the
cymbal stand evenly, so each side of the Adjustable
Clamp is parallel, as shown in (Fig.2).
2. ウイングナット (B) をゆるめ、クランプを開きます。 取り付
けるシンバルスタンドのパイプの太さに合わせ、アジャス
トナットを調整して、クランプが平行になるように取り付け
ます(図 2)。
ブームアーム
Boom Arm
ウイングナット(A)
Wing-Nut (A)
ウイングナット(B)
Wing-Nut (B)
Stand Attachment
スタンドへの取り付け
Fig.3 /
図3
Loosen the Wing-Bolt of the Tilter and adjust it upwards,
then tighten to secure. Thread the Microphone Clip onto
the 5/8” Thread Adapter by rotating it clockwise until tight
(Fig.3).
ティルターのウイングボルトをゆるめ上向きに調整した後、
お手持ちのマイククリップをスレッドアダプターに締め込み
ます(図 3)。
Microphone Clip
/
マイククリップ
5/8" Thread Adapter
/
スレッドアダプター
Wing-Bolt
/
ウイングボルト
ティルター
Tilter
Microphone Clip Installation
マイククリップの取り付け
アジャストナット
Adjustment Nut
クランプ
Adjustable Clamp