background image

1. Sicherheitshinweise 

 
Dieses 

Gerät 

erfüllt 

die 

EU-Bestimmungen 

2004/108/EG 

(elektromagnetische 

Kompatibilität) 

und 

2006/95/EG 

(Niederspannung)  entsprechend  der  Festlegung  im  Nachtrag 
2004/22/EG (CE-Zeichen).  
Überspannungskategorie  III  1000V;  Überspannungskategorie  IV 
600V; 
Verschmutzungsgrad 2. 
 
CAT I: 

Signalebene,  Telekommunikation,  elektronische  Geräte 
mit geringen transienten Überspannungen 

CAT II:   Für  Hausgeräte,  Netzsteckdosen,  portable  Instrumente 

etc. 

CAT III:  Versorgung durch ein unterirdisches Kabel; Festinstallierte 
 

Schalter, Sicherungsautomaten, Steckdosen oder Schütze 

CAT IV:  Geräte  und  Einrichtungen,  welche  z.B.  über  Freileitungen 
 

versorgt 

werden 

und 

damit 

einer 

stärkeren 


Blitzbeeinflussung  ausgesetzt  sind.  Hierunter  fallen  z.B. 


Hauptschalter  am  Stromeingang,  Überspannungsableiter, 


Stromverbrauchszähler und Rundsteuerempfänger 

 
Zur  Betriebssicherheit  des  Gerätes  und  zur  Vermeidung  von 
schweren  Verletzungen  durch  Strom-  oder  Spannungsüberschläge 
bzw. 

Kurzschlüsse 

sind 

nachfolgend 

aufgeführte 

Sicherheitshinweise  zum  Betrieb  des  Gerätes  unbedingt  zu 
beachten. 
 
Schäden, die durch Nichtbeachtung dieser Hinweise entstehen, sind 
von Ansprüchen jeglicher Art ausgeschlossen. 


Dieses Gerät darf nicht in hochenergetischen Schaltungen 
verwendet werden. 


Gerät nicht auf feuchten oder nassen Untergrund stellen. 


Keine 

Flüssigkeiten 

auf 

dem 

Gerät 

abstellen 

(Kurzschlussgefahr beim Umkippen des Gerätes) 

-1- 

Содержание 3441

Страница 1: ...Bedienungsanleitung Operation Manual Digital Multimeter PeakTech 3441 ...

Страница 2: ...htungen welche z B über Freileitungen versorgt werden und damit einer stärkeren Blitzbeeinflussung ausgesetzt sind Hierunter fallen z B Hauptschalter am Stromeingang Überspannungsableiter Stromverbrauchszähler und Rundsteuerempfänger Zur Betriebssicherheit des Gerätes und zur Vermeidung von schweren Verletzungen durch Strom oder Spannungsüberschläge bzw Kurzschlüsse sind nachfolgend aufgeführte Si...

Страница 3: ...itten werden muss die Messspannung entsprechend 10 1 vorgedämpft werden Nehmen Sie das Gerät nie in Betrieb wenn es nicht völlig geschlossen ist Defekte Sicherungen nur mit einer dem Originalwert entsprechenden Sicherung ersetzen Sicherung oder Sicherungshalter niemals kurzschließen Vor dem Umschalten auf eine andere Messfunktion Prüfleitungen oder Tastkopf von der Messschaltung abkoppeln Keine Sp...

Страница 4: ... umschalten Gerät keinen extremen Temperaturen direkter Sonneneinstrahlung extremer Luftfeuchtigkeit oder Nässe aussetzen Starke Erschütterung vermeiden Heiße Lötpistolen aus der unmittelbaren Nähe des Gerätes fernhalten Vor Aufnahme des Messbetriebes sollte das Gerät auf die Umgebungstemperatur stabilisiert sein wichtig beim Transport von kalten in warme Räume und umgekehrt Überschreiten Sie bei ...

Страница 5: ...ngen geeignet Vermeiden Sie jegliche Nähe zu explosiven und entflammbaren Stoffen Öffnen des Gerätes und Wartungs und Reparatur arbeiten dürfen nur von qualifizierten Service Technikern durchgeführt werden Gerät nicht mit der Vorderseite auf die Werkbank oder Arbeitsfläche legen um Beschädigung der Bedienelemente zu vermeiden Keine technischen Veränderungen am Gerät vornehmen Messgeräte gehören ni...

Страница 6: ...gt diese Neuentwicklung unter anderem über eine 4 20mA Stromschleifenmessung einen Tiefpassfilter und eine Auto Hold Funktion Durch diese vielen hervorragenden technischen Eigenschaften ist dieses Gerät für jeden Elektroniker Techniker und Ingenieur bestens für den täglichen Einsatz im Service Bau oder Industriesektor geeignet 1 2 Maximal zulässige Eingangswerte Funktion Überlastschutz DCV ACV 100...

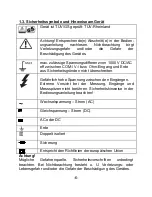
Страница 7: ... Sicherheitsgründen nicht überschreiten Gefährlich hohe Spannung zwischen den Eingängen Extreme Vorsicht bei der Messung Eingänge und Messspitzen nicht berühren Sicherheitshinweise in der Bedienungsanleitung beachten Wechselspannung Strom AC Gleichspannung Strom DC AC oder DC Erde Doppelt isoliert Sicherung Entspricht den Richtlinien der europäischen Union Achtung Mögliche Gefahrenquelle Sicherhei...

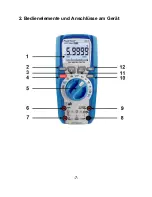
Страница 8: ...2 Bedienelemente und Anschlüsse am Gerät 7 ...

Страница 9: ...bereichswahl 6 10A Buchse AC DC Strommessungen bis 10A 7 µA mA Buchse AC DC Strommessungen bis 800mA 8 COM Buchse Zum Anschluss der korrespondierenden Messleitung am Bezugspunkt 9 V Ω CAP Hz Temp Buchse Zum Anschluss der Messleitung 10 MAX MIN PMAX MIN Taste Zum Einschalten der Maximal Minimal Peak und AVG Messfunktion 11 Hz REL Taste Tastverhältnis Messfrequenz und Relativwertfunktion umschalten ...

Страница 10: ...ereich erlischt die Anzeige automatisch 3 1 Vorbereitung zum Messbetrieb 1 Prüfen Sie vor der Messung die Versorgungsspannung des Akkus Ist sie zu schwach erscheint das Batteriesymbol rechts oben und der Akku muss wieder aufgeladen werden 2 Das Warndreieck neben den Eingangsbuchsen soll Sie warnen dass Messspannung oder Messstrom zum Schutz der internen Schaltung nicht den angegebenen Wert überste...

Страница 11: ...n 3 Zur Rückkehr zu automatischer Bereichswahl Taste RANGE für ca 2 Sekunden gedrückt halten Die Anzeige für automatische Bereichswahl AUTO leuchtet auf 4 Merkmale 4 1 Erklärung der Drucktaster RANGE Durch Drücken der RANGE Taste wird der manuelle Messbereich in der aktuellen Messfunktion gewählt Wird die RANGE Taste 2 Sekunden gedrückt gehalten kehrt das Gerät wieder in die automatische Bereichsw...

Страница 12: ...ird die Grundauflösung des Gerätes von 3 5 6 stellig auf 4 5 6 stellig umgeschaltet AUTO Der angezeigte Messwert wird durch kurzes Betätigen im HOLD Display eingefroren Wir die AUTO HOLD Taste ca 2 Sekunden gedrückt wechselt das Gerät in die Auto Hold funktion und hält immer den aktuell stabilen Messwert in der Anzeige MAX Durch kurzes mehrmaliges Betätigen der MAX MIN Taste MIN schalten Sie durch...

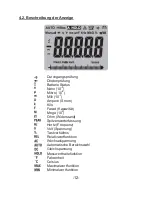
Страница 13: ... 6 Milli 10 3 Ampere Strom Kilo Farad Kapazität Mega 106 Ohm Widerstand Spitzenwerterfassung Hertz Frequenz Volt Spannung Tastverhältnis Relativwertfunktion Wechselspannung Automatische Bereichswahl Gleichspannung Messwerthaltefunktion Fahrenheit Celsius Maximalwertfunktion Minimalwertfunktion 12 ...

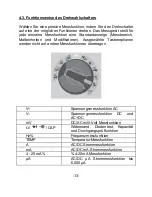
Страница 14: ...ten und Modifikatoren Ausgewählte Tastenoptionen werden nicht auf andere Messfunktionen übertragen V Spannungsmessfunktion AC V Spannungsmessfunktion DC und AC DC mV DC AC milli Volt Messfunktion CAP Widerstand Diodentest Kapazität und Durchgangsprüffunktion Hz Frequenzmessfunktion TEMP Temperatur Messfunktion A AC DC Strommessfunktion mA AC DC mA Strommessfunktion 4 20 mA 4 20mA Messfunktion µA A...

Страница 15: ... COM Eingangsanschlüsse verwendet 10A Eingang für 0 A bis 10 00 A Strom 20 VA Überlast für 30 Sekunden ein 10 Minuten aus µA mA Eingang für Strommessungen bis 600mA COM Masse Anschluss für alle Messungen V Ω Hz CAP TEMP Eingang für Spannung Kontinuität Widerstand Diodentest Frequenz Kapazität und Temperatur 14 ...

Страница 16: ...leitung an den V CAP Hz Temp Eingang und die schwarze Prüfleitung an den COM Eingang des Gerätes anschließen 3 Prüfleitungen über die zu messendende Spannungsquelle anlegen und Messwert in der LCD Anzeige des Gerätes ablesen Bei negativen Messwerten erscheint ein Minussymbol links vom Messwert 15 ...

Страница 17: ...inschaltströme oder spannungen könnten sonst u U das Messgerät beschädigen bzw zerstören Achtung Phantomwerte In niedrigen DC und AC Spannungsbereichen und nicht angeschlossenen und somit offenen Eingängen zeigt die LCD Anzeige sogenannte Phantomwerte d h nicht 000 an Dieses ist normal und stellt keinen Defekt des Gerätes dar 16 ...

Страница 18: ...ien Kontakt mit den Innenkontakten der Steckdose nicht lang genug und die LCD Anzeige zeigt daher 0 V obwohl eine Spannung von 230 V an der Steckdose anliegt Daher immer sicherstellen dass ein einwandfreier Kontakt zwischen den Messspitzen den Prüfleitungen und den Innenkontakten der Steckdose besteht und nicht blind der 0 V Anzeige vertrauen Wichtig Vor dem Ein bzw Ausschalten der Messschaltung P...

Страница 19: ...leitung an den COM Eingang des Gerätes anschließen 4 Prüfleitungen über die zu messende Spannungsquelle anlegen und Messwert in der LCD Anzeige des Gerätes ablesen 5 Bei Bedarf Hz Taste drücken um auf Frequenzmessung Tastverhältnis der Wechselspannung umzuschalten 6 In der Wechselspannungsmessung die MODE Taste drücken um auf eine Low Pass Filter Messung umzuschalten 18 ...

Страница 20: ...equenz Hz und Duty Cycle umschalten 3 Rote Prüfleitung an den V CAP Hz Temp Eingang und schwarze Prüfleitung an den COM Eingang des Gerätes anschließen 4 Prüfleitungen über das zu messende Bauteil bzw die zu messende Schaltung anlegen 5 Messwert in der LCD Anzeige ablesen Der Messwert wird in der entsprechenden Maßeinheit Hz kHz MHz oder angezeigt 19 ...

Страница 21: ...s messfunktion angeschlossene Prüfleitungen nicht an eine Spannungsquelle anlegen Widerstandsmessungen nur an spannungsfreien Schaltungen bzw Bauteilen vornehmen und Netzstecker aus der Steckdose ziehen In der Schaltung befindliche Kondensatoren vor der Messung unbedingt entladen 20 ...

Страница 22: ... Eigenwiderstand üblicher Prüfleitungen liegt zwischen 0 2 1 Ohm Zur exakten Bestimmung des Eigenwiderstandes Prüfleitungen an die Eingangsbuchsen des Multimeters anschließen und Messspitzen kurzschließen Der angezeigte Messwert entspricht dem Eigen widerstand der Prüfleitungen 5 6 Durchgangsprüffunktion Achtung Nach Umschaltung des Multimeters auf die Widerstands messfunktion angeschlossene Prüfl...

Страница 23: ...MODE drücken um die Durchgangsprüffunktion auszuwählen 3 Rote Prüfleitung an den V CAP Hz Temp Eingang und schwarze Prüfleitung an den COM Eingang des Gerätes anschließen 4 Wenn der Widerstand unter ca 30Ω liegt ertönt das akustische Signal Ist der Stromkreis offen wird das Display OL anzeigen 22 ...

Страница 24: ... Dioden und anderen Halbleiter Elementen in definierten Schaltungen sowie die Bestimmung der Durchgängigkeit Kurzschluss und des Spannungsabfalls in Durchlassrichtung Achtung Vor Überprüfung der Diode Bauteil bzw Schaltung unbedingt spannungslos schalten oder Diode aus der Schaltung auslöten 23 ...

Страница 25: ...wert in der LCD Anzeige ablesen 5 Prüfleitungen über den Anschlüssen der Diode vertauschen und Messwert ablesen 6 Wird nach dem ersten Anlegen oder nach dem Vertauschen der Prüfleitungen über dem zu messenden Bauteil einmal ein Messwert und einmal das Überlaufsymbol OL angezeigt ist die Diode in Ordnung Erscheint beim Anlegen bzw Vertauschen der Prüfleitungen in beiden Fällen das Überlaufsymbol is...

Страница 26: ...edingt entladen Kondensator zur Messung aus der Schaltung auslöten Messung wie beschrieben durchführen 1 Funktionswahlschalter in Stellung Ω CAP drehen 2 Taste MODE drücken um die Kapazitätsmessfunktion auszuwählen 3 Rote Prüfleitung an den V CAP Hz Temp Eingang und schwarze Prüfleitung an den COM Eingang des Gerätes anschließen 25 ...

Страница 27: ...über den zu messenden Kondensator anlegen Polarität beachten 5 Messwert in der LCD Anzeige ablesen 5 9 Temperaturmessfunktion Achtung Temperaturmessungen nur an spannungsfreien Schaltungen bzw Messobjekten vornehmen 26 ...

Страница 28: ...s zu messenden Bauteils aufsetzen und Kontakt bis zur Stabilisierung der Messwertanzeige aufrechterhalten ca 30 Sekunden 6 Temperaturwert nach erfolgter Stabilisierung in der LCD Anzeige ablesen Achtung Aus Sicherheitsgründen Temperaturfühler unbedingt vor dem Umschalten auf eine andere Messfunktion von den Eingangsbuchsen des Multimeters abziehen 5 10 Gleichstrommessung Achtung Aus Sicherheitsgrü...

Страница 29: ...mschalten In der LCD Anzeige leuchtet das Funktionssymbol DC auf 3 Abhängig von der zu messenden Stromstärke rote Prüfleitung an den µA mA oder den 10A Eingang und schwarze Prüfleitung an den COM Eingang des Gerätes anschließen Bei unbekannter Stromgröße aus Sicherheitsgründen den 10A Bereich wählen und bei entsprechender Messwertanzeige ggf auf einen mA Messbereich umschalten 28 ...

Страница 30: ...er internen Sicherung führen Achtung 1 Entsprechend der zu messenden Stromgröße Funktionswahlschalter entweder in Stellung µA mA oder 10A drehen 2 Gerät auf die Wechselstrommessfunktion AC durch Drücken der Taste MODE umschalten In der LCD Anzeige leuchtet das Funktionssymbol AC auf 3 Abhängig von der zu messenden Stromstärke rote Prüfleitung an den µA mA oder den 10 A Eingang und schwarze Prüflei...

Страница 31: ...rstrom abgesichert Defekte Sicherungen müssen zur weiteren Messung gegen neue Sicherungen des gleichen Typs ausgewechselt werden Bei ausgelösten Sicherungen ist keine Strommessung mehr möglich Den maximalen Strommessbereich nicht überschreiten um ein Auslösen der Sicherung zu vermeiden 30 ...

Страница 32: ...n die Unterscheidung zwischen einem Nullsignal und einem unterbrochenen Draht oder fehlerhaften Gerät Die Vorteile der 4 20 mA Übertragung die geringen Implementierungskosten sowie die Möglichkeit viele Formen des elektrischen Rauschens auszuschließen 1 Einstellungen und Verbinden der Prüfleitungen wie in Punkt 6 10 Gleichstrommessungen beschrieben durchführen 3 Funktionswahlschalter in 4 20mA Pos...

Страница 33: ...ngangsbuchsen 2 Drehen Sie die Schraube des Batteriefaches eine halbe Umdrehung gegen den Uhrzeigersinn um das Batteriefach zu öffnen 3 Ersetzen Sie die 4 x 1 5V AAA Batterien durch neue in gleicher Bauform 4 Setzen Sie das Batteriefach wieder auf das Gerät und sichern Sie es durch Drehen der Schraube um eine halbe Umdrehung im Uhrzeigersinn 32 ...

Страница 34: ...es eine halbe Umdrehung gegen den Uhrzeigersinn um das Batteriefach zu öffnen 2 Defekte Sicherung vorsichtig aus dem Sicherungshalter entfernen 4 Neue im Wert und den Abmessungen der Originalsicherung entsprechende Sicherung in den Sicherungshalter einsetzen Darauf achten dass die Sicherung mittig im Halter sitzt 5 Nach dem Auswechseln der entsprechenden Sicherung Batteriefachdeckel wieder auf das...

Страница 35: ... Temperaturbereich für angegebene Genauigkeit 18 28 C 11 2 Allgemeine technische Daten Gehäuse Doppelt isoliert wasserdicht Falltest 2 m Dioden Test Teststrom von 0 9 mA maximal Leerlaufspannung 2 8 V DC typisch Durchgangsprüffunktion Akustisches Signal ertönt wenn der Widerstand geringer als 30 ist Teststrom 0 35mA PEAK Funktion Spitzenwerterfassung 1ms Temperatursensor Benötigt Typ K Temperaturf...

Страница 36: ...Signale ungenau an Geräte mit Echteffektiv Funktion True RMS können auch diese Signaltypen genau anzeigen ACV Frequenz Bandbreite 50Hz to 5000Hz Überbereichsanzeige OL wird angezeigt Abschaltautomatik ca 15 Minuten Polaritätsanzeige Automatisch Minus Zeichen für negativ Messrate 3 x pro Sekunde nominal Batteriezustandsanzeige wird angezeigt wenn die Batteriespannung unter die benötigte Betriebsspa...

Страница 37: ...tzt durch doppelte Isolierung entsprechend EN 61010 1 2010 und IEC 61010 1 2010 und Überspannungskategorie CAT IV 600 V und CAT III 1000 V Verschmutzungsgrad 2 Es erfüllt auch die UL 61010 1 2 Ausgabe 2004 CAN CSA C22 2 Nr 61010 1 2 Ausgabe 2004 und UL 61010B 2 031 1 Auflage 2003 Abmessungen B x H x T 80 x 175 x 50 mm Gewicht 400 g 36 ...

Страница 38: ... 0 5 St 6 V 0 0001V 60 V 0 001V 600 V 0 01V 1000 V 0 1V Nicht spezifiziert Genauigkeit bei 10 des Messbereiches Gleichspannung DCV Bereich Auflösung Genauigkeit 600 mV 0 01 mV 0 9 5 St 6 V 0 0001 V 60 V 0 001 V 600 V 0 01 V 1000 V 0 1 V 1 2 5 St Bei Verwendung des Relativ Modus REL zum Ausgleich des Offsets 37 ...

Страница 39: ... C 2 0 3 0 C 58 1400 F 0 1 F 2 0 5 5 F 1 Spezifikation enthält nicht den Messfehler des angeschlossenen Temperatursensors 2 Genauigkeit der angegebenen Spezifikation setzt eine Stabilität der Umgebungstemperatur von 1 0 C voraus Kapazität 60 nF 0 01 nF 3 5 10 St 600 nF 0 1 nF 6 µF 0 001 µF 2 5 10 St 60 µF 0 01 µF 600 µF 0 1 µF 6000 µF 1 µF 3 5 10 St Tast verhältnis 0 001 99 90 0 0001 1 2 50 St Pul...

Страница 40: ...00 kHz Frequenz Elektrisch 40 Hz 10 kHz 0 0001 Hz 0 5 v M Empfindlichkeit min 15Veff Gleichstrom DCA 600 µA 0 01 µA 1 5 v M 5 St 6000 µA 0 1 µA 60 mA 0 001 mA 600 mA 0 01 mA 10 A 0 001 A Wechselstrom ACA 1 kHz 5 kHz 600 µA 0 01 µA 2 5 v M 5 St 3 5 v M 5 St 6000 µA 0 1 µA 60 mA 0 001 mA 600 mA 0 01 mA 10 A 0 001 A Nicht spezifiziert 20A maximal 30 Sekunden mit reduzierter Genauigkeit Alle Wechselst...

Страница 41: ...mit schriftlicher Genehmigung des Herausgebers gestattet Letzter Stand bei Drucklegung Technische Änderungen des Gerätes welche dem Fortschritt dienen vorbehalten Hiermit bestätigen wir dass alle Geräte die in unseren Unterlagen genannten Spezifikationen erfüllen und werkseitig kalibriert geliefert werden Eine Wiederholung der Kalibrierung nach Ablauf von 1 Jahr wird empfohlen PeakTech 03 2016 Ehr...

Страница 42: ...ut off or main plugs CAT IV Units and installations which are supplied overhead lines which are stand in a risk of persuade of a lightning i e main switches on current input overvoltage diverter current use counter To ensure safe operation of the equipment and eliminate the danger of serious injury due to short circuits arcing the following safety precautions must be observed Damages resulting fro...

Страница 43: ...st and discharge all capacitors before taking any resistance measurements Do not conduct current measurements with the leads connected to the V Ω terminals of the equipment Check test leads and probes for faulty insulation or bare wires before connection to the equipment Please use only 4mm safety test leads to ensure immaculate function To avoid electric shock do not operate this product in wet o...

Страница 44: ...as the battery indicator BAT appears With a low battery the meter might produce false reading that can lead to electric shock and personal injury Fetch out the battery when the meter will not be used for long period Periodically wipe the cabinet with a damp cloth and mid detergent Do not use abrasives or solvents The meter is suitable for indoor use only Do not operate the meter before the cabinet...

Страница 45: ...n to the comprehensive measurement functions for current voltage capacity resistance and more this new developed device has among other things a 4 20mA current loop measurement a low pass filter and an Auto Hold function Through these many technical qualities this device for every electronics engineer technician and engineer is ideal for daily use in the service construction or industrial sector 1...

Страница 46: ...ety reasons Dangerous high voltage is applied between the inputs Extreme caution in the measurement Do not touch inputs and measuring tips Safety instructions in the user manual note AC Alternating Current DC Direct Current AC or DC Earth ground Doppelt isoliert Fuse Conforms to European Union directives This WARNING CAUTION symbols indicate a potentially hazardous situation which if not avoided m...

Страница 47: ...2 Front Panel Description 46 ...

Страница 48: ...d measurement 6 10A Socket AC DC current measurements up to 10A 7 µA mA Socket AC DC current measurements up to 800mA 8 COM Socket To connect the corresponding measuring line at the reference point 9 V Ω CAP Hz Temp Socket Input connector for red test lead for all measurement functions except current measurements 10 Hz REL Key Switches duty cycle frequency measurement and relative value function 1...

Страница 49: ...ly voltage by setting the DMM switch to ON If the voltage is weak a BAT sign will appear on the right of display and you have to charge the battery 2 The warning sign next to the test leads jack is for warning that the input voltage or current should not exceed the indicated values This is to prevent damage to the internal circuitry 3 The function switch should be set to the range which you want t...

Страница 50: ...e available ranges until you select the range you want 3 Press and hold the RANGE button for 2 seconds to exit the manual ranging mode and return to AUTO mode 4 Features 4 1 Understanding the Push Buttons RANGE The manual range is selected in the current measurement function by pressing the RANGE button When the RANGE button is held for 2 seconds the unit will return to autoranging MODE Can switch...

Страница 51: ...ng switches the base resolution of the device from 3 5 6 digit to 4 5 6 digits AUTO The displayed value will be frozen by pushing the HOLD HOLD key Pressing the AUTO HOLD button for about 2 seconds the unit enters the auto hold function and keeps the next stable reading in the display MAX By briefly repeatedly pressing the MAX MIN key you can MIN cycle through the maximum value holding function th...

Страница 52: ...icro 10 6 Milli 10 3 Ampere Current Kilo Farad Capacity Mega 106 Ohm Resistance Peak detection Hertz Frequency Volt Voltage Duty Cycle Relative function Alternating Current Automatic Range Direct Current Data Hold function Fahrenheit Celsius Maximum value function Minimum value function 51 ...

Страница 53: ... and modifiers Button choices made in one function do not carry over into another function V AC voltage measurements V DC and AC DC voltage measurements mV DC AC milli volts measurements CAP Resistance Diode test capacitance and continuity measurements Hz Frequency measurements TEMP Temperature measurements A AC DC amps measurements mA AC DC milliamps measurements 4 20 mA 4 20mA measurements µA AC...

Страница 54: ... and COM input terminals 10A Input for 0 A to 10 00 A current 20VA overload for 30 seconds on 10 minutes off µA mA Input for 0 A to 600 mA current measurements COM Ground terminal for all measurements V Hz CAP TEMP Input for voltage continuity resistance diode test frequency capacitance and temperature 53 ...

Страница 55: ... the function switch to the green position 2 Insert the black test lead into the negative COM jack Insert the red test lead into the positive V CAP Hz Temp jack 3 Read the voltage in the display When the value is negative a symbol is displayed 54 ...

Страница 56: ... or OFF operations that can damage the meter Caution Understanding Phantom readings In some DC and AC voltage ranges when the test leads are not connected to any circuit the display might show a phantom reading This is normal The meter s high input sensitivity produces a wandering effect When you connect the test leads to a circuit accurate reading appears 55 ...

Страница 57: ...ts for appliances because the contacts are recessed deep in the outlets As a result the reading may show 0 volts when the outlet actually has voltage on it Make sure the probe tips are contacting the metal contacts inside the outlet before assuming that no voltage is present Caution Do not measure AC voltages if a motor on the circuit is being switched ON or OFF Large voltage surges may occur duri...

Страница 58: ...COM jack and the red test lead into the positive V CAP Hz Temp jack 4 Touch the test probe tips to the circuit under test 5 Read the voltage in the display The display will indicate the proper decimal point value and symbol 6 Press the MODE button in the AC voltage measurement to switch to a low pass filter measurement 57 ...

Страница 59: ...and Duty Cycle 3 Insert the black test lead into the negative COM jack and the red test lead banana plug into the positive V CAP Hz Temp jack 4 Touch the test probe tips to the circuit under test 5 Read the frequency in the display The digital readings will indicate the proper decimal point symbols Hz kHz MHz and value 58 ...

Страница 60: ...tance measurements Warning To avoid electric shock disconnect power to the unit under test and discharge all capacitors before taking any resistance measurements Remove the batteries and unplug the line cords 59 ...

Страница 61: ...bol Caution When you short the test leads in the 600 range your meter display a small value no more than 0 2 1 This value is due to your meter s and test leads internal resistance Make a note of this value and subtract it from small resistance measurements for better accuracy 5 6 Continuity Test Caution To avoid electric shock disconnect power to the unit under test and discharge all capacitors be...

Страница 62: ...o select the continuity test 3 Insert the black test lead into the negative COM jack and the red test lead into the positive V CAP Hz Temp jack 4 If the resistance is less than approximately 30Ω the audible signal will sound If the circuit is open the display will indicate OL 61 ...

Страница 63: ...f the usability of diodes and other semiconductor elements defined in circuits as well as the determination of the continuity short circuit and the voltage drop in the forward direction Warning To avoid electric shock do not test any diode that has voltage on it 62 ...

Страница 64: ...iode or semiconductor junction you wish to test Note the meter reading 5 Reverse the probe polarity by switching probe position Note this reading 6 The diode or junction can be evaluated as follows A If one reading shows a value and the other reading shows OL the diode is good B If both readings are OL the device is open C If both readings are very small or 0 the device is shorted Note The value i...

Страница 65: ...tteries and unplug the line cords 1 Set the function switch to the Ω CAP position 2 Press the MODE button until the CAP symbol appears in the display 3 Insert the black test lead into the negative COM jack and the red test lead into the positive V CAP Hz Temp jack 4 Touch the test leads to the capacitor to be tested The display will indicate the proper decimal point value and symbol 64 ...

Страница 66: ...adaptor in the input socket for V CAP Hz Temp and COM for temperature measurements 4 Insert the K type thermocouple into the multi function adaptor making sure to observe the correct polarity 5 Touch the temperature probe head to the part whose temperature you wish to measure Keeps the probe touching the part under test until the reading stabilizes about 30 seconds 6 Read the temperature in the di...

Страница 67: ...urement function 5 10 DC Current measurements Warning To avoid electric shock do not measure DC current on any circuit whose voltage exceeds 1000V DC ACRMS Caution Do not make current measurements on the 10A scale for longer than 30 sec Exceeding 30 sec may cause damage to the meter and or the test leads 66 ...

Страница 68: ...µA jack 5 For current measurements up to 10 A DC set the function switch to the 10 A position and insert the red test lead banana plug into the 10 A jack 6 For safety reasons in case of unknown current magnitudes always choose the 10A range and corresponding measured value display switch to a mA measurement range 7 Remove power from the circuit under test and open the circuit at the point where yo...

Страница 69: ... electric shock do not measure AC current on any circuit whose voltage exceeds 1000V DC ACRMS Caution Do not make current measurements on the 10A scale for longer than 30 sec Exceeding 30 sec may cause damage to the meter and or the test leads 68 ...

Страница 70: ... For current measurements up to 500mA AC set the function switch to the mA position and insert the red test lead into the µA mA jack 4 For current measurements up to 10A AC set the function switch to the 10A position and insert the red test lead into the 10A jack 5 Press the MODE button until AC appears in the display 6 Remove power from the circuit under test and open the circuit at the point whe...

Страница 71: ...n at 4 mA allows the receiving instrument to distinguish between a zero signal and a broken wire or faulty appliance The advantage of the 4 20 mA transmission are low implementation costs and the possibility of excluding many forms of electrical noise 1 Set up and connect as described for DC mA measurements 2 Set the rotary function switch to the 4 20mA position 3 The meter will display loop curre...

Страница 72: ... from the terminals 2 Remove the battery door assembly by using a screwdriver to turn the battery door screw one half turn counterclockwise 3 Replace the batteries with 4 x 1 5V AAA batteries Pay regard to the proper polarity 4 Reinstall the battery door assembly and secure it by turning the screw one half turn clockwise 71 ...

Страница 73: ...value and the dimensions of the original fuse Make sure that the fuse is centred in the holder 5 After replacing the appropriate backup attach the battery cover back to the device and secure it by turning the screw by half a turn clockwise Warning To avoid electric shock do not operate your meter until the back cover and the battery door is in place and fastened securely Note If your meter does no...

Страница 74: ...ture 18 C 28 C 64 F to 82 F to maintain guaranteed accuracy 12 2 General Specifications Enclosure Double molded waterproof Shock Drop Test 6 5 feet 2 meters Diode Test Test current of 0 9mA maximum open circuit voltage 2 8V DC typical Continuity Check Audible signal will sound if the resistance is less than 30 test current 0 35mA PEAK Captures peaks 1ms Temperature Sensor Requires type K thermocou...

Страница 75: ...ed signals True rms meters read accurately on either type of signal ACV Bandwidth 50Hz 5000Hz Overrange indication OL is displayed Auto Power Off approx 15 min Polarity Automatic no indication for positive Minus sign for negative Measurement Rate 3 times per second nominal Low Battery Indication is displayed if battery voltage drops below operating voltage Battery 4 x 1 5V AAA battery Fuse mA μA r...

Страница 76: ...e insulation per EN61010 1 and IEC61010 1 2nd Edition 2001 to Category IV 600V and Category III 1000V Pollution Degree 2 The meter also meets UL 61010 1 2nd Edition 2004 CAN CSA C22 2 No 61010 1 2nd Edition 2004 and UL 61010B 2 031 1st Edition 2003 Dimensions W x H x D 80 x 175 x 50 mm Weight 400 g 75 ...

Страница 77: ...1 5 St 3 0 5 dgt 6 V 0 0001V 60 V 0 001V 600 V 0 01V 1000 V 0 1V Not specified Accuracy 10 of range DC Voltage Range Resolution Accuracy 600 mV 0 01 mV 0 9 5 dgt 6 V 0 0001 V 60 V 0 001 V 600 V 0 01 V 1000 V 0 1 V 1 2 5 dgt When using the relaiv mode REL Q to compensate for offsets 76 ...

Страница 78: ... 0 1 C 2 0 3 0 C 58 1400 F 0 1 F 2 0 5 5 F 1 Does not include error of the thermocouple probe 2 Accuracy specification assumes ambient temperature stable to 1 0 C Capacitance 60 nF 0 01 nF 3 5 10 dgt 600 nF 0 1 nF 6 µF 0 001 µF 2 5 10 dgt 60 µF 0 01 µF 600 µF 0 1 µF 6000 µF 1 µF 3 5 10 dgt With a film capacitor or better using relative mode REL Δ to zero residual Duty Cycle 0 001 99 90 0 0001 1 2 ...

Страница 79: ...cy Sinusodial 40 Hz 10 kHz 0 01 Hz 0 5 of reading Sensitiviy 15Vrms DC Current DCA 600 µA 0 01 µA 1 5 5 dgt 6000 µA 0 1 µA 60 mA 0 001 mA 600 mA 0 01 mA 10 A 0 001 A 20A 30 sec max with reduced accuracy AC Current ACA 1 kHz 5 kHz 600 µA 0 01 µA 2 5 5 dgt 3 5 5 dgt 6000 µA 0 1 µA 60 mA 0 001 mA 600 mA 0 01 mA 10 A 0 001 A Not specified 20A 30 sec max with reduced accuracy All AC current ranges are ...

Страница 80: ...l knowing Technical changings which are in the interest of progress reserved We herewith confirm that the units are calibrated by the factory according to the specifications as per the technical specifications We recommend to calibrate the unit again after 1 year PeakTech 03 2016 Ehr PeakTech Prüf und Messtechnik GmbH Gerstenstieg 4 DE 22926 Ahrensburg Germany 49 0 4102 42343 44 49 0 4102 434 16 i...

Отзывы: