background image

INSTALLATION

 Some states or local governments may have regulations or laws that restrict the 

use of anything that might impair the clear view of a license plate. Check local laws for 
compliance. 

 For the Back-Up Camera to be properly installed, it must be wired into the vehicle’s 

taillight harness. If you are not comfortable or knowledgeable with 12-volt DC wiring, have the 
system professionally installed.

 These instructions are only meant as a general guide due to the number of 

di erent makes and models of vehicles. For vehicle-speci c questions, contact your vehicle’s 
manufacturer.

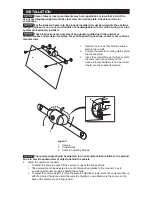
1. 

Remove the screws that hold the license  


plate to the vehicle.

2. 

Position the camera mounting plate behind  


the license plate.

3. 

Insert the screws through the license plate,  


the camera mounting plate and the  


washers. If your hardware is not the correct  


length, use the supplied hardware.

UP

1

2

3

Legend

1. Camera
2. Screw 

Holes

3.  Camera Adjusting Screws

 The camera angle should be adjusted to a horizontal position relative to the ground, 

so as to provide optimal view of objects behind the vehicle.

4.  Adjust the camera as required:

• 

To adjust the camera angle, tilt the camera to one of the five positions.

• 

The camera should be adjusted to a horizontal position relative to the ground, so as to 
provide optimal view of objects behind the vehicle.

• 

To adjust the camera height, remove the camera adjusting screws, move the camera to line up 
with the desired holes and install the camera adjusting screws. Make sure the arrows on the 
back of the camera are pointing upward.

Содержание PKC0BU7

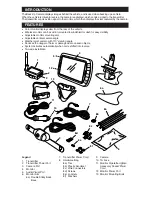
Страница 1: ...TM 7 0 inch Back Up Camera Model No PKC0BU7 Owner s Manual and Warranty Information V A Read these instructions completely before using this product Retain this Owner s Manual for future reference ...

Страница 2: ...nitor mounting arm x Adjustable vertical camera angle x Weatherproof camera with 110 viewing angle x Reduces the danger of harm or damage due to unseen objects x System activates automatically when car is shifted into reverse x Two wire installation 8 9 1 7 8c 8b 8f 8a 11 13 6 6a 3 2 10 8e 8d V A 4 12 5 Legend 1 Transmitter 2 Transmitter Power Port 3 Camera Port 4 Monitor 5 Audio Visual Port 6 Mon...

Страница 3: ...mounting plate behind the license plate 3 Insert the screws through the license plate the camera mounting plate and the washers If your hardware is not the correct length use the supplied hardware UP 1 2 3 Legend 1 Camera 2 Screw Holes 3 Camera Adjusting Screws The camera angle should be adjusted to a horizontal position relative to the ground so as to provide optimal view of objects behind the ve...

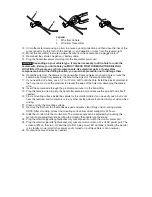
Страница 4: ...ng the supplied wire connectors If you choose to wire the transmitter using a different method you must be knowledgeable in 12 volt DC electrical practices 2 3 7 6 8 4 3 5 1 Legend 1 Transmitter 2 Positive Wire from Reverse Light 3 Wire Connector 4 Reverse Light 5 Negative Wire from Reverse Light 6 Negative Transmitter Power Wire Black 7 Positive Transmitter Power Wire Red 8 Camera 9 The red posit...

Страница 5: ...u must use the grommet to prevent the edge of the hole from damaging the camera wire 18 Insert the camera wire through the grommet and route it to the transmitter 19 Plug the camera wire plug into the transmitter camera port and secure the wire with wire ties if needed 20 Find a mounting surface inside the vehicle for the monitor where it can be easily seen but is not near the rearview mirror asse...

Страница 6: ...u must use the grommet to prevent the edge of the hole from damaging the camera wire 18 Insert the camera wire through the grommet and route it to the transmitter 19 Plug the camera wire plug into the transmitter camera port and secure the wire with wire ties if needed 20 Find a mounting surface inside the vehicle for the monitor where it can be easily seen but is not near the rearview mirror asse...

Страница 7: ...hen in AUTO mode the Back Up Camera image will display when shifted into reverse and will go back to display the audio visual device when shifted out of reverse CARE AND MAINTENANCE Storage Store this Back Up Camera in a cool dry area and keep it away from direct sunlight heat excessive humidity and dampness Cleaning Do not clean or wipe the Back Up Camera with solvents or chemical materials If ne...

Страница 8: ...rmful interference and 2 this device must accept any interference received including interference that may cause undesired operation of device The manufacturer is not responsible for any radio or TV interference caused by unauthorized modifications to this equipment Such modifications could void the user s authority to operate this equipment Notice to Drivers in California and Minnesota State law pr...

Отзывы: