PDi SW24LEDA Скачать руководство пользователя страница 2


Better Solutions Are Within Reach

®


MODEL NUMBER:


SW24LEDA, SW32LEDA, SW42LEDA 

DVB-T LED TV’S 

Document Number:


PD196-210R1 


User Manual 

Page 1 of 22 


PDi International, PTE LTD, Henry Building, 5 Eunos Ave #2-00 8A, Singapore 409459  PH +65-6846-1482   FX 937-743-5664  


IMPORTANT SAFETY INSTRUCTIONS 


THIS INSTALLATION SHOULD BE MADE BY A QUALIFIED SERVICE PERSON AND SHOULD CONFORM TO ALL LOCAL 

CODES.  READ AND FOLLOW THE SAFETY INSTRUCTIONS BEFORE ATTEMPTING THIS INSTALLATION. 


1.


Read these instructions. 

2.


Keep these instructions. 

3.


Heed all warnings 

4.


Follow all instructions. 

5.


Use only a power source from a CSA Certified UL 

Approved Class 2 Power Supply suitable for use in 

a Health Care Facility.  This TV will operate on 

either DC or AC voltage, range 18 to 32 volts. 

6.


DO NOT

  attempt to modify this product in any 

way without written authorization.  Unauthorized 

modification could void the user’s authority to 

operate this product. 

7.


DO NOT

 expose this TV to rain or moisture. 

8.


DO NOT

 use this TV near water.  TV SHALL NOT 

be exposed to  dripping or splashing.  No objects 

filled with liquids, such as vases, shall be placed on 

the TV. 

9.


DO NOT

  install near any heat source such as 

radiators, heat registers, stoves,  or  any  other 

apparatus that produces heat. 

10.


Use only with the cart, 

stand, tripod, bracket or 

table specified by the 

manufacturer or sold 

with the TV.  When a 

cart is used, use caution 

when moving the 

cart/TV  combination to 

avoid injury from tip-

over.  

11.


DO NOT

 block any ventilation openings.  Install in 

accordance with the manufacturer’s instructions. 

12.


  DO NOT

  defeat the safety purpose of the 

polarized or grounding-type plug.  A polarized 

plug has two blades with one wider than the 

other.  A grounding type plug has two blades and 

a third grounding prong.  The wide blade or the 

third prong is provided for your safety. If the 

provided plug does not fit into your outlet, 

consult an electrician for replacement of the 

obsolete outlet. 

13.


  DO NOT

  use in an oxygen tent or oxygen 

chamber.  Such use may cause a fire hazard. 

14.


  To prevent injury, this TV  must be securely 

attached to the wall in accordance with the 

installation instructions.  TV’s can pose a striking 

hazard when mounted at an elevated position. 

15.


  Protect the power cord from being walked on or 

pinched particularly at plugs, convenience 

receptacles, and the point where it exits from the 

apparatus. 

16.


  Only use attachments/accessories specified by 

the manufacturer. 

17.


  Unplug this TV during lightning storms or when 

unused for long periods of time. 

18.


  Refer all servicing to qualified service personnel.  

Servicing is required when the TV  has been 

damaged in any way, such as power-supply cord 

or plug is damaged, liquid has been spilled or 

objects have fallen into the TV, the TV has been 

exposed to rain or moisture, does not operate 

normally, or has been dropped. 

19.


  Clean only with dry cloth.  For further cleaning, 

use a soft cloth or paper towel dampened with 

water. 

20.


  If at any time you wish to 

dispose of this product, 

remember that electrical 

products should not be 

disposed of with household 

waste.  Consult your local 

authority or retailer for 

more details. 


Содержание SW24LEDA

Страница 1: ...DVB T 24 32 42 LED Televisions Model Numbers SW24LEDA SW32LEDA SW42LEDA Document Number PD196 210...

Страница 2: ...block any ventilation openings Install in accordance with the manufacturer s instructions 12 DO NOT defeat the safety purpose of the polarized or grounding type plug A polarized plug has two blades w...

Страница 3: ...by Laboratories Dolby and the double D symbol are trademarks of Dolby Laboratories All other brand names and product names used in this manual are trademarks registered trademarks or trade names of th...

Страница 4: ...tion 2 Remote Control 5 Connecting External Devices 6 Connections 6 Using Common Interface Slot 7 Television Controls 7 Pillow speaker 8 Across Room Wiring 8 Channel Menu 9 Service Levels Setup 9 Chan...

Страница 5: ...age 16 TT Language Teletext 16 Hearing Impaired 17 PVR File System Personal Video Recorder 17 Aspect Ratio 17 Blue Screen 17 Remote Select 17 Auto Power On 18 Energy Saving 18 Channel up Change Source...

Страница 6: ...Page 5 of 22 PDi International PTE LTD Henry Building 5 Eunos Ave 2 00 8A Singapore 409459 PH 65 6846 1482 FX 937 743 5664 Remote Control The PD108 210 programming remote control is required to perfor...

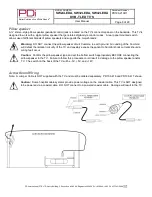
Страница 7: ...equipment Alternate methods are listed below Connections 5v 5v 12v switch Set for pillow speaker type Pillow speaker Attach pillow speaker CCI Computer Controlled Interface Service Connect USB device...

Страница 8: ...M and Smart Card in order to view the pay TV programs and additional services PDi does not supply Smart Cards Contact your Pay Per View TV service provider to get more information about the modules an...

Страница 9: ...pillow speaker circuit Common to earth ground Grounding of the Common will defeat the isolation circuitry of the TV and possibly expose the patient to harmful shock currents should a wiring fault occ...

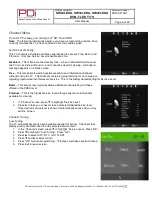
Страница 10: ...mation channels without renting the TV The channels containing programming for no charge are typically programmed into this level of service This is the factory default setting for Service Level Basic...

Страница 11: ...Manual Tuning menu 4 Press OK to enter ATV Manual Tuning Screen 5 Press or to select and or to adjust menu item 6 Press Exit to leave screen Copy Clear Channel 1 In Service Level menu press or to high...

Страница 12: ...the PICTURE menu 2 Press to highlight Picture Mode 3 Select your preferred mode and press OK 4 Press EXIT to return to previous screen Colour Temperature Colour Temperature adjusts the colour balance...

Страница 13: ...e desired sound preference 5 Press OK to select and return to previous screen Balance This controls how the sound is distributed between the left and right speakers 1 Press to enter the SOUND menu 2 P...

Страница 14: ...reen Internal Speaker Enable This will allow you to enable or disable the sound from your different sources 1 Press to enter the SOUND menu 2 Press to highlight Internal Speaker Enable 3 Press to ente...

Страница 15: ...to desired time Auto Standby This will automatically shut off the TV after a programmed amount of inactivity 1 Press to enter the TIME menu 2 Press to highlight Auto Standby 3 Press to enter the scree...

Страница 16: ...will not restore the default code Pressing 4711 will allow you to enter a new code Parental Guidance This allows you to block programs that may not be suitable for children 1 Press to enter the LOCK...

Страница 17: ...HDMI2 OR MEDIA 3 Press to turn item OFF or ON 4 Press EXIT to return to previous screen Setup OSD On Screen Display Language This will let you choose the language of your on screen display 1 Press to...

Страница 18: ...Press OK to select 4 Press or to select desired information 5 Press OK to check 6 Press EXIT to leave menu Aspect Ratio This will automatically set the aspect ratio for the TV or let you choose from t...

Страница 19: ...e 1 Press to enter the SETUP menu 2 Press to highlight Channel up Change Source 3 Press to choose Enable or Disable 4 Press to continue setup Reset This will restore the TV to factory default settings...

Страница 20: ...nter into a schedule list to view or delete recording data 7 Press or to view the programs 8 Press blue button to exit 9 Press blue button to set up a reminder notice Recording a Program In DTV mode y...

Страница 21: ...ing times 6 Press OK to confirm choices View Schedule List 1 Press EPG to enter the PROGRAMME menu 2 Press yellow button to view list of scheduled recordings 3 Press or to view all programs 4 Press re...

Страница 22: ...ia files Note Confirm source lock is off to view media 1 Press INPUT button on remote 2 Choose your desired media source to view 3 Press OK to confirm View Picture Play Music View Movie View Text 1 In...

Страница 23: ...led Confirm sound is not muted Confirm no headphones are plugged in If using an external source confirm proper connection Remote control does not work Change batteries Confirm no interferences with in...

Отзывы: