


Better Solutions Are Within Reach
®
MODEL NUMBER:
PD168-204
Document Number:
PD196-182R3
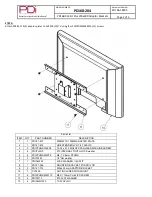
PD168-033 Kit Plus 200x400 Adaptor Brackets
Page 3 of 3
STEP 4:
Attach the PD181-674 mount (#2) to the wall using customer supplied
1/4" fasteners.
Place one PDIFW25 (#6) washer and one PDISLW25 (#7) lock washer
on the top fastener and thru top slot in the bracket.
Place the remaining PDIFW25 (#6) washer in the bottom mounting
fastener.
Level the bracket using top leveling slot and finish tightening fasteners.
STEP 5:
Carefully lift the set up and position PD181-596 bracket (#8) inside the sides
of PD181-674 mount (#2), allowing the two side support pins of PD181-596
bracket (#8) to rest in the two notches at the front of PD181-674 mount (#2).
Adjust the tilt and secure PD181-596 bracket (#8) to PD181-674 mount (#2)
using two PDIPPHMS103238 screws (#3) and two PDIITLW10 washers (#4).
Parts List
ITEM
QTY
PART NUMBER
DESCRIPTION
1
1
PD181-672
200MM TO 100MM ADAPTER PLATE
2
1
PD181-674
HD EXTENDED LCD TILT CLEVIS
3
2
PDIPPHMS103238
10-32 x .375 PHILLIPS PAN HEAD MACHINE SCREW
4
6
PDIITLW10
#10 INTERNAL TOOTH LOCK washer
5
8
PDIPPHMSM4X76
M4-.7 X 6mm PPHMS
6
2
PDIFW 25
1/4" flat washer
7
1
PDISLW25
LOCK WASHER 1/4 SPLIT
8
1
PD181-596
MOUNTING BRACKET FOR PDI LCD
9
2
PD181-714
200x400 mm ADAPTOR BRACKET
10
1
CV3200
NOT INCLUDED WITH MOUNT
11
8
PDIPPHMSM6X110
M6 X1 10mm PHILLIPS SCREW
12
4
PDIFW10
#10 FLAT WASHER
13
4
PDINILN1032
10-32 NYLOC


