NEXUS
Generator & Multi-head Inflator user manual
www.pclairtechnology.com
Operation
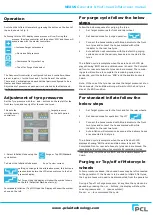
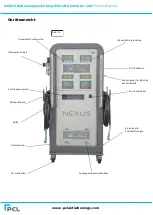
Switch on the Inflator Generator by pressing the button on the front of
the unit, shown in Fig. 9.
Following this the LCD display check process will run. During this
process, the slave controller will then show ‘SYN’ and these will
synchronise with the master controllers.
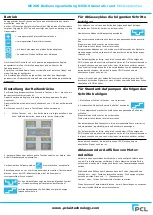
= Increase target set pressure
= Decrease Set pressure
= Commence flat tyre start up
= Top off or Purge Mode select
The Nexus multi-controller is configured to have 4 controllers, these
are set in pairs, 1 for the Front and 1 for the Rear of the vehicle.
There are 2 Vertical pairs and each Vertical pair is configured to be a
Master and Slave controller.
Adjustment of pressure on each pair is controlled by the Master and
the Target pressure is also simultaneously set on both.
Adjustment of tyre pressures
Set the Tyre pressure with the + and – buttons on the top left for the
front two tyres, and top right for the rear two tyres.
This sets the
target pressure
simultaneously
on the both paired
controllers.
1. Select Inflation Mode using the
Purge or Top Off/Standard
cycle button.
To Select the Inflation Mode press ‘once’ to view current
setting, to change to the alternative mode, this button is
pressed twice before the LCD screen returns to the Set
pressure display.
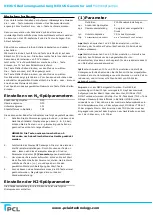
For Purge Mode the display will show the symbol shown
on the left (Default at Machine start up).
For standard inflation / Top Off Mode the Display will show the symbol
shown on the left.
For purge cycle follow the below
steps
Follow the below sequence for purging the tyres.
1.
Set Target pressures for front and rear wheel.
2.
Set desired mode for ‘purge’ operation.
3.
Connect the hoses marked with Blue indicator to the front
two tyres and connect the hoses marked with white
indicator to the rear two tyres.
4.
Auto deflation will commence with the default 2 purging
cycles as soon as the delivery hoses are connected to the
tyres.
The inflation cycle is complete when the axle has both LCD dis-
plays showing ‘END’ and an audible buzzer is heard. The Complet-
ed front or rear axle hoses to tyres can be removed. The remain-
ing axle will continue to complete its remaining cycles inde-
pendently, until the both show ‘END’ and the audible buzzer is
heard.
Note: If the one of the tyre has reaches the target pressure 1st on
the same axle, the audible warning will wait until the 2nd tyre is
also at the END condition.
For standard inflate follow the
below steps
1.
Set Target pressures for the front and for the rear wheels.
2.
Set desired mode for operation ‘Top off’
3.
Connect the hoses marked with Blue indicator to the front
two tyres and connect the hoses marked with white
indicator to the rear two tyres.
4.
Auto inflation will commence as soon as the delivery hoses
are connected to the tyres.
The inflation cycle is complete when the axle has both LCD
displays showing ‘END’ and an audible buzzer is heard. The
Completed Front or rear axle hoses to tyres can be removed. The
remaining axle will continue to complete its remaining cycles
independently, until the same ‘END’ and the audible buzzer is
heard.
Purging or Top/off of Motorcycle
wheels
Follow procedures above, the unused hoses may be left connected
to the generator. If the Device is to be used to inflate 2 flat tyres,
the 2 spare hoses will need to be disconnected from the generator
During a Top off or Purge procedure, at any time the cycle can be
paused by pressing the + or - buttons, the display will show the
current pressure and l l (pause symbol).
Press + or – to recommence the cycle.


