5
1.4 Abbreviation/Terminology
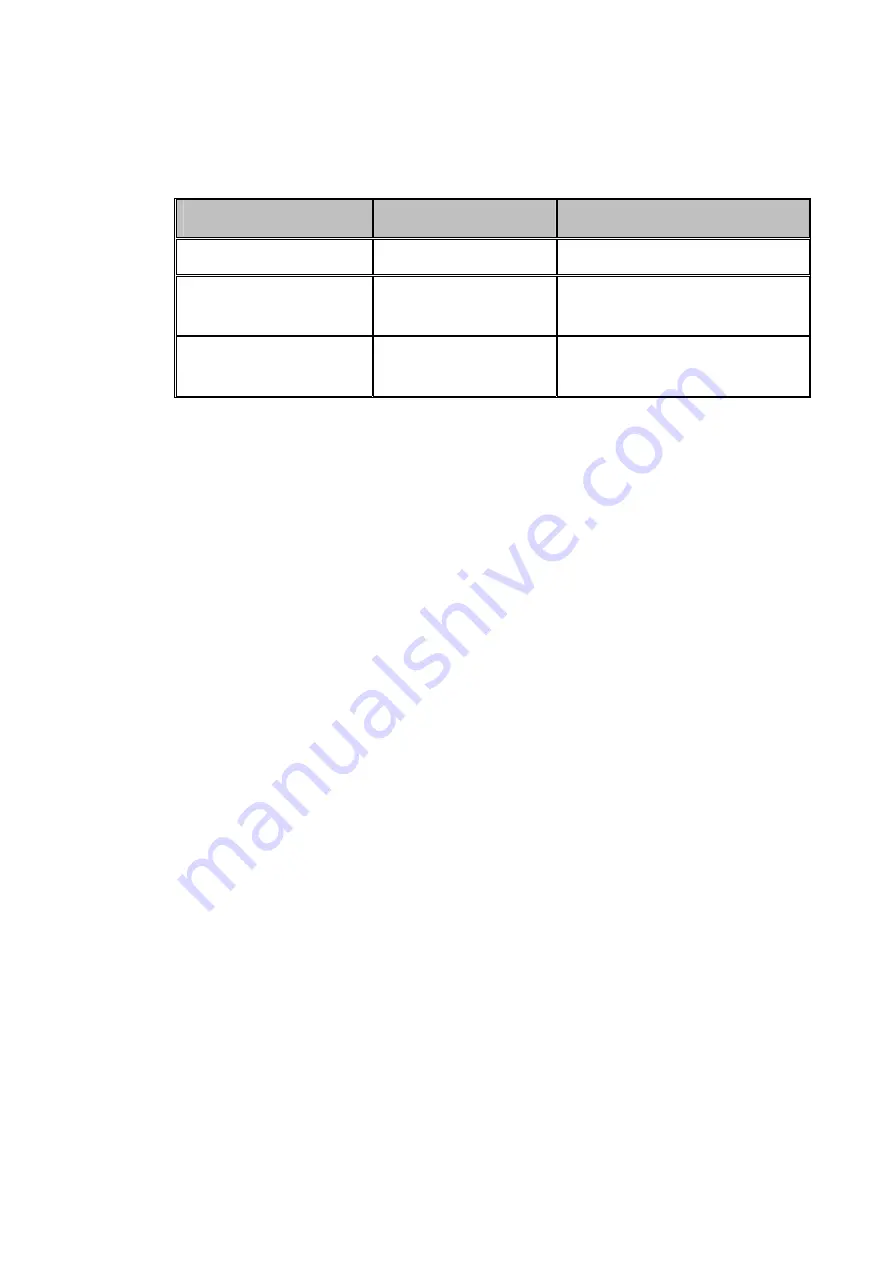
Abbreviation/Terminology
Full Name
Description
MID
Mobile Internet Device
Mobile Internet Terminal
WIFI
Wireless Fidelity
Base on IEEE 802.11b\g\n
standard wireless LAN
T F
TransFlash
Alternative name Micro SD,super
miniature memory card
Страница 1: ...8 3 3 Open and Close of the Screen 8 3 4 Usage of Touch Screen 9 3 5 Home Page 10 3 6 Visit Application Procedures 13 3 7 USB Connection 14 3 8 Typing words 14 3 9 Operation Technique 16 4 Basic Sett...
Страница 2: ...Gallery 47 5 3 Camera 48 5 4 FM Radio 48 6 Communication Function 50 6 1 Phone 50 6 2 Text Message 51 6 3 Contact List 51 7 Internet 53 7 1 Browser 53 7 2 Email 54 8 Other Application Procedures 57 8...
Страница 3: ...time The manual systemically introduces the functions use techniques and announcements please read this manual carefully before your operation 1 2 Announcements Preventive maintainance z Please always...
Страница 4: ...n t disassemble the MID and accessories Only authorized agent has access to service the MID z Please keep the MID far away from magnetic equipments the radiation of MID may erase the data stored in th...
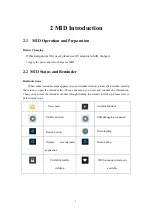
Страница 5: ...reviation Terminology Full Name Description MID Mobile Internet Device Mobile Internet Terminal WIFI Wireless Fidelity Base on IEEE 802 11b g n standard wireless LAN T F TransFlash Alternative name Mi...
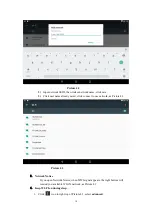
Страница 6: ...ears in your reminder window please click column and slip the screen to open the reminder list Choose the menu you need and confirm the information Then you can close the reminder window through click...
Страница 7: ...eceiving emails WIFI is open you can open the reminder board to view the detailed information Open the reminder board When the reminder column shows new reminder icon please hold the column and slip d...
Страница 8: ...splay in menu interface Setting button display recently browsed history 3 2 Startup and Shutdown Startup Long press POWER key for three seconds you can enter into startup picture The system enters int...
Страница 9: ...Screen MID operating methods There are below methods to view the main screen menu and application procedure in your MID Click When you want to use the screen keyboard typing or choose application in t...
Страница 10: ...opup windows to set wallpaper folder widgets and shortcut Picture 3 2 The extended home page The home page can be extended beyond the wideness of screen to provide more space which you can put new add...
Страница 11: ...r on one icon can also overlay several icons as Picture 3 4 2 Then click the overlayed icons the applications can be folded as Picture 3 5 Click the unnamed folder in the black box it will popup the h...
Страница 12: ...ure 3 5 Remove the icons in desktop 1 Long press the icons need to be remove then on the right above of the screen it will appear icons 2 Drag the icon to the above of the remove icon till the icon be...
Страница 13: ...in screen it will popup a window to change the wallpaper 2 Click the gallery or wallpaper gallery to select the wallpaper 3 6 Visit Application Procedures Click in right top of Picture 3 2 enter into...
Страница 14: ...e board 3 In the reminder board click the USB Connected it will as below Picture 3 7 then click File transfers 4 Now the USB is connected successfully Picture 3 7 Copy the document into memory card 1...
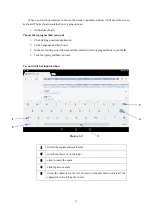
Страница 15: ...ick Language and Keyboard 3 In the text setting area will reveal all the installed words typing methods in your MID 4 Tick the typing method you want Use and switch of input method Picture 3 8 1 switc...
Страница 16: ...to create its shortcut then you can enter into the application through the shortcut icon Create application shortcut icons in the desktop In the application interface or widgets interface long press a...
Страница 17: ...ion procedure 2 Click WLAN open wifi MID will automatically search the available Wifi wireless internet As Picture 4 1 3 Choose the Wi Fi internet you want to connect if it has password it will popup...
Страница 18: ...ready saved click connect to use network as Picture 4 3 Picture 4 3 3 Network Notice If you open Network Notice when WIFI signal appears the right bottom will remind you available WLAN network as Pict...
Страница 19: ...oth Bluetooth function operation 1 Click setting application in main menu interface 2 Click bluetooth and open it 3 If somebody open bluetooth in your surroudings click search device in right above th...
Страница 20: ...related password and match the device to connect 5 After match successfully choose the operation you want to click to enter into Picture 4 6 Picture 4 6 Bluetooth setting 1 Rename tablet Click icon i...
Страница 21: ...Picture 4 7 2 Display the file you received Choose display the file you received in Picture 4 7 you can view download and upload files 4 3 Data Usage Check SIM card data usage as Picture 4 8 Picture 4...
Страница 22: ...1 Airplane Mode Airplane Mode can turn off WIFI and GSM card function quickly when airplane mode is turned on WIFI and GSM can t get any signal then airplane mode is turned off WIFI and GSM module wil...
Страница 23: ...t VPN user name and password click connect Picture 4 11 4 4 3 Network sharing and portable hotspots Portable WI FI hotspots 1 Click setting application in main menu 2 Click more when wifi is well conn...
Страница 24: ...24 Picture 4 12 Picture 4 13 3 Click keep WI FI hotspots on choose open time 4 Return to previous menu open portable WLAN hotspots click Set up WI FI hotspots...
Страница 25: ...connect Choose connect type Remark CMWAP transmitters data through GPRS the webpage it visit belongs to wap webpage and CMNET support www browse mobile phone network it can also log in webpage in com...
Страница 26: ...icture 4 15 4 4 5 GPRS data prior mode After Open GPRS data prior mode systems will priority chooses your network 4 5 Sound notification 1 Open settings click contextual model as Picture 4 16 Picture...
Страница 27: ...re 4 20 click vibrate MID will vibrate when someone calls you 2 Volume In picture 4 27 click volume you can set ringtone notice and alarm volume as Picture 4 18 Picture 4 18 3 Voice call Ringtone In p...
Страница 28: ...t meet outdoor are only for selection they can t be set 4 6 Display 4 6 1 Adjust the screen brightness 1 Click Setting application procedure 2 Click display choose brightness 3 Drag the portlito to ad...
Страница 29: ...after brightness is adjusted 4 6 2 Wallpapers 1 Click setting application 2 Click display click wallpaper 3 You can choose different wallpapers as you like gallery live wallpapers photos wallpapers sy...
Страница 30: ...tion when it is turned off system won t rotate MID screen by G sensor 4 6 4 Sleep 4 Click setting appliation 5 Click display 6 Click sleep 7 Set the sleep time as you want as Picture 4 22 Picture 4 22...
Страница 31: ...display picture quality 4 7 Storage Open setting function click memory click preferred install location you can choose isntall new application to choose preferred install location Check SD card and MI...
Страница 32: ...nal storage Internal storage is MID local NAND storage as Picture 4 25 if you need to check the storage content you can check it in main menu Picture 4 25 2 SD card Click SD card to check the storage...
Страница 33: ...ick Settings 3 After the above two steps you can choose what you want to do remove or format SD card Note Removing SD card safely can protect SD card and increase its lifetime 4 8 Battery Click settin...
Страница 34: ...34 Picture 4 27 4 9 Application program 1 Click setting application in Apps 2 Select application after enter you can manage and delete installed application As Picture 4 28 Picture 4 28...
Страница 35: ...35 4 10 Memory View the used space and available space as Picture 4 29 Picture 4 29 Click view the working device as Picture 4 30...
Страница 36: ...36 Picture 4 30 4 11 Account and Sync 1 Select setting application 2 Open account and sync as Picture 4 31 Picture 4 31 3 Click add an account as Picture 4 32...
Страница 37: ...37 Picture 4 32 4 After successfully load it will open the sync function as Picture 4 33 Picture 4 33 4 12 Location service Click setting select Mode as Picture 4 34...
Страница 38: ...reen is locked Set unlocked picture 1 Click setting application in main interface 2 Click security 3 Click screen lock 4 Choose pattern in text setting area 5 Click next following the remind message 6...
Страница 39: ...g area 5 Enter new PIN code numbers and click continue 6 Ener new PIN code again and click confirm Set unlock password 1 Click setting application in main interface 2 Click safe 3 Click screen locked...
Страница 40: ...unknown source 4 14 Language and Input Method Click setting select language and input method choose language to switch language as Picture 4 37 Picture 4 37 Click setting choose language and input ch...
Страница 41: ...se the language you want to change in the language list as Picture 4 39 Picture 4 39 4 15 Backup and Reset Connect WIFI and login your google account choose backup my data system will backup your data...
Страница 42: ...to setting zone 5 Click Zone Selecting then choose the zone lists Slide down the list to view more zones 6 Click Date setting then click upper or down buton to adjust date month and year click setting...
Страница 43: ...ne 4 17 Fixed time Startup and Shutdown 1 Click Setting application procedure 2 Click fixed tine startup and shutdown 3 Operate as below Picture 4 42 Picture 4 42 Click it into fixed time startup sett...
Страница 44: ...e 4 43 4 18 4 Install webpage script It will allow you install webpage scrip when you open system but it will increase the risk when you are browsing webpage 4 19 Engineer Selection 4 19 1 USB adjustm...
Страница 45: ...Show screen update If you open screen refresh it will display related area when the area is refreshing 4 19 6 Show CPU usage After open CUP usage in the right top of MID will show CPU usage situation...
Страница 46: ...sktop click music icon to enter into music player click the music you want to play as Picture 5 1 Picture 5 1 Picture 5 2 z Drag the progress bar to adjust play progress Album Pause play Next song Pre...
Страница 47: ...e when you browse the pictures slide left or right to view more pictures Edit and set pictures When check the pictures in full screen mode click menu key to display menu selection you can choose the s...
Страница 48: ...ra as Picture 5 4 Picture 5 4 5 4 FM Radio Click in the main interface or desktop to enter into FM radio interface z Radio button operation instruction as Picture 5 5 z normalCamera mode Face beauty m...
Страница 49: ...rface to save the channel and the channel will be saved in channels list Note You need to insert earphone as antenna when using FM radio If no antenna your MID can t search any frequency band Save but...
Страница 50: ...50 6 Communication Function 6 1 Phone 1 Click Phone application procedure 2 Operate as Picture 6 1 Picture 6 1 Display phone numbers Dial phone numbers...
Страница 51: ...pplication procedure 2 Click Edit new message Picture 6 2 6 3 Contact List Click Contact list in the main interface enter into the contact list as Picture 6 3 Directly input phone number Add receiver...
Страница 52: ...52 Picture 6 3 z Search contact click button enter into search function z Add contact click button enter into add contact interface...
Страница 53: ...he main menu or desktop to enter the IE interface as Picture 7 1 Picture 7 1 Click address bar to input the website click start enter into related webpage then you can browse the website information a...
Страница 54: ...Email Email application procedure contains email setting guide you can add the external POP3 OR IMAP email account of normal web email service provider For instance Yahoo Gmail Hotmail and 163 as Pict...
Страница 55: ...ly b Delete the email account You can delete setted POP3 or IMAP email account from your MID Click 1 Enter into your mail box 2 Press Menu key 3 Click Account 4 Press the account you want to delete 5...
Страница 56: ...56 Picture 7 3 Click it and Add attachment...
Страница 57: ...procedure enter into below interface as Picture 9 1 There are clock picture music and homepage buttons Picture 8 1 8 2 Calculator 1 Click 2 Enter into the basic board of calculator 3 Soft touch the n...
Страница 58: ...manager will copy cut delete rename the documents or the folder in the TF card it also will share the files install apk etc In the main menu or desktop click the document manager icon to enter into do...
Страница 59: ...older choose the file or folder long pressthe file or folder to enter into the interface as Picture 8 4 you can operate the file or folder Picture8 4 b Paste the copy or cut file choose the file you w...
Страница 60: ...le click icon in right top choose new folder you can build new folder as reminder 8 4 Recorder In the main interface or desktop click recorder icon to enter into record interface click record key to s...
Страница 61: ...61 Picture8 8...
Страница 62: ...hird party procedure searched from internet to use on the system are all suffixed with apk 9 2 Uninstall Uninstall application procedure 1 Click setting icon in main interface 2 Click apps list all th...
Страница 63: ...the lightest or under charging MID may feel fever It is normal 4 Email can t be set or Registeration of application procedure z Ensure your internet is well connected z Make sure your email setting wa...
Страница 64: ...interference will not occur in a particular installation If this equipment does cause harmful interference to radio or television reception which can be determined by turning the equipment off and on...