Paxton NET2 ENTRY-MONITOR Скачать руководство пользователя страница 2

Page 2

Installation 

A desk mount stand is also available (PN: 337-847) 

See also

:  AN1127 - Net2 Entry - Planning and installation <


http://paxton.info/1896 >

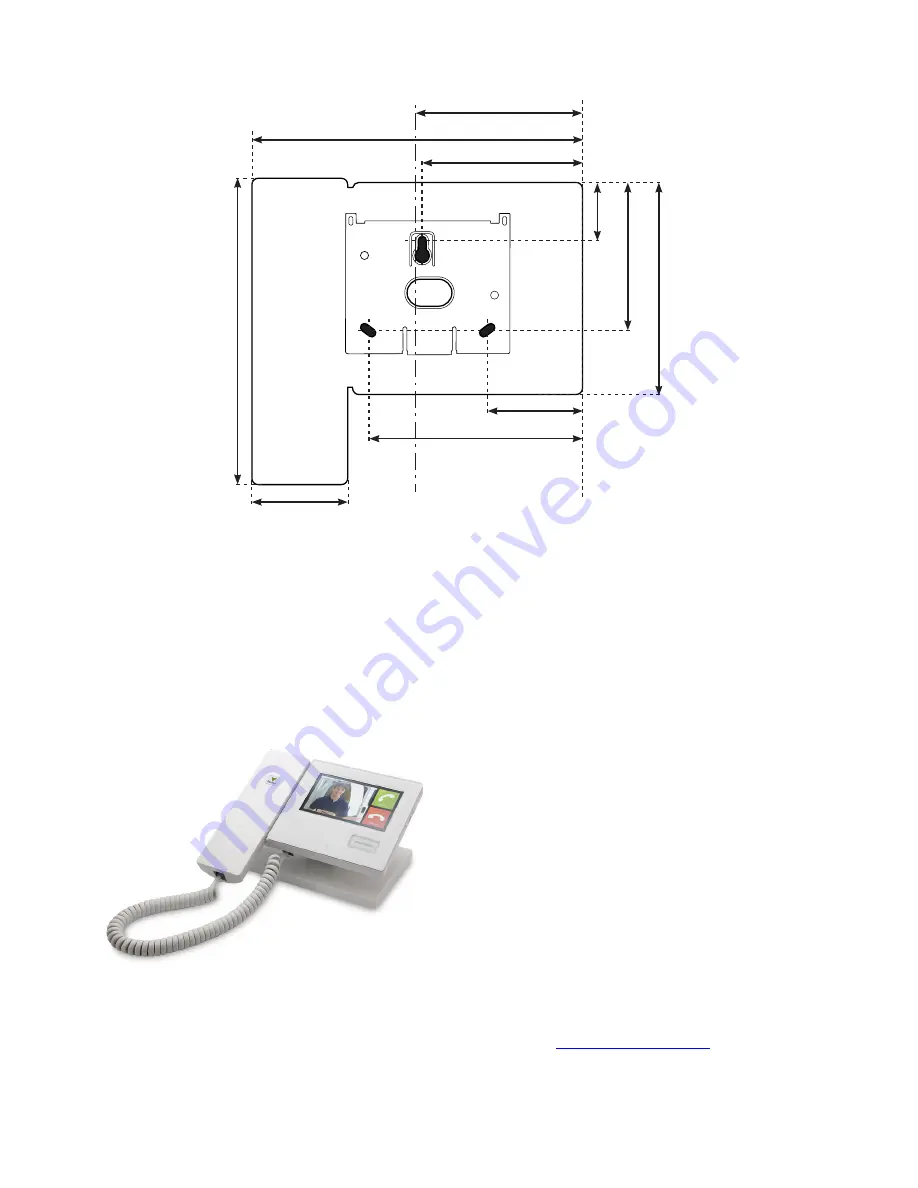
Determine where the monitor will be sited.  The top right corner of the unit is regarded as the reference point for 

drilling and measurements. Screws and wall plugs are provided in the fitting kit. 

1. Determine the position of the top mounting screw. Drill the hole and tap in one of the No 8 wall plugs.

2. Put in one of the screws, leaving a suitable gap to the wall surface and slide the bracket over it.

3. Mark the hole positions for the lower 2 screws and the network cable entry.

4. Remove the bracket and drill the additional holes.

5. Tap in the other 2 wall plugs and hang the bracket back on the top screw. Secure the bracket with the 3 screws. 

Power is supplied via the network connection from a Net2 Entry controller or a network PoE switch. 

30 mm

79 mm

170 mm

55 mm

186 mm

88 mm

120 mm

53 mm

118 mm

93 mm

A white network cable is supplied with the stand. 

Feed this through the mount and push it into the 

socket at the rear of the monitor.  Clip the mount to 

the monitor. 

Содержание NET2 ENTRY-MONITOR

Страница 1: ...or used to remotely communicate with visitors It is powered using power over Ethernet PoE and communicates with the other elements of the system using IPv6 providing plug and play installation The only configuration required is the allocation of a monitor ID which the system uses to identify the correct monitor If used in conjunction with Net2 access control software this must be version 4 25 or l...

Страница 2: ...e of the screws leaving a suitable gap to the wall surface and slide the bracket over it 3 Mark the hole positions for the lower 2 screws and the network cable entry 4 Remove the bracket and drill the additional holes 5 Tap in the other 2 wall plugs and hang the bracket back on the top screw Secure the bracket with the 3 screws Power is supplied via the network connection from a Net2 Entry control...

Страница 3: ...or If unterminated cable is used clip the supplied IDC module into the wall bracket Connect the cable as per the wiring label and use the small patch lead to connect the monitor to the module Fit the monitor to the bracket by hooking the unit onto the two top pins and push the bottom edge until it clicks Paxton recommend that the network cable is run to each location and terminated in a network bo...

Страница 4: ...visitor will call to request entry unless they are using a text only list so it should relate to the location of the monitor where possible e g Flat Number 1 Touch the screen to display the menu 2 Touch the Monitor settings option 5 Enter the Monitor ID number Use the on screen keypad and press Accept Language and Easy read options may be selected during the configuration process Touch the Display...

Страница 5: ...tton is not illuminated Touch the Answer option to talk handsfree to the visitor or lift the handset You can press the open door button at any time to unlock the door You can terminate the call at any time by touching the Hang up option or replacing the handset Pressing the open door button will unlock the door and cause the button to flash green If the door has a contact switch the door icon will...

Страница 6: ...display This allows the camera to be used for an external view at any time Touch the screen to display the default menu Touch the View video option The camera view will display on the monitor Touch the Hang up option to terminate the session At the end of the permitted viewing time a Continue to view option will display At this point a timer must be reset or viewing will be ended Default Menu Moni...

Страница 7: ...se on this monitor Installer settings QDisplays the Installer settings for this monitor Name QAllows the user to edit the name of this monitor QThis option may be restricted in software by the installer Installer Settings Enter monitor ID QThis option is used to set up the Monitor ID See Configuration Factory reset QReturns the monitor settings to factory defaults Touch Monitor settings to display...

Страница 8: ...IP Rating Min Min Min Min Max Max Max Ethernet bandwidth requirement Communication Two way 100kb s multicast 1Mb s multicast IEEE 802 3af class 0 Screen size per call in progress Screen resolution Handset audio Hands free audio Screen illumination Two way LED backlight 4 3 inch colour TFT 480x272 pixels Monitors should be cleaned using a clean damp cloth Chemical cleaning products must not be used...

Отзывы: