background image

Using the Application  

2-7


5. 

Press 

OK

6. 

Press 

Return

 to return to the product menu.  

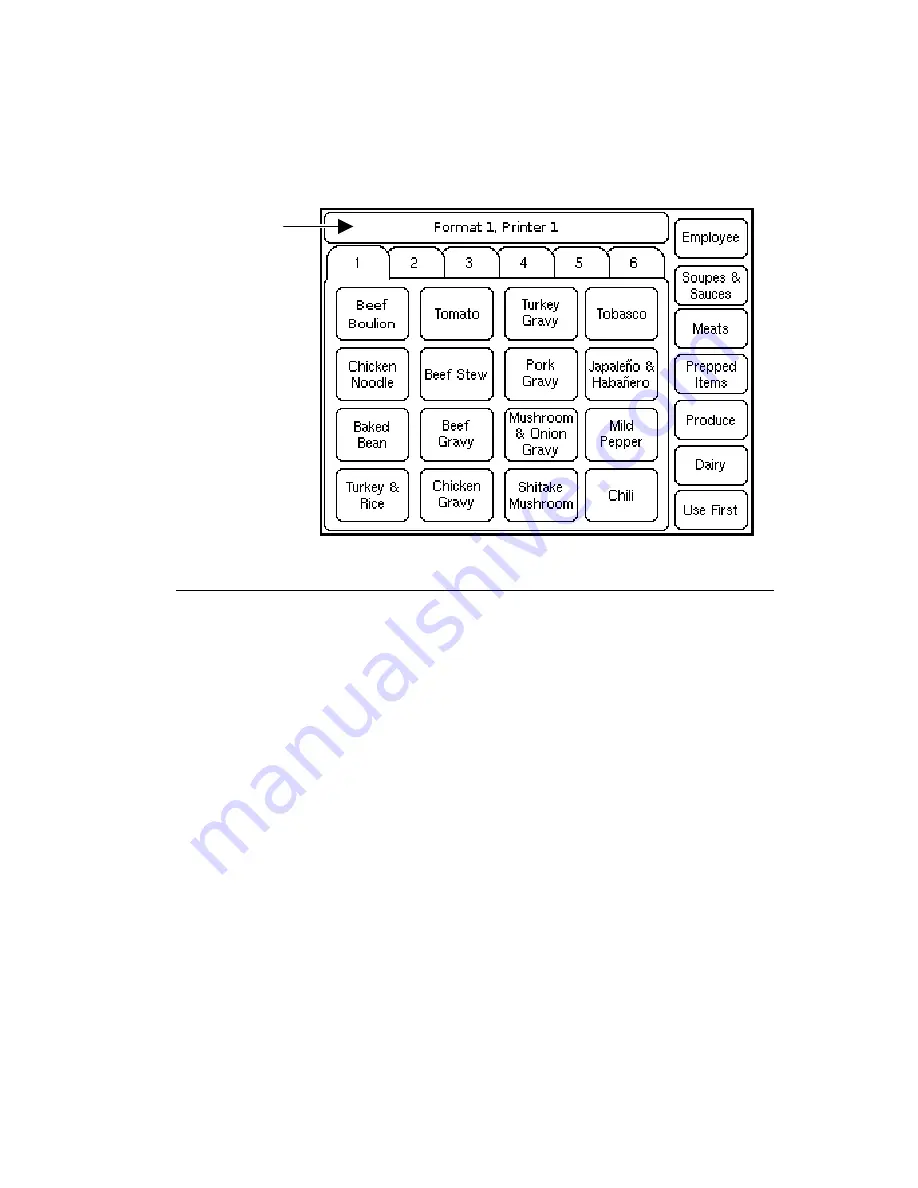
The label format number appears on the status bar at 
the top of the product menu screen. 

P r i n t i n g   F r e s h n e s s   L a b e l s  

Use the application to label any product for freshness.  
All products are listed under their corresponding 
category. Select a new category by touching one of 
the color-coded home keys on the right side of the 
screen.  

Note:  

All products in a category may not appear on 
the screen. Use the numbered tabs at the top 
of the screen to view more products.  

1. 

Turn on the printer. 

2. 

Enter your Employee ID and press 

Enter

. Your ID 

must be 2-10 alphanumeric characters. Your ID 
appears on the freshness labels. 

Status Bar 

Содержание Freshmarx 9415

Страница 1: ...FRESHMARX 9415 AutoMarx Labeling System TC9415OH Rev AC 1 08 2007 Paxar Americas Inc a subsidiary of Avery Dennison Corp All rights reserved Operator s Handbook Operator s Handbook ...

Страница 2: ...ence when the equipment is operated in a commercial environment This equipment generates uses and can radiate radio frequency energy and if not installed and used in accordance with the instruction manual may cause harmful interference to radio communications Operation of this equipment in a residential area is likely to cause harmful interference in which case the user will be required to correct...

Страница 3: ...s 1 5 USING THE APPLICATION 2 1 About the Printer 2 2 Calibrating the Touch Screen 2 3 Configuring the Printer 2 4 Selecting a Format 2 6 Printing Freshness Labels 2 7 Printing Use First Labels 2 9 Changing the Password 2 10 Sleep Mode 2 10 Future Upgrades 2 10 CARE MAINTENANCE 3 1 Clearing Label Jams 3 2 Cleaning the Printhead 3 3 Cleaning the Touch Screen Display 3 4 Cleaning the Printer 3 4 ...

Страница 4: ...OUBLESHOOTING 4 1 Technical Support 4 2 LABEL FORMATS A 1 Format 1 A 1 Format 2 A 2 Format 3 A 2 Format 4 A 3 Format 5 A 4 Format 6 A 5 SPECIFICATIONS B 1 Printer Specifications B 1 Supply Specifications B 1 ...

Страница 5: ...llowing is a summary of the contents of this manual Chapter Contents 1 Getting Started Unpacking and installing the printer and loading supplies 2 Printing Labels Configuring the printer selecting formats and printing labels 3 Care Maintenance Clearing supply jams and cleaning the printer 4 Troubleshooting Common problems and their solutions A Label Formats Format sizes and content fields B Specif...

Страница 6: ...the following 9415 printer power supply 4 wall anchors wall mount template Keep all packaging material in case you need to move or return the printer Caution Do not touch the electrical connectors while setting up the printer Static electricity can damage or destroy the electronic components ...

Страница 7: ...will not install correctly 3 Install the four wall anchors according to the four outside holes indicated on the template 4 Remove the template 5 Lower the supply door on the printer so you can see the mounting holes on the back of the printer 6 Attach the printer to the wall anchors using the corresponding holes on the back of the printer 7 Press down firmly on the printer to lock it in place 8 Cl...

Страница 8: ... an electrical outlet 3 Plug the three hole end of the AC adapter cable into the three pronged outlet in the printer s power supply 4 Plug the L shaped end of the power supply cable into the socket on the side of the printer 5 Plug the three pronged end of the AC adapter cord into a grounded electrical outlet Warning The printer and power supply should never be operated in a location where either ...

Страница 9: ...e supply door 4 Slide a roll of labels onto the supply holder If necessary adjust the supply holder guide so it touches the roll 5 Feed the labels printing side up into the supply slots in the supply door Note Make sure no label adhesive is exposed when loading labels This causes jams 6 Make sure the supply clip is in the correct position to touch the edge of the supply This clip guides the labels...

Страница 10: ...1 6 Operator s Handbook 7 Close the supply door 8 The printer calibrates the labels automatically ...

Страница 11: ...r describes how to use the application calibrate the touch screen select a format print freshness labels print Use First labels Note You may have a custom application that differs slightly from the examples in this manual The screens and labels shown are for reference only 2 ...

Страница 12: ...ob Advances supply for the selected printer or Selects printer to print freshness labels Printer 1 is located on the left side Printer 2 is located on the right side Enters the printer configuration menu The rest of the touch screen contains product buttons that are color coded so you can easily print the item labels Yellow Red Green Blue Orange Printer 1 Printer 2 ...

Страница 13: ...spond correctly when pressed 1 Press any part of the upper right hand quarter of the screen as you turn on the printer The Touch Screen Calibration screen appears 2 Follow the instructions to calibrate the touch screen The application runs automatically when you are finished TOUCH SCREEN CALIBRATION Please press center of cross ...

Страница 14: ... configuring the printer are located under Manager Help Refer to the System Administrator s Guide available on our Web site www paxar com for more information about the Configure screen Note The Configure screen is for Managers and Supervisors only To access the Manager Help 1 Press 2 Enter the Manager Password and press Enter The default password is 1234 The Configure screen appears ...

Страница 15: ...Using the Application 2 5 3 Press Manager Help Scroll through the text to the instructions you need ...

Страница 16: ...ent of each format 1 Press 2 Enter the Manager Password and press Enter The default password is 1234 The Configure screen appears 3 Press Select Format 4 Press the button of the format you need The currently selected format number appears across the top of the screen Note If you select a format larger than the loaded labels some information may not print ...

Страница 17: ...ss All products are listed under their corresponding category Select a new category by touching one of the color coded home keys on the right side of the screen Note All products in a category may not appear on the screen Use the numbered tabs at the top of the screen to view more products 1 Turn on the printer 2 Enter your Employee ID and press Enter Your ID must be 2 10 alphanumeric characters Y...

Страница 18: ...2 8 Operator s Handbook 3 Use the Control buttons to select the printer you need The default is printer 1 Sample Home Keys Numbered Tabs Sample Product Buttons Control Buttons ...

Страница 19: ...return to the product screen without printing labels 6 Press Enter to print labels in the quantity you entered OR Press Enter without entering a quantity to print only one label Labels print for the selected product Note If the selected printer is out of labels a preview of the label appears on the screen and no label prints Touch the screen to return to the product screen ...

Страница 20: ...t is printer 1 2 Press Use First on the right side of the screen The Enter Print Quantity screen appears 3 Enter the quantity of Use First labels you need to print and press Enter OR Press Enter without entering a quantity to print only one label Labels with the words Use First print Note If the selected printer is out of labels a preview of the label appears on the screen and no label prints Touc...

Страница 21: ...en appears 3 Press Change Password 4 Enter the new password using the touch screen keypad 5 Press OK or Cancel 6 Press Return to return to the product screen Sleep Mode After 10 minutes of inactivity the touch screen backlight dims to conserve power After 30 minutes of inactivity the screen saver appears After 50 minutes of inactivity the screen goes blank To wake up the printer gently touch the s...

Страница 22: ...2 12 Operator s Handbook ...

Страница 23: ...Care Maintenance 3 1 C A R E M A I N T E N A N C E This chapter tells you how to clear label jams clean the printhead clean the printer 3 ...

Страница 24: ...y loaded labels 3 Slide the roll of labels off the supply holder 4 Remove the jammed labels Caution Do not use sharp or pointed objects to remove labels It may damage the printer 5 Reload the labels See Loading Labels in Chapter 1 for more information 6 Close the supply door 7 Press to calibrate the labels ...

Страница 25: ...e printhead use a Thermal Printer Cleaning Card order number 116527 sold separately 1 Turn on the printer 2 Lower the supply door 3 Remove any labels Note You may need to carefully remove the supply clip so the cleaning card fits through the supply slot 4 Feed the cleaning card into the supply slot Cleaning Card Supply Clip Voids Correct Print ...

Страница 26: ...uch Screen Display Use a non ammonia glass cleaner and a soft cloth to clean the touch screen display If a stronger cleaner is needed use a mixture of 50 isopropyl alcohol and water Caution Do not use sharp objects or abrasive cleaners on the touch screen display It can damage the screen Cleaning the Printer Slightly dampen a cloth with water and wipe the printer s exterior surfaces clean Use a dr...

Страница 27: ...mended for this application See Loading Labels in Chapter 1 for more information The printer does not print Labels may be jammed See Clearing Label Jams in Chapter 3 for more information Calibrate the supply 1 Load labels See Loading Labels in Chapter 1 for more information 2 Press to calibrate the labels Clear a label jam See Clearing Label Jams in Chapter 3 for more information Printing stops OR...

Страница 28: ... labels recommended for this application See Loading Labels in Chapter 1 for more information Printing is faded or poor quality Clean the printhead See Cleaning the Printhead in Chapter 3 for more information Paper Out error appears Load labels See Loading Labels in Chapter 1 for more information Printhead Over Temperature error appears Turn off the printer and allow it to cool down before you res...

Страница 29: ...er the following information for each field Field Description Description 1 Prints up to 17 characters Description 2 Prints up to 17 characters Description 3 Prints up to 17 characters EMPL Employee ID must be 2 10 characters Must Use By Numbers only Days 0 365 hours 0 23 minutes 0 59 A A ...

Страница 30: ...ong labels Enter the following information for each field Field Description Description 1 Prints up to 35 characters Description 2 Prints up to 35 characters EMPL Employee ID must be 2 10 characters Must Use By Numbers only Days 0 365 hours 0 23 minutes 0 59 ...

Страница 31: ...bels Enter the following information for each field Field Description Description 1 Prints up to 25 characters Description 2 Prints up to 25 characters EMPL Employee ID must be 2 10 characters Expire Date Time Numbers only Days 0 365 hours 0 23 minutes 0 59 ...

Страница 32: ...te Enter the following information for each field Field Description Description Prints up to 15 characters EMPL Employee ID must be 2 10 characters Use By Numbers only Days 0 365 hours 0 23 minutes 0 59 Blue Use by Monday Yellow Use by Tuesday Red Use by Wednesday Brown Use by Thursday Green Use by Friday Gold Use by Saturday Black Use by Sunday Color Coded Block ...

Страница 33: ...0 long labels Enter the following information for each field Field Description Description Prints up to 18 characters Shelflife Prints up to 13 characters EMPL Employee ID must be 2 10 characters Use By Numbers only Days 0 365 hours 0 23 minutes 0 59 ...

Страница 34: ...o 17 characters Description 1 Prints up to 23 characters Description 2 Prints up to 23 characters Description 3 Prints up to 23 characters Ingredients Prints up to 688 characters Note Does not print semicolons or returns Net Weight Prints up to 10 characters Price Prints up to 7 characters numbers 0 9 period and dollar cents Euro pound and yen signs only ...

Страница 35: ...upplies 24V DC 90W to printer Operating Limits Operating Thermal Direct 32 to 122 F 0 to 50 C Storage 4 to 149 F 20 to 65 C Relative Humidity 0 90 non condensing Printhead 203 dpi 8 0 dots per mm Printing Method Thermal Direct Supply Specifications Supply Type Labels Supply Widths 1 2 30 mm minimum 2 2 56 mm maximum Supply Lengths 1 1 28 mm minimum 4 0 102 mm maximum Max Print Area 2 0 51 mm B ...

Страница 36: ...B 2 Operator s Handbook ...

Страница 37: ......

Страница 38: ...ce supplies information and telephone numbers for our International locations www monarch com TOLL FREE 1 800 363 7525 In Canada For FreshMarx sales 1 800 543 6650 In the U S A 1 877 774 6829 In the U S A www freshmarx com ...

Отзывы: