


13
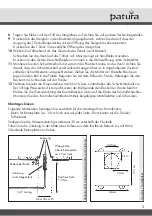
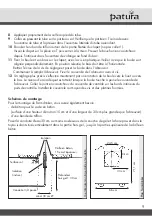
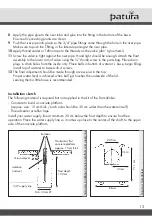
Installation sketch
The following material is required but not supplied in the kit of the Farmdrinker:
·
Concrete to build a concrete platform
(approx. size: 15 cm thick / each side should be 30 cm wider than the waterer itself)
·
Thread sealer or teflon tape
Install your water supply line at minimum 30 cm below the frost depth to ensure frost free
operation. Place the water supply line so it comes up close to the center of the shaft, to the upper
side of the concrete platform.
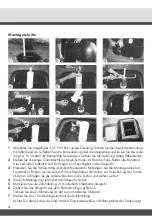
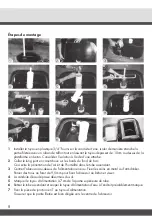
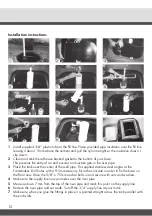
8
Apply the pipe glue to the riser tube and glue into the fitting in the bottom of the base.
Ensure all connecting points are clean.
9
Push the riser pipe into place so the 3/4” pipe fittings come through the hole in the riser pipe.
Make sure to push the T-fitting in the lateral opening at the riser pipe.
10
Apply thread sealer or Teflon tape to the threads on the valve (don`t glue them!)
11
Screw the valve in tight against the riser pipe. Hand tight should be enough. Attach the float
assembly to the lower arm of valve using the ¼” thumb screw in the parts bag. Place drain
plugs in drain holes from the inside only. Place balls in bottom of waterer`s base, begin filling.
Install top of waterer to base with 4 screws.
12
The final adjustment should be made through access post in the top.
Proper water level is achieved when ball just touches the underside of the lid.
Leaving them a little loose is recommended.
Horizontal, flat
concrete platform,
approx. 15 cm thick
Ground Level
Isolation
(incluse)
3/4" supply line
Min. 30 cm Ø
Frost depth
+ 30 cm
Isolation
24.5 cm
66 cm
71.1
cm
21.6 cm
33
cm
Top vie
w F
ar
mdr
ink
er
Side vie
w ins
tallation concr
ete platf
or
m and supply line


