manualshive.com logo in svg
background image

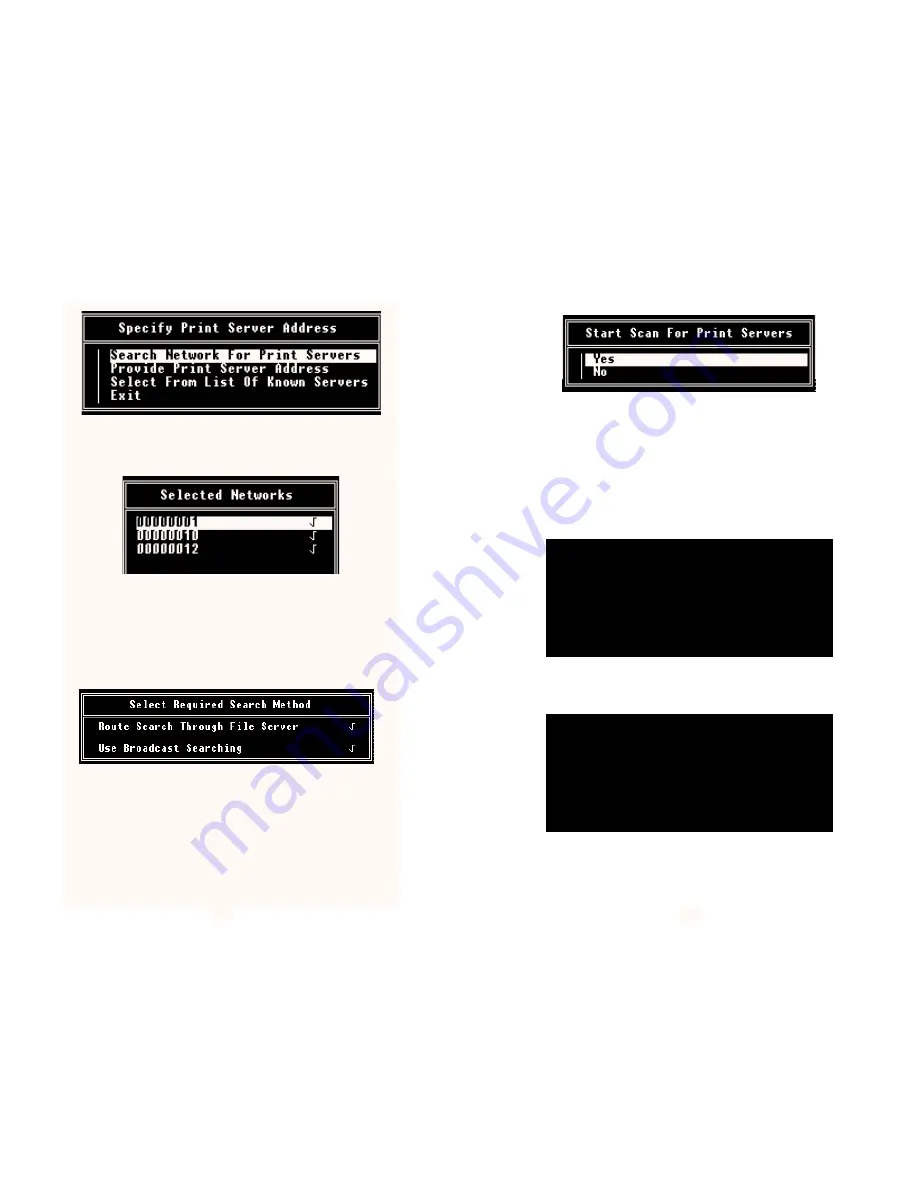
3) In the Specify Print Server Address Screen, select “Search Network
for Print Servers” and press [ENTER].  This will take you to the Selected
Networks screen.

4) The Selected Networks screen allows you to choose the networks
you want UCONNECT to search in order to locate the Print Server.  Use
the arrow keys to scroll between lines.  Use the [esc] key to select and
deselect networks.  Press [ENTER] to update the file with your
selections and go to the Select Required Search Method screen.

5) The Select Required Search Method screen allows you to specify the
search path(s) that UCONNECT takes in order to locate the Print
Server.  The first option will route the search through the file sever your
workstation is connected to.  This will limit the search.  The second
option will search all selected networks in a “broadcast” manner.  (The
default is 

both methods.) Use the arrow keys to scroll between lines.

Use the [esc] key to select and deselect search methods.  Press
[ENTER] to update the file with your selections and go to the next
screen.

11

6) The Start Scan for Print Servers screen allows you to initiate the
scan based upon the criteria you have chosen.  Select an option using
[ENTER].  Choosing “yes” will begin the search.  Choosing “no” will
take you back to the Main Menu.

Once your search has begun, UCONNECT will provide you with

screens updating you on the progress of the search.  If you have
chosen to search through the local file server, you will see a display-
only screen that looks like the image below:

If you have chosen the broadcast search option, you will then see a
display-only screen that looks like the following image:

(continued)

12

Routing Search Through

Server Name

Searching on Network

xxxxxxxxxxx

Patton Print Servers Found

:xx

Networks Searched

:xx

Networks to Search

:xx

Using Broadcast Search
Searching on Network

xxxxxxxxxxx

Patton Print Servers Found

:xx

Networks Searched

:xx

Networks to Search

:xx

Содержание MODEL 2126

Страница 1: ...USER MANUAL MODEL 2126 PeNetTM Miniature 10Base2 to Parallel Print Server SALES OFFICE 301 975 1000 TECHNICAL SUPPORT 301 975 1007 07M2126 A Doc 081021UA Revised 3 07 96...

Страница 2: ...warranties expressed or implied and the installation or use of this product shall be deemed an acceptance of these terms by the user 1 1 Radio and TV Interference The Model 2126 generates and uses ra...

Страница 3: ...e of power loss the Model 2126 can restore connection to servers that are downed It also supports all the Novell printing and print server features The PeNetTM supports print speeds greater than 60 00...

Страница 4: ...er status page b Is your printer set up for Postscript If so this will interfere with the default set up of the Print Server The status page may be garbled or may not print at all See Section 4 8 on G...

Страница 5: ...assword are as allocated in PCONSOLE 3 Check that there is a connection available for the Print Server use Monitor on the Server Console 4 If Selective Login is enabled ensure correct File Server name...

Страница 6: ...the menus use the arrow keys to scroll up and down between menu items The esc key is a toggle switch used to select and deselect menu items to be edited The ENTER key is used to update the file and m...

Страница 7: ...the arrow keys to scroll between lines Use the esc key to select and deselect search methods Press ENTER to update the file with your selections and go to the next screen 11 6 The Start Scan for Prin...

Страница 8: ...of Novell compatible network operating systems This section will guide you through the various configuration options 4 2 1 General Configuration The first option on the Available Configuration Options...

Страница 9: ...nfigure Use the arrow and esc keys to scroll and select the print server you wish to configure Then press ENTER 15 2 Once you have selected a print server to configure you will receive the Advanced No...

Страница 10: ...il the Print Server is rebooted 17 Warning If you select Yes you will lose all changes you have made in the configuration process 2 After you have sent your configuration changes to the print server a...

Страница 11: ...understanding of the Novell printing system More information is available from Novell s Concepts and Print Server manuals The PeNetTM Print Server interface fully supports all common Novell print com...

Страница 12: ...N This section tells how to use the Print Server with a TCP IP network Functions described include locating the Print Server on the network configuration initialization testing printing and FLASH EPRO...

Страница 13: ...nd PESETUP Enter Setup Password PATTON Menu Displays Once connection to the Print Server has been achieved using the Telnet Protocol it is then simply necessary to enter the command PESETUP to enter t...

Страница 14: ...use SMIT to add a host with the PeNetTM Print Server s Host Name Add a remote queue and specify Destination Host as above and Queue on Remote Printer Pport1 or other PeNetTM Print Server port Set the...

Страница 15: ...based method of FLASH upgrade it is firstly necessary to establish an FTP connection to the Print Server in the same way as that used when printing to the unit via FTP Typically this will be achieved...

Страница 16: ...l wall mount 120V AC domestic 220V AC international Temperature Range 2 60 C 37 140 F Altitude 0 10 100 feet Humidity Up to 95 non condensing Dimensions 4 0 x 2 1 x 0 8 Weight 3 oz max 29 APPENDIX B I...

Отзывы: