background image

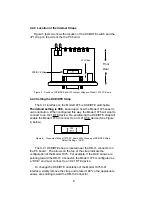
3.2.4  Setting the JP1 Shield Strap

The setting of JP1 determines whether the shield (pin 1) of the

X.21 interface is connected signal ground.  In the default setting, DB-15
shield is connected to signal ground.  The X.21 shield is not connected
to signal ground when the jumper is placed on pins 1 and 2 .  See
Figure 7, below.

Jumper 1:  DB15 Shield

Position

DB15 Shield

1-2

Not connected to signal ground

2-3

Connected to signal ground 

(default)

9

4.0  INSTALLATION

When you have properly configured the configuration switches and

straps, you are ready to connect the Model 1075  to connect to your
system.  This section tells you how to properly connect the Model 1075
to the twisted pair.

4.1  CONNECTION TO THE TWISTED PAIR INTERFACE

The Model 1075 supports full or half duplex communication

between two X.21 devices at distances to 6 miles (9.7 km) and data
rates to 64 kbps.  There are two essential requirements for installing
the Model 1075:

1.

These units work in 

pairs.

Therefore, you must have one 

Model 1075 (or compatible unit) at each end of a two twisted 
pair interface.

2.

To function properly, the Model 1075 needs two twisted pairs 
of metallic wire.  These pairs must be 

unconditioned,

dry

metallic wire, between 19 and 26 AWG (the higher number 
gauges may limit distance somewhat).  Standard dial-up 
telephone circuits, or leased circuits that run through signal 
equalization equipment, are 

not acceptable.

For your convenience, the Model 1075 is available with two

different twisted pair interface options:  RJ-11 jack or RJ-45 jack.

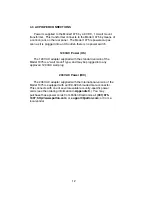
4.1.1  Twisted Pair Connection Using RJ-11 OR RJ-45

The RJ-11 and RJ-45 connectors on the Model 1075's twisted pair

interface are pre-wired for a standard TELCO wiring environment.  The
signal/pin relationships are shown below.

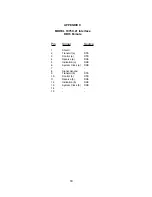
RJ-11

SIGNAL

RJ-45

SIGNAL

1...................GND

1 .................N/C

2...................RCV

2 .................GND

3...................XMT

3 .................RCV

4...................XMT

4 .................XMT

5...................RCV

5 .................XMT

6...................GND

6 .................RCV
7 .................GND
8 .................N/C

10

Figure 7.

Jumper JP1 Orientation on the PC board 

1

2

3

Front

Rear

Содержание KiloModem II 1075

Страница 1: ...Modem II AC Powered High Speed X 21 Short Range Modem SALES OFFICE 301 975 1000 TECHNICAL SUPPORT 301 975 1007 http www patton com Part 07M1075 B Doc 054081U Rev C Revised 1 23 08 C E R T I F I E D An...

Страница 2: ......

Страница 3: ...ontainer This number may be obtained from Patton Electronics Technical Service 301 975 1007 http www patton com or support patton com NOTE Packages received without an RMA number will not be accepted...

Страница 4: ......

Страница 5: ...16 external switches are grouped into two eight switch sets and are externally accessible from the underside of the Model 1075 See Figure 1 The two sets of DIP switches on the underside of the Model 1...

Страница 6: ......

Страница 7: ...terminal interface Off On Receive Recover System clock derived from the received line signal Switch S2 5 Carrier Control S2 5 Carrier Description Off Always On Transmitter is always ON On Follows ter...

Страница 8: ......

Страница 9: ...e 6 below The X 21 DCE DTE strap is located near the DB 15 connector on the PC board The arrows on the top of the strap indicate the configuration of the Model 1075 For example if the DCE arrows are p...

Страница 10: ......

Страница 11: ...pair interface 2 To function properly the Model 1075 needs two twisted pairs of metallic wire These pairs must be unconditioned dry metallic wire between 19 and 26 AWG the higher number gauges may li...

Страница 12: ......

Страница 13: ...d with the standard version of the Model 1075 is a wall mount type and may be plugged into any approved 120 VAC wall plug 230 VAC Power IEC The 230 VAC adapter supplied with the international version...

Страница 14: ......

Страница 15: ...nal equipment is operating properly and can be used for a test If a fault is indicated call a technician or replace the unit C Perform a Bit Error Rate BER test on each unit If the BER test equipment...

Страница 16: ......

Страница 17: ...terfaces CCITT ITU X 21 Data Rates 32 56 and 64 Kbps switch selectable Isolation 1500V RMS via isolation transformers Surge Protection IEC 801 S Level 2 1kV Carrier Control Constantly on or Controlled...

Страница 18: ......

Страница 19: ...Female Pin Signal Source 1 Shield 2 Transmit a DTE 3 Control a DTE 4 Receive a DCE 5 Indication a DCE 6 System Clock a DCE 7 8 Signal Ground 9 Transmit b DTE 10 Control b DTE 11 Receive b DCE 12 Indic...

Страница 20: ......

Страница 21: ......

Страница 22: ......

Страница 23: ......

Страница 24: ...from you Please contact us in any of the following ways to tell us how you like this product and how we can meet your product needs today and in the future Web http www patton com Sales E mail sales...

Отзывы: