background image

RO

110

RO

111

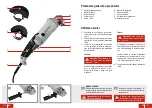
POLIZARE

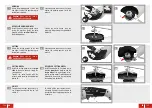
Montaţi apărătorul pentru polizare 

1

 pe 

sculă şi aliniaţi-l în aşa fel ca operatorul 

să fie protejat împotriva scânteilor.

Precauţie!

 Aveţi grijă ca scula să fie 

oprită şi deconectată.

1

Închideţi pârghia de eliberare a apără-

torului. Cu ajutorul unei chei strângeţi 

corespunzător apărătorul pentru poli-

zare 

1

.

2

DISC DE POLIZARE CU CENTRU DE-

PRESAT

Montaţi discul cu centrul ridicat direcţi-

onat spre maşină. Instalaţi flanşa exte-

rioară 

8

 cu partea 

mai mică

 spre discul 

de polizare.

3

PORNIT / OPRIT

Pentru a porni scula împingeţi maneta 

de siguranţă 

6

 în faţă şi apăsaţi buto-

nul on / off 

5

.

1

Pentru a opri scula eliberaţi butonul on 

/ off 

5

 şi lăsaţi discul să se oprească 

fără aplicarea vreunie presiuni asupra 

suprafeţei acestuia.

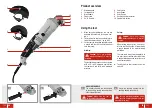
TĂIERE

Montaţi apărătorul pentru tăiere 

2

 pe 

sculă şi aliniaţi-l în aşa fel ca operatorul 

să fie protejat împotriva scânteilor.

Precauţie!

 Aveţi grijă ca scula să fie 

oprită şi deconectată.

1

Închideţi pârghia de eliberare a apără-

torului. Cu ajutorul cheii strângeţi co-

respunzător apărătorul pentru tăiere 

2

.

2

DISC DE TĂIAT

Montaţi discul de tăiat. Instalaţi flanşa 

exterioară 

8

 cu partea 

mai mare

 spre 

discul de tăiat.

Strângeţi  flanşa exterioară cu ajutorul 

cheii în timp ce apăsaţi butonul de fi-

xare a axului 

10

.

3A

DISC DE TĂIAT CU CENTRU  DEPRESAT

Montaţi discul cu centrul ridicat îndrep-

tat 

spre

 maşină. Instalaţi flanşa exteri-

oară 

8

 cu partea 

mai mare

 spre discul 

de tăiat. Strângeţi flanşa exterioară cu 

ajutorul cheii în timp ce apăsaţi butonul 

de fixare a axului 

10

.

3B

Strângeţi  flanşa exterioară cu ajutorul 

cheii în timp ce apăsaţi butonul de fi-

xare a axului 

10

.

3a

1

1

2

3A

3B

2

3

1.

1.

2.

2.

1.

1.

1.

1.

1.

1.

2.

2.

2.

2.

2.

2.

1

1.

1.

1.

1.

2.

2.

Содержание PE-125WS

Страница 1: ...GB PE 125WS bersetzung der Originalbetriebsanleitung Traduction de la notice originale Traduzione delle istruzioni originali Vertaling van de oorspronkelijke gebruiksaanwijzing vers ttning av original...

Страница 2: ...n Sicherstellen dass das Werkzeug aus geschaltet und der Netzstecker gezo gen ist Schutzklasse II Lieferumfang 1x Winkelschleifer 1x Zusatzhandgriff 1x Schleifschutz 1x Trennscheibenschutz 1x Schraube...

Страница 3: ...nschalten des Werkzeugs Ein stellwerkzeuge oder Schl ssel entfer nen An einem drehenden Bauteil belassene Werkzeuge oder Schl ssel k nnen zu K r perverletzungen f hren e Keine Selbst bersch tzung Jede...

Страница 4: ...das Einsatzwerkzeug vollst ndig zum Stillstand gekommen ist Das sich drehende Einsatz werkzeug kann sich in der Oberfl che verhaken und zum Kontrollverlust ber das Elek tro werk zeug f hren m Das Elek...

Страница 5: ...ie Gefahr des Blockierens oder eines R ckschlags zu ver ringern Gro e Platten neigen dazu sich unter ihrem eigenen Gewicht durchzubiegen Werk st cke m ssen auf beiden Seiten der Trenn scheibe in der N...

Страница 6: ...n Ein Ausschalter 5 loslassen Verwendung des Werkzeugs 1 Sicherstellen dass das Werkst ck nicht wegrutschen kann und das Werkzeug fest am Hauptgriff 3 halten 2 Zum Einschalten des Werkzeugs den Si che...

Страница 7: ...RENNEN Den Trennscheibenschutz 2 am Werk zeug anbringen und so ausrichten dass der Bediener vor Funken gesch tzt ist Achtung Sicherstellen dass das Werkzeug ausgeschaltet und der Netzstecker gezogen i...

Страница 8: ...ngern empfehlen wir Personen mit medizinischen Implantaten vor der Benutzung dieses Pro dukts ihren Arzt und den Hersteller des medizinischen Implantates zu kontaktie ren Konformit tserkl rung Wir erk...

Страница 9: ...s respiratoires S assurer que l outil est hors service et d branch Indice de protection II Fournitures 1x Ponceuse d angle 1x Poign e auxiliaire 1x Protection pour le meulage 1x Protection pour la cou...

Страница 10: ...l interrupteur ou de brancher un ou til lectrique dont l interrupteur est positionn sur ON marche favorise les accidents d Retirer les cl s ou dispositifs de r glage avant de mettre en service l outil...

Страница 11: ...urface et tirer l outil lectrique hors de votre contr le m Ne faites pas fonctionner l outil lectrique en le portant sur le c t Tout contact acci dentel avec l accessoire cisaillant peut d chirer vos...

Страница 12: ...pi ces usiner tendent s affaisser sous leur propre poids Des sup ports doivent tre plac s sous la pi ce usiner proximit de la ligne de coupe et du bord de la pi ce usiner de part et d autre du disque...

Страница 13: ...t 5 Utilisation de l outil 1 S assurer que la pi ce usiner ne peut pas glisser puis tenir fermement l outil la poign e principale 3 2 Pour allumer l outil pousser le levier de s curit 6 vers l avant...

Страница 14: ...on pour le tron on nage 2 sur l outil et l aligner de sorte que l utilisateur soit prot g du scintil lement Attention S assurer que l outil est hors service et d branch 1 Fermer le levier de d verroui...

Страница 15: ...res graves ou mortelles nous recommandons aux per sonnes quip es d implants m dicaux de consulter leur m decin et le fabricant de l implant m dical avant d exploiter ce pro duit D claration de conform...

Страница 16: ...o e scollegato Classe di protezione II Materiale compreso nella fornitura 1x Smerigliatrice angolare 1x Impugnatura ausiliaria 1x Carter di protezione per molatura 1x Carter di protezione per taglio 1...

Страница 17: ...quel la fissa prima di accendere l attrezzo Po trebbe essere causa di lesioni fisiche se una di queste chiavi dovesse rimanere incastrata in un elemento rotante dell attrezzo elettrico e Non inclinar...

Страница 18: ...completamente fermo L ac cessorio in rotazione potrebbe entrare in con tatto con la superficie sulla quale posato e far perdere il controllo dell attrezzo m Non far funzionare l attrezzo mentre lo si...

Страница 19: ...mensioni per ridurre al minimo il rischio di contraccolpo e di incastro del disco I pezzi da lavorare di grandi dimensio ni tendono ad abbassarsi per effetto del loro peso Porre dei supporti sotto al...

Страница 20: ...dell attrezzo 1 Assicurarsi che il pezzo da lavorare non possa scivolare e tenere l attrezzo salda mente dal manico principale 3 2 Per accendere l attrezzo spingere in avanti la leva di sicurezza 6 e...

Страница 21: ...O Fissare il carter per taglio 2 all attrezzo ed allinearlo in modo che l operatore sia protetto della scintille Attenzione Assicurarsi che l at trezzo sia spento e scollegato 1 Chiudere la leva di ri...

Страница 22: ...gliamo alle persone portatrici di im pianti di consigliare il loro dottore e il co struttore dell impianto medico prima di utilizzare il presente prodotto Dichiarazione di conformit Si dichiara che il...

Страница 23: ...ervoor dat het gereedschap is uit geschakeld en de stekker uit het stop contact is gehaald Beschermingsklasse II Leveringsomvang 1x Haakse slijper 1x Extra handgreep 1x Slijpbeveiliging 1x Snijdbeveil...

Страница 24: ...t elektrische gereedschap kan letsel veroorzaken e Reik niet te ver Zorg te allen tijde voor een goede balans Hierdoor hebt u meer controle over de elektrische gereedschappen bij onver wachte situatie...

Страница 25: ...e accessoire kan zich vastgrijpen in het oppervlak waardoor u de controle over het gereedschap verliest m Schakel het gereedschap niet in als u het naast u draagt Door per ongeluk contact kan het draa...

Страница 26: ...n gewicht Plaats aan beide kanten ondersteu ningen onder het paneel in de buurt van de snijdlijn en bij de rand van het paneel f Wees extra voorzichtig bij het snijden in bestaande muren of andere bli...

Страница 27: ...n laat u de aan uit knop 5 weer los Het gereedschap gebruiken 1 Zorg ervoor dat uw werkstuk niet kan wegglijden en houd het gereedschap ste vig vast aan de hoofdhendel 3 2 Om het gereedschap in te sch...

Страница 28: ...komen zonder druk uit te oefenen op het oppervlak SNIJDEN Bevestig de slijpbeveiliging 2 aan het gereedschap en lijn het uit zodat de gebruiker tegen vonken wordt be schermd Let op Zorg ervoor dat het...

Страница 29: ...per ken raden wij personen met medische im plantaten aan hun arts en de fabrikant van het medische implantaat te raadplegen vooraleer dit product in gebruik te nemen Conformiteitsverklaring Wij verkla...

Страница 30: ...ill att verktyget r avst ngt och inte r anslutet till eln tet Skyddsklass II Leveransomf ng 1x Vinkelslip 1x St dhandtag 1x Slipskydd 1x Kapskydd 1x Nyckel Om n gon del skulle saknas eller vara skadad...

Страница 31: ...inte l st sit tande kl der eller smycken H ll undan h r kl der och handskar fr n r rliga de lar L sa kl der smycken och l ngt h r kan fastna i r rliga delar g Om det finns anordningar f r anslutning a...

Страница 32: ...an som g r in i fastkl mningspunkten gripa in i ytan p materialet och orsaka att skivan sl r tillbaka Skivan kan antingen hoppa mot eller bort fr n anv ndaren beroende p slipskivans r relse riktning v...

Страница 33: ...illbeh r h ll h nderna varma organisera arbetet och arbetstiderna Buller och vibrationer V rdena i den h r bruksanvisningen har m tts upp i enlighet med den standardiserade m t metoden som anges i SS...

Страница 34: ...get genom att sl ppa upp str mbrytaren 5 Anv ndning av verktyget 1 Se till att arbetsstycket inte kan glida un dan och h ll verktyget stadigt i handtaget 3 2 Starta verktyget genom att trycka s ker he...

Страница 35: ...yck mot dess yta KAPA S tt p kapskyddet 2 p verktyget och rikta det s att anv ndaren skyddas fr n gnistor F rsiktig Se till att verktyget r av st ngt och inte r anslutet till eln tet 1 St ng skyddet o...

Страница 36: ...enderar vi per soner med medicinska implantat att kon takta l karen och tillverkaren av det medi cinska implantatet innan den h r produkten anv nds Intyg om verensst mmelse Vi intygar att produkten so...

Страница 37: ...ontrolujte zda je n ad vypnut a odpojen ze z suvky T da ochrany II Rozsah dod vky 1x hlov bruska 1x Pomocn rukoje 1x Ochrann kryt p i brou en 1x Ochrann kryt p i ez n 1x Kl Jestli e kter koli d l chyb...

Страница 38: ...d pojte ve ker nastavovac kl ny nebo kl e Kl nebo kl n p ipojen k rotuj c sti elektrick ho n ad m e zp sobit raz e Nep esahujte V dy pevn st jte na no hou a udr ujte rovnov hu Umo n v m to lep ovl d n...

Страница 39: ...in et nebezpe razu elektrick m proudem o Elektrick n ad nepou vejte v bl zkos ti ho lav ch materi l Jiskry by mohly tyto materi ly zap lit p Nepou vejte p slu enstv vy aduj c kapaln chladiva Pou v n v...

Страница 40: ...mi mo dnou pozornost Vy n vaj c kotou by mohl p e znout plynov nebo vodovodn potrub elektrick veden nebo jin p ed m ty kter by mohly zp sobit zp tn r z DAL BEZPE NOSTN POKYNY OHLEDN RIZIK V D SLEDKU...

Страница 41: ...vyp na 5 Pou v n n ad 1 Zajist te aby zpracov van d l nemohl sklouznout a podr te n stroj za hlavn rukoje 3 2 K zapnut n ad zatla te na bezpe nostn p ku 6 sm rem dop edu a stiskn te sp na vyp na 5 3 N...

Страница 42: ...z pou it tlaku na jeho povr chu EZ N Na n ad nasa te kryt ur en k ez n 2 a vyrovnejte ho tak aby byl u ivatel chr n n p ed jiskrami Pozor Zkontrolujte zda je n ad vypnut a odpojen ze z suvky 1 Zav ete...

Страница 43: ...s l ka em a v robcem l ka sk ho implant tu Prohl en o shod Prohla ujeme e v robek popsan v sti Technick parametry 1200 W hlov bruska PE 125WS vyrobeno pro HORNBACH Baumarkt AG Hornbachstra e 11 76879...

Страница 44: ...ho strojenstva Skontrolujte i je n stroj vypnut a od pojen Trieda ochrany II Rozsah dod vky 1x Uhlov br ska 1x Pomocn rukov 1x Ochrann kryt pre br senie 1x Ochrann kryt pre rezanie 1x K Ak niektor die...

Страница 45: ...ojov ktor maj zapnut sp na sa zvy uje pravdepodobnos neho dy d Pred zapnut m n stroja odstr te v etky pr padn nastavovacie alebo franc zske k e Franc zsky k alebo in k na saden na ot aj com sa diele e...

Страница 46: ...oj mimo va ej kon troly m Nesp ajte n stroj ke ho nesiete na boku Ne myseln kontakt s rotuj cim pr slu enstvom by mohol zachyti v odev a vtiahnu pr slu enstvo do v ho tela n Pravidelne istite vetracie...

Страница 47: ...kot a f Pri vykon van vreckov ho rezu do existuj cich stien i in ch nezn mych pl ch bu te mimoriadne opatrn Vy nie vaj ci kot m e zareza do plynov ch ale bo vodovodn ch r rok elektrick ch veden alebo...

Страница 48: ...Zabezpe te aby obrobok nemohol vyk z nu a dr te n stroj pevne za hlavn ru kov 3 2 N stroj zapnete zatla en m bezpe nost nej p ky 6 dopredu a n sledn m stla e n m hlavn ho sp na a 5 3 Nechajte n stroj...

Страница 49: ...v jajte tlak REZANIE Nasa te na n stroj ochrann kryt reza nia 2 a vyrovnajte ho aby bol obsluhu j ci chr nen pred iskren m Pozor Skontrolujte i je n stroj vypnut a odpojen 1 Zatvorte uvo ovaciu p ku o...

Страница 50: ...osob m s zdravotn mi implant tmi poradi sa s lek rom a v rob com zdravotn ho implant tu pred pou it m tohto produktu Vyhl senie o zhode Vyhlasujeme e produkt pop san v asti Technick daje 1200 W uhlov...

Страница 51: ...i grij ca scula s fie oprit i deco nectat Clasa de protec ie II Con inutul livr rii 1x Polizor unghiular 1x M ner auxiliar 1x Ap r tor polizare 1x Ap r tor t iere 1x Cheie Dac oricare dintre componen...

Страница 52: ...a sculei electrice av nd degetul pe butonul ntrerup tor sau alimentarea sculei electrice cu butonul de pornire ac ionat pre dispune la accidente d nainte de a porni scula electric nde p rta i cheile s...

Страница 53: ...nsiune i pot electrocuta operatorul k Pozi iona i cablul n a a fel ca s nu fie n apropierea accesoriului n mi care de rota ie Dac pierde i controlul asupra scu lei cablul poate fi t iat sau prins i br...

Страница 54: ...a minim riscul prinderii discului n material i al reculului Piesele mari tind s se ndoaie sub propria greutate Trebuie a ezate suporturi sub piese pe ambele p r i ale discului n apropierea liniei de t...

Страница 55: ...libera i butonul on off 5 Utilizarea sculei 1 Ave i grij s nu se alunece piesa prelu crat i ine i ferm scula de m nerul prin cipal 3 2 Pentru a porni scula mpinge i maneta de siguran 6 n fa i ap sa i...

Страница 56: ...stuia T IERE Monta i ap r torul pentru t iere 2 pe scul i alinia i l n a a fel ca operatorul s fie protejat mpotriva sc nteilor Precau ie Ave i grij ca scula s fie oprit i deconectat 1 nchide i p rghi...

Страница 57: ...dicul i produ c torul implantului medical nainte de utili zarea acestui produs Declara ie de conformitate Declar m c produsul descris n Date tehnice Polizor unghiular PE 600 WS de 1200 W fabricat pent...

Страница 58: ...he tool is switched off and unplugged Protection Class II Scope of delivery 1x Angle grinder 1x Auxiliary handle 1x Grinding protection guard 1x Cutting protection guard 1x Wrench If any parts are mis...

Страница 59: ...ure these are connected and properly used Use of dust collection can reduce dust related hazards h Do not let familiarity gained from fre quent use of tools allow you to become complacent and ignore t...

Страница 60: ...procedures or con ditions and can be avoided by taking proper precautions as given below a Maintain a firm grip on the power tool and position your body and arm to al low you to resist kickback forces...

Страница 61: ...given in these instructions have been measured in accordance with a stand ardized measurement procedure specified in EN 60745 1 and EN 60745 2 3 and can be used to compare tools It may be used for a...

Страница 62: ...he tool release the on off switch 5 Using the tool 1 Make sure your workpiece can not slip and hold the tool firmly at the main han dle 3 2 To switch on the tool push safety lever 6 forward and press...

Страница 63: ...ace CUTTING Attach the cutting guard 2 to the tool and align it so that the operator is pro tected from sparking Caution Make sure the tool is switched off and unplugged 1 Close the guard release leve...

Страница 64: ...s to consult their doctor and the medical implant manufac turer before operating this product Declaration of conformity We declare that the product described in Technical Data 1200 W Angle Grinder PE...

Страница 65: ...11 76879 Bornheim Germany Ausklappseiten beachten Observer les pages d plier Badare alle pagine pieghevoli Let op de uitvouwpagina s Observera utviksbladen Viz rozkl dac str nky V imnite si rozkladac...

Отзывы: