


EN
119
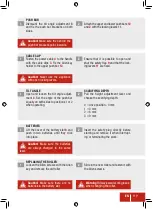
Caution!
Make sure there are no
batteries in the battery slot.
1
Ensure that it is possible to open and
shut the safety flap
9
and that the lock-
ing levers
11
are fixed.
CABLE CLIP
Fasten the power cable
4
to the handle
with the cable clips
3
. Fix the Allen key
holder to the upper push bar
12
.
2
TILT ANGLE
Open and loosen the tilt angle adjust-
ment
8
. Set the angle of the push bar
equally on both sides to positions 1 or 2
when operating.
1
SCARIFYING DEPTH
Pull the height adjustment lever and
choose the scarifying depth:
0 = drive position - 3 mm
1 = 3 mm
2 = 6 mm
3 = 9 mm
Insert the safety plug directly before
starting and remove it when interrupt-
ing or terminating the work.
2
Attach the upper and lower push bars
12
and
2
with the locking levers
11
.
2
BATTERIES
Lift the cover of the battery slot
6
and
push in two batteries until they click
into place.
1
2
Caution!
Never use the appliance
with open locking levers.
Caution!
Make sure the bend in the
push bar brackets point inwards.
PUSH BAR
Dismount the tilt angle adjustment
8
and fix the push bar brackets on both
sides.
1
Caution!
Make sure the batteries
are always charged to the same
level.
Slide in the new roller and fasten it with
the Allen screws.
2
REPLACING THE ROLLER
Loosen the Allen screws with the Allen
key and remove the old roller.
1
Warning!
Always wear work gloves
when changing the roller.
Содержание 3420652
Страница 14: ...DE 14...
Страница 28: ...FR 28...
Страница 42: ...IT 42...
Страница 56: ...NL 56...
Страница 70: ...SV 70...
Страница 84: ...CZ 84...
Страница 98: ...SK 98...
Страница 112: ...RO 112...
Страница 126: ...EN 126...
Страница 127: ......
Страница 128: ......


