®
M o t i o n S e n s o r I I
C I - 6 7 4 2 A
2
Set-up
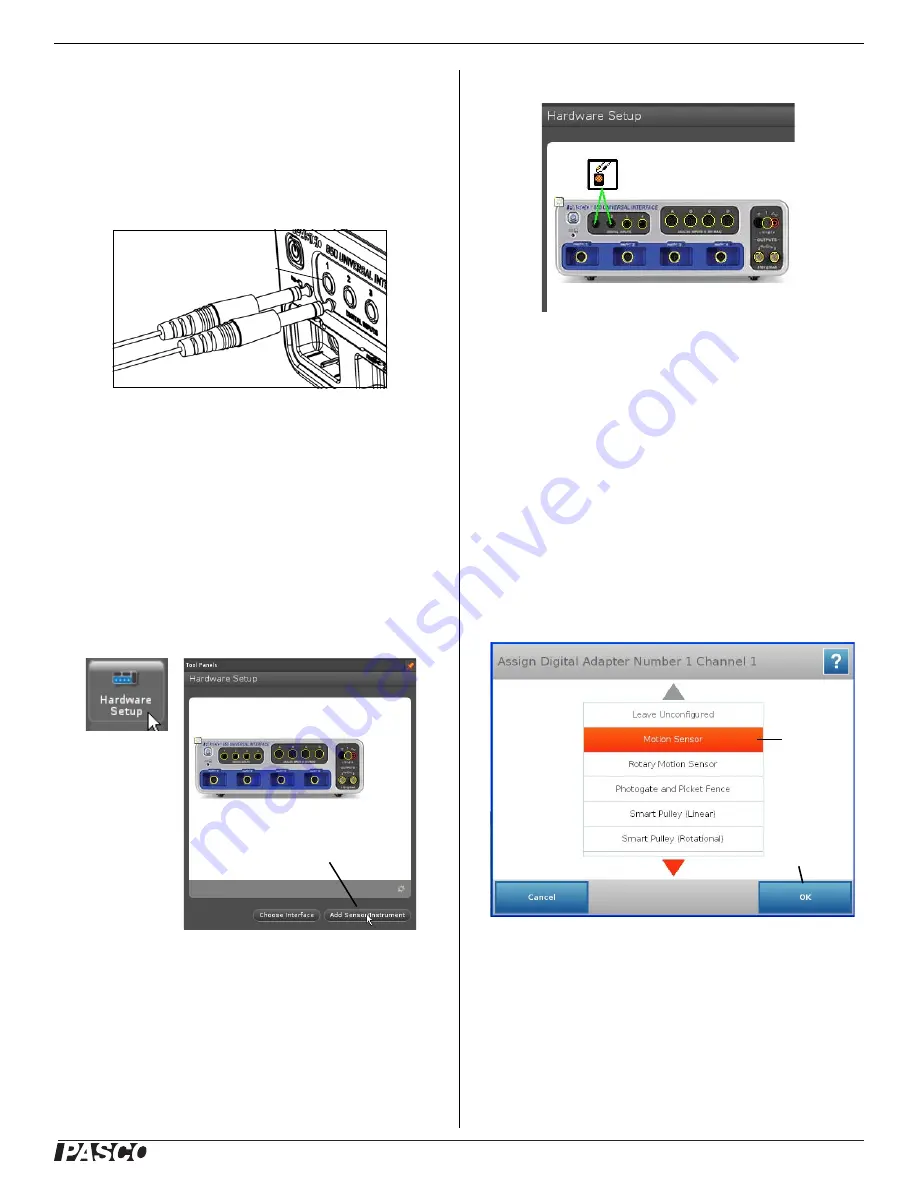
To Connect to a PASCO Interface
Connect the Motion Sensor's yellow plug to DIGITAL INPUT 1
(or Digital Channel 1) of your
ScienceWorkshop-
compatible
interface. Connect the black plug to DIGITAL INPUT 2 (or Digi-
tal Channel 2).
NOTE: If you are using a PASPORT-only interface (such as the
SPARK Science Learning System), use a PS-2159 Digital
Adapter to connect the Motion Sensor to the interface. Put the
yellow plug into Input Port 1, and the black plug into Input Port
2. Plug the Digital Adapter into a port on the PASPORT-only
interface.
PASCO Capstone Setup
1.
Turn on the interface and launch the PASCO data acquisition
software, such as PASCO Capstone..
2.
In PASCO Capstone, click the “
Hardware Setup
” icon in
the Tools palette to open the “Hardware Setup” panel.
3.
In the “Hardware Setup” panel, click “
Add Sensor/Instru-
ment
” to open the “Add Sensor or Instrument” window.
4.
In the “Add Sensor or Instrument window, click the “
Sensor
or Instrument Type
” menu and select “
ScienceWorkshop
Digital Sensors
” from the list.
5.
Select “
Motion Sensor II
” in the list and then click “
OK
”.
6.
Confirm that the “Hardware Setup” panel shows the icon of
the Motion Sensor and the icon of the interface.
7.
Double-click the
Graph
icon in the Displays palette (or
other display icon) to create a data display.
8.
In a Graph display, click the “
Select Measurement
” menu
button on the vertical axis and select position, velocity, or
acceleration. Click “
OK
”.
SPARK Science Learning System (SLS) Setup
1.
Turn on the interface. Connect the Motion Sensor’s plugs to
the input ports on a PS-2159 Digital Adapter, and plug the
adapter into the interface.
2.
The SPARKvue program recognizes that the Digital Adapter
is connected to the interface, and shows a screen with a list
of digital sensors. Press “Motion Sensor” and then press
“OK”.
Yellow Plug
Black Plug
DIGITAL
INPUT
Click “Add
Sensor/Instrument”
Hardware
Setup
icon
Motion Sensor Icon
850 Interface Icon
1) Press
“Motion
Sensor”
2) Press
“OK”


