


Equipment setup
Mounting the Force Sensor on a PASCO cart
The Force Sensor has two built-in mounting screws that align
with the threaded holes in the accessory tray of a PASCO
dynamics cart, such as the Plunger Cart (ME-9430) or Collision
Cart (ME-9454). The screws are spring-loaded so they remain in
a retracted position when not in use.
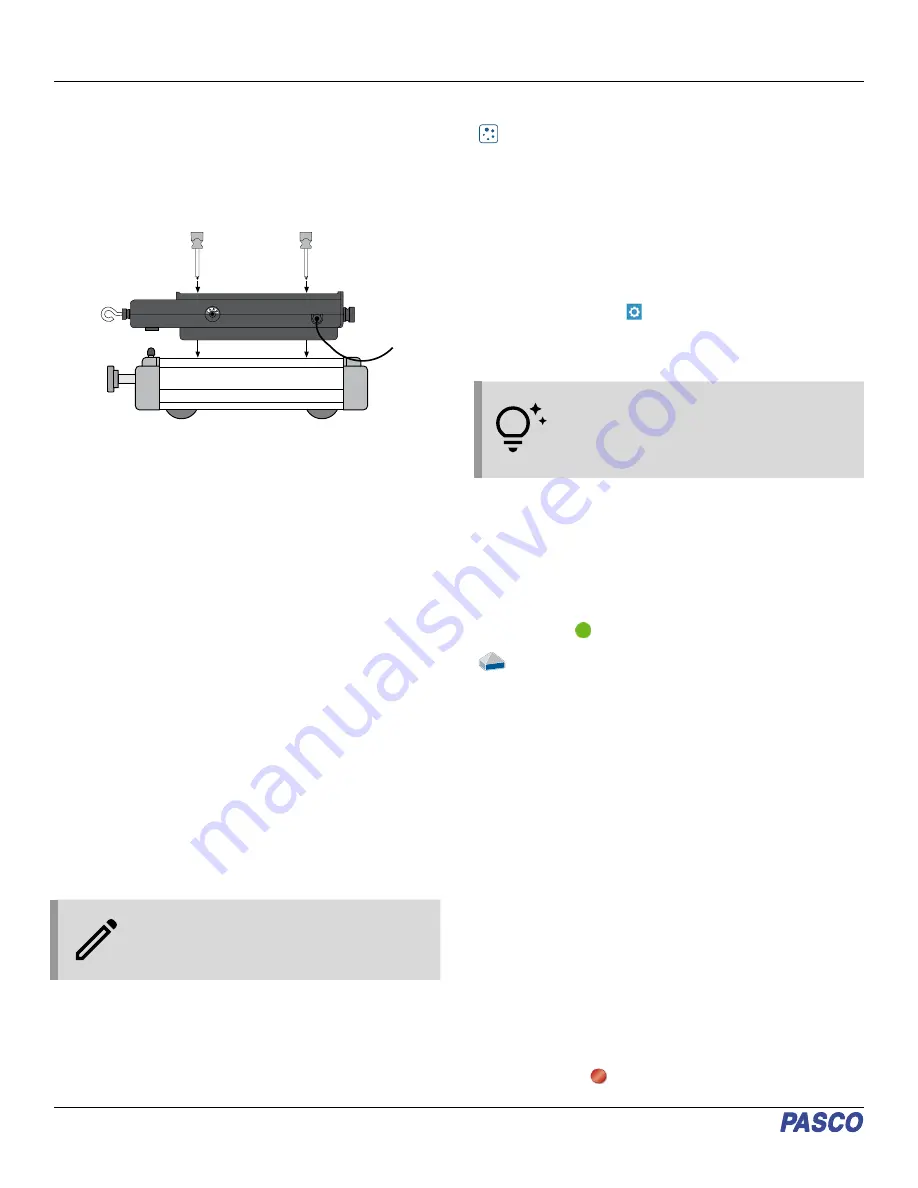
1. Position the sensor lengthwise in the accessory tray of the
cart.
2. Insert a size #0 Phillips head screwdriver into one of the
threaded holes in the accessory tray of the Force Sensor.
Align the screwdriver with the built-in mounting screw.
3. Gently press down with the screwdriver until the screw
extends into the threaded hole on the cart, then turn the
screwdriver clockwise until the screw is tight.
4. Repeat Steps 2 and 3 with the other hole.
To mount other accessories on top of the Force Sensor, attach
the accessory in the Force Sensor accessory tray in the same
way you would attach the accessory to a dynamics cart.
Mounting the Force Sensor on a support rod
The Force Sensor has a hole and thumbscrew at one end that
allows you to mount the sensor on a support rod. Rods from 3/8"
to 1/2" in diameter can be used with this hole and thumbscrew.
Mounting the Force Sensor on the Force
Sensor Track Bracket
The Force Sensor can be mounted on the Force Sensor Track
Bracket (ME-6622) in order to keep the sensor in a fixed position
on a track.
1. Place the bracket on top of the sensor so the thumbscrew
aligns with the threaded hole nearest to the side of the
sensor where the hook or bumper is attached.
NOTE: Do not use the threaded hole nearest to
the thumbscrew for mounting the Force Sensor
Track Bracket, as this position will put strain on
the analog cable.
2. Turn the thumbscrew clockwise until tight to secure the
sensor in place.
3. Mount the Force Sensor Track Bracket in the T-slot on the
side of the track.
For more information, see the manual for the Force Sensor Track
Bracket.
Software setup
SPARKvue
Connect the sensor to SPARKvue:
1. Start SPARKvue, then click Sensor Data.
2. Turn on the 550 Universal Interface and connect the
interface to SPARKvue. For specific details on doing this,
see the interface’s manual or the SPARKvue online help.
3. Plug the Force Sensor’s analog cable into one of the
analog ports of the analog interface.
4. In the Select Measurements for Templates column,
select the Settings
icon next to the name of the channel
to which the Force Sensor is connected.
5. From the Assign Analog Adapter menu, select Force
Sensor and click OK.
TIP: If desired, you can adjust the gain for the
sensor from the Assign Analog Adapter menu by
clicking the box next to Gain and selecting
Low (1x), Medium (10x), or High (100x) from
the list.
Set up data collection:
1. From the Select Measurements for Templates column,
select the measurements to be used for your experiment.
2. From the Templates column, select Graph to open the
Experiment Screen. The display should automatically be
set to measure the selected values on the y-axis and time
on the x-axis.
3. Click Start
to begin recording data.
PASCO Capstone
Connect the sensor to Capstone:
1. Start Capstone, then click Hardware Setup from the Tools
palette.
2. Turn on your chosen analog interface (if required) and
connect the interface to your computer via USB cable.
Capstone will automatically recognize the interface. (If
using a 550 Universal Interface, you can instead connect to
Capstone via Bluetooth.) For more details, see the
interface’s manual or the Capstone online help.
3. Plug the Force Sensor’s analog cable into one of the
analog ports of the analog interface.
4. On the visual display of the analog interface on the
Hardware Setup menu, click the yellow circle over the port
to which the Force Sensor is connected. Select Force
Sensor from the list of possible sensors.
Set up data collection:
1. Create a Graph display by double-clicking the Graph icon
in the Displays palette.
2. To assign the axes, click each <Select Measurement> box
and select the appropriate measurement for your
experiment from the list.
3. Click Record
to begin recording data.
Force Sensor | CI-6537
2