background image

58 

C H A P T E R   5   R E P L A C I N G   F I E L D   R E P L A C E A B L E   U N I T S   ( F R U s )

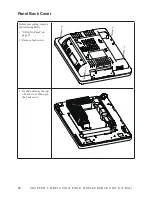
Panel Back Cover

Before proceeding, remove 

the following FRUs.

• 

“SP-600-A Panel” on 

page 57.

1.  Remove four screws.

2.  Gently pull away the top 

of back cover, then open 

the back cover.

Содержание SP-600-A

Страница 1: ...POS Terminal SP 600 A Service Manual...

Страница 2: ......

Страница 3: ...manual provides service information for the SP 600 A This manual is designed to help train service personnel to locate and fix failing parts on the machine This manual consists of the following secti...

Страница 4: ...o http www dtsc ca gov hazardouswaste perchlorate Vermont Mercury Management Rules LCD display lamps contain mercury Dispose of them properly CE Mark This device complies with the requirements of the...

Страница 5: ...16 USB Configuration 17 Super IO Configuration 18 Serial Port x Configuration 19 Parallel Port Configuration 20 Serial Port x Voltage select 21 Hardware Monitor 22 CPU PPM Configuration 23 Chipset Set...

Страница 6: ...ctors 51 Inverter connectors 51 CHAPTER 5 REPLACING FIELD REPLACEABLE UNITS FRUs 53 Safety and precautions 53 Before you begin 54 Replacing parts 54 MSR 55 Customer Display 55 HDD 56 SP 600 A Panel 57...

Страница 7: ...ure 2 10 Parallel Port Configuration sub menu 20 Figure 2 11 Serial Port x Voltage select sub menu 21 Figure 2 12 Hardware Monitor sub menu 22 Figure 2 13 CPU PPM Configuration sub menu 23 Figure 2 14...

Страница 8: ...vi...

Страница 9: ...d Unpacking the machine on page 1 Identifying components on page 2 Connector pin define on page 5 Unpacking the machine It is a good idea to save the packaging materials and shipping box in case that...

Страница 10: ...dentifying components This section describes the parts and connectors on the machine 1 2 Figure 1 2 Front right view Component Description 1 15 inch TFT LCD 2 LED Power Indicator 3 IO Panel 4 HDD Comp...

Страница 11: ...3 Rear view 1 2 3 4 Figure 1 3 Rear view Component Description 1 MSR optional Slot 2 HDD Compartment for wall mounting 3 VFD Customer Display optional Slot 4 Cable Compartment...

Страница 12: ...nectors Connector Description 1 VGA port 2 COM 1 port 3 USB ports 4 RJ11 cash drawer port 5 DC 12V input connector 6 DC 12V output connector 7 COM 3 port 8 COM 2 port 9 LAN jack 10 SATA cable hole 5 2...

Страница 13: ...USB connector pin define Pin Signal Pin Signal 1 DCD 6 DSR 2 SIN 7 RTS 3 SOUT 8 CTS 4 DTR 9 RI 5 GND 1 5 6 10 11 15 Pin Signal Pin Signal Pin Signal 1 Red 6 AGND 11 N A 2 Green 7 AGND 12 DDC DAT 3 Bl...

Страница 14: ...nnector pin define LAN connector pin define 1 6 1 8 Pin Signal 1 CASEOPEN2 2 CASH1 3 CASEOPEN1 4 24V 5 CASH2 6 GND Pin Signal Pin Signal 1 TXA 5 TXC 2 TXA 6 TXB 3 TXB 7 TXD 4 TXC 8 TXD DC 12V input co...

Страница 15: ...7 DC 12V output connector pin define SATA connector pin define Pin Signal 1 12V 2 GND 7 1 Pin Signal Pin Signal 1 GND 5 SATA_RX 2 SATA_TX 6 SATA_RX 3 SATA_TX 7 GND 4 GND 1 2...

Страница 16: ...8 C H A P T E R 1 G E T T I N G S TA R T E D...

Страница 17: ...gs on page 28 Security Settings on page 29 Save Exit on page 30 About the Setup Utility The BIOS Setup Utility enables you to configure the following items Hard drives diskette drives and peripherals...

Страница 18: ...tup Press the delete key Delete to access the BIOS Setup Utility BIOS navigation keys The BIOS navigation keys are listed below Key Function Moves between the available menus Moves the cursor between...

Страница 19: ...the highlight to other options When an option is highlighted execute the option by pressing Enter Some options lead to pop up dialog boxes that prompt you to verify that you wish to execute that optio...

Страница 20: ...sor System memory System Time and System Date System Time System Date The System Time and System Date items show the current date and time held by the machine To set the time and date use the Tab key...

Страница 21: ...tings This setup screen includes sub menus for APCI Configuration CPU Configuration SATA Configuration USB Configurations Super IO Configurations and Hardware Health Configuration Figure 3 3 Advanced...

Страница 22: ...store on AC power loss PME Wake up from S5 This feature allows the system wakeup on PME Power Management Event Wake system with Fixed Time This function is for setting the Date and Time for your compu...

Страница 23: ...allel thereby improving their performance Execute Disable Bit Capability This feature is used to protect certain system memory data regions from insertion and execution of potentially harmful code Lim...

Страница 24: ...Mode Selection This item is used to configure SATA mode The default setting is IDE SMART Self Test This item is used to enable monitoring of hard disks that support the S M A R T Self Monitoring And...

Страница 25: ...ch as DOS that does not support Plug and Play USB transfer time out This item allows you to specific the USB transfer timeout value for control bulk and interrupt transfers Device reset time out This...

Страница 26: ...nal degree of Watch Dog Watch Dog Timer When select any time period the Watchdog Timer will be enabled after that time period passes every time the system boots up It will monitor the time taken for e...

Страница 27: ...nfiguration Figure 3 9 Serial Port x Configuration sub menu Serial Port x This item allows you to enables or disables a serial port Change Settings This item allows you to specific IO address and IRQ...

Страница 28: ...port Device Mode This item allows you to set the data transfer protocol for the parallel port There are four options Standard Parallel Port Mode EPP Mode Enhanced Parallel Port ECP Mode Extended Capab...

Страница 29: ...21 Serial Port x Voltage select Figure 3 11 Serial Port x Voltage select sub menu Serial Port x Voltage select This item allows you to set voltage for a serial port...

Страница 30: ...U P Hardware Monitor Figure 3 12 Hardware Monitor sub menu Shutdown Temperature This item allows setting the shutdown temperature Once enabled the machine will automatically shutdown when the tempera...

Страница 31: ...PM Configuration sub menu EIST This item allow you to enable or disable EIST Enhanced Intel Speedstep Technology When enabled CPU will reduce power consumption CPU C state Report This item is used to...

Страница 32: ...24 C H A P T E R 2 B I O S S E T U P Chipset Settings This screen allow you to configure the chipset options Figure 3 14 Chipset Set tings Screen...

Страница 33: ...This item allows you to determine how various resolutions appear on your screen Option Description Auto The scaling unit on your graphics card will rescale the image before it reaches your LCD displa...

Страница 34: ...ler Use this item to enable or disable the onboard LAN controller The default setting is Enabled Onboard LAN OPROM This feature allows you to enable or disable the onboard LAN boot ROM to boot system...

Страница 35: ...27 USB Configuration Figure 3 17 USB Configu ration sub menu EHCI This item allows you to enable or disable USB 2 0 support...

Страница 36: ...This item is used to select the Power on state for Numlock Fullscreen Logo This item enables you to show the full screen logo on the bootup screen Hard Disk Write Protect When enabled the hard disks w...

Страница 37: ...n the Security menu and press Enter 2 The password dialog box appears 3 If you are creating a new password type in the password You can type alphanumeric characters Symbols are ignored The Administrat...

Страница 38: ...ess Yes to save and exit or press No to return to the menu Restore Defaults This option opens a dialog box that lets you load optimized defaults for all appropriate items in the Setup Utility The opti...

Страница 39: ...page 32 Intel Chipset Graphics Driver on the page 34 LAN Driver on the page 36 Touch Screen Driver on the page 38 Driver auto installation Use an external CD ROM drive to install the drivers or copy t...

Страница 40: ...Software updates the Windows XP 7 INF files so that the Intel chipset is correctly configured Follow these instructions to install the chipset software 1 Browse to the DRIVER chipset Intel Inf folder...

Страница 41: ...ReadMe Information then click Next 5 The Intel Chipset Software Utility files are installed to the system When prompted to restart select Yes I want to restart my computer now Then click Finish to res...

Страница 42: ...Graphics Driver This utility installs the Intel Extreme Graphics 2 drivers for Windows XP 2000 To install the drivers 1 Browse to the DRIVER VGA intel folder 2 Double click the executable file The fol...

Страница 43: ...35 4 Browse the ReadMe Information then click Next 5 When installation is completed select Yes I want to restart my computer now Then click Finish to restart the system...

Страница 44: ...R E LAN Driver The network driver support Windows XP 2000 Refer to the following to install the drivers 1 Browse to the DRIVER LAN RealTek folder 2 Double click the executable file The following scree...

Страница 45: ...37 4 When installation is completed click Finish...

Страница 46: ...Driver Refer to the following to install the touch screen driver 1 Browse to the DRIVER Touch eGalax folder 2 Double click setup exe The following screen appears Click Next to continue 3 Read the lic...

Страница 47: ...the box for Install PS 2 interface drive and then click Next to continue 5 System will give you a warning click OK to continue 6 Uncheck the box for Install RS232 interface drive and then click Next t...

Страница 48: ...N G D R I V E R S A N D S O F T W A R E 7 Check the box for None and then click Next to continue 8 System will give you a warning click OK to continue 9 Uncheck the box for Support Mulit Monitor Syste...

Страница 49: ...41 10 Click Next to continue 11 Click Next to continue...

Страница 50: ...42 C H A P T E R 3 I N S TA L L I N G D R I V E R S A N D S O F T W A R E 12 Click Next to continue 13 Click Yes I want to restart my computer now and then click Finish...

Страница 51: ...he TouchKit application 1 Launch the TouchKit application from the Windows desktop by clicking on Start All Programs eGalaxTouch Configure Utility 2 Select the Tools page 3 Click the 4 Points Calibrat...

Страница 52: ...44 C H A P T E R 3 I N S TA L L I N G D R I V E R S A N D S O F T W A R E 5 Click OK to complete the 4 points calibration You may also use this application to adjust the touch settings NOTE...

Страница 53: ...onnectors on the page 51 General checkout guidelines Use the following procedure to troubleshoot problems Identify as many symptoms as possible in detail Verify symptoms by recreating them Follow the...

Страница 54: ...en Cashdrawer A Status port 538 10 High 1 Close Low 0 Open Cashdrawer B Status port 50E 40 High 1 Close Low 0 Open LCD symptoms Symptom Corrective Procedure LCD backlight is not working but text is st...

Страница 55: ...Procedure Power shuts down unexpectedly Cannot turn the system on 1 Reseat the power AC adapter cable 2 Reseat the power AC adapter 3 Replace the mainboard Cannot turn the system off 1 Hold down the p...

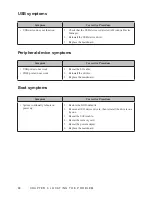
Страница 56: ...eripheral device symptoms Symptom Corrective Procedure USB ports do not work COM ports do not work 1 Reseat the I O cable 2 Reinstall the drivers 3 Replace the mainboard Boot symptoms Symptom Correcti...

Страница 57: ...er Jumper Setting Description JLV1 LCD Backlight Inverter Power Select Jumper 1 2 Closed 5V 2 3 Closed 12V JLV2 LCD Panel Power Select Jumper 1 2 Closed 3 3V 2 3 Closed 5V JLV3 Backlight Control Mode...

Страница 58: ...P T E R 4 L O C AT I N G T H E P R O B L E M Jumper Setting Description JP2 COM3 Power Select Jumper 1 2 Close 5V 3 4 Close RING 5 6 Close 12V JCMOS Clear CMOS Jumper 1 2 Close Clear CMOS 2 3 Close K...

Страница 59: ...ctors connector to LCD panel connector to MSR connector to SATA HDD connector to HDD power connector to speaker connector to touch panel connector to PS 2 port connector to parallel port connector to...

Страница 60: ...52 C H A P T E R 4 L O C AT I N G T H E P R O B L E M...

Страница 61: ...he SP 600 A Dam age due to unauthorized servicing is not covered by the warranty Safety and precautions Computer components and electronic circuit boards can be damaged by discharges of static electri...

Страница 62: ...compo nents and may cause malfunction Adequate lighting and proper tools can prevent you from accidentally damaging the internal components Most of the electrical and mechanical connections can be dis...

Страница 63: ...55 MSR 1 Remove two screws 2 Disconnect the cable 3 Remove the MSR Customer Display 1 Remove two screws 2 Disconnect the cable 3 Remove the customer display...

Страница 64: ...connect the power cord from the power outlet 3 Press and the hard drive com partment cover as it shown on the picture 4 Turn the screw counterclockwise to loosen the hard drive tray HDD 5 Slide the ha...

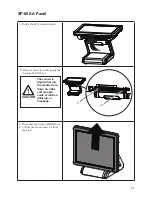
Страница 65: ...emove two screws that secure the base to the SP 600 A The screen is fragile Placing the monitor face down on a flat soft area pre vents scratches defacing or breakage CAUTION 3 Disconnect power and HD...

Страница 66: ...I N G F I E L D R E P L A C E A B L E U N I T S F R U s Panel Back Cover Before proceeding remove the following FRUs SP 600 A Panel on page 57 1 Remove four screws 2 Gently pull away the top of back...

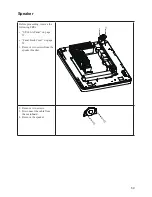
Страница 67: ...proceeding remove the following FRUs SP 600 A Panel on page 57 Panel Back Cover on page 58 1 Remove two screws from the speaker bracket 2 Remove two screws 3 Disconnect the cable from the mainboard 4...

Страница 68: ...U N I T S F R U s Power Button Before proceeding remove the following FRUs SP 600 A Panel on page 57 Panel Back Cover on page 58 1 Remove two screws from the power button bracket 2 Remove two screws...

Страница 69: ...on page 57 Panel Back Cover on page 58 1 Remove ten screws from the het sink 2 Remove the heat sink CAUTION To avoid the heat sink clearance issue When you replace the heat sink check the thermal pads...

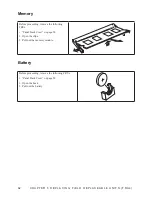
Страница 70: ...L E U N I T S F R U s Memory Before proceeding remove the following FRUs Panel Back Cover on page 58 1 Open the clips 2 Pull out the memory module Battery Before proceeding remove the following FRUs P...

Страница 71: ...Shield Before proceeding remove the following FRUs SP 600 A Panel on page 57 Panel Back Cover on page 58 1 Remove all screws from the I O ports 2 Remove two screws from the I O shield 3 Remove the I O...

Страница 72: ...FRUs SP 600 A Panel on page 57 Panel Back Cover on page 58 Heat Sink on page 61 I O Shield on page 63 1 Disconnect all cables from the mainboard 2 Remove four screws 3 Remove the mainboard CAUTION To...

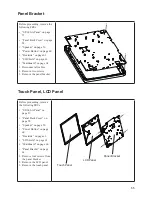
Страница 73: ...ll cables 2 Remove two screws 3 Remove the panel bracket Touch Panel LCD Panel Before proceeding remove the following FRUs SP 600 A Panel on page 57 Panel Back Cover on page 58 Speaker on page 59 Powe...

Страница 74: ...66 C H A P T E R 5 R E P L A C I N G F I E L D R E P L A C E A B L E U N I T S F R U s...

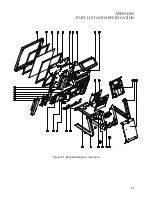
Страница 75: ...67 APPENDIX PART LIST AND SPECIFICATION Figure 6 1 Exploded diagram main parts...

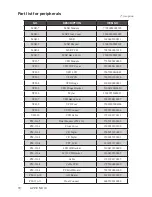
Страница 76: ...5002500M2001 14 MSR Body 7005000001015 15 MSR Cover 25002500M2001 16 HDD Compartment Cover 25003500S0103 17 Back Cover 25002500S0105 18 Power Bottom 25003500S0104 19 IO Cover 25003500S0109 20 VFD 7705...

Страница 77: ...69 Figure 6 2 Exploded peripheral parts PM 116 VFD MSR...

Страница 78: ...0050 VFD 6 Mylar 2509075500M21 VFD 7 VFD Base Cover 2500250410007 VFD 8 VFD Foot 2509030500B00 VFD 9 VFD Connect 25003500S0106 VFD 10 VFD Cable 1721200170011 PM 116 Dual Module PM 116 7705920100000 PM...

Страница 79: ...rface Memory 204pin DDR3 SO DIMM 2GB 1 DIMM Socket Ethernet 10 100 1000 Mbps Gigabit Ethernet Storage Internal 2 5 type SATA HDD x 1 I O Interface 3 COM ports COM1 3 on rear I O Powered with DC 0 5 12...

Страница 80: ...r Smart Card Reader I Button RFID reader Operation System Windows 7 POSReady7 Linux ubuntu Power Supply AC100 240V DC12V 90watt power adaptor Dimensions Physical 360mm W x240mm D x365mm H LCD 15 tilt...

Отзывы: