background image

C H A P T E R   1   G E T T I N G   S TA R T E D

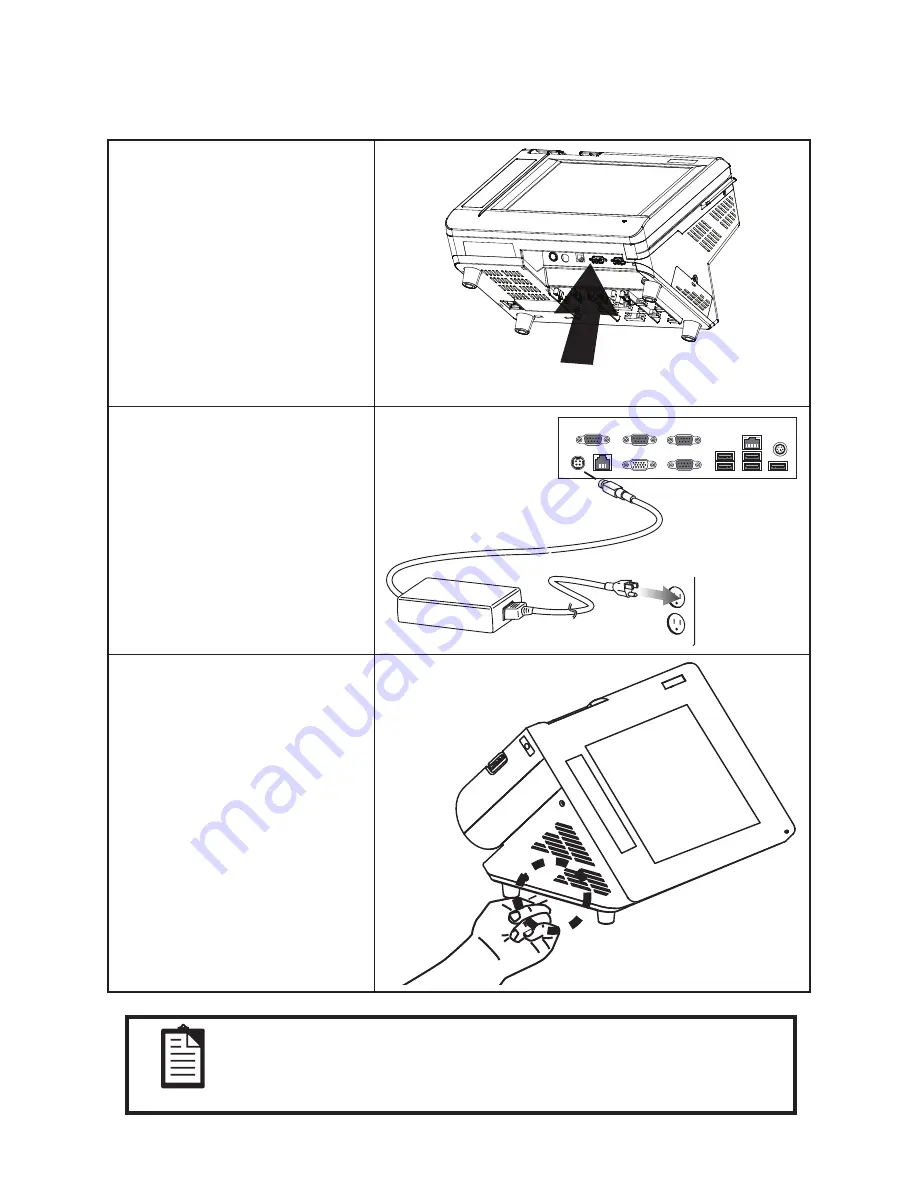
Powering the machine on and off

Refer to the following to power on and off the machine.

1.  Locate the I/O panel that is at the 

bottom of the machine.

2.  Connect the adapter to the 

power cable, and then insert the 

power plug into an electrical outlet 

(AC100 - 240 V).

3.  Press the power button, it’s at the 

bottom left of the machine. The 

power LED turns on.

4.  To turn off the machine, shut down 

the operating system. The main 

power turns off automatically.

NOTE

You may need to force power off the machine, for example if the 

operating system you are using does not support power down by the OS 

or if the system crashes or hangs. To force power off , long press the 

power button for five seconds. 

Содержание PT-6210-E

Страница 1: ...All in one POS Terminal PT 6210 E User Manual...

Страница 2: ......

Страница 3: ...pment generates uses and can radiate radio frequency energy and if not installed and used in accordance with the instructions may cause harmful interference to radio communications However there is no...

Страница 4: ...n shock and damage to the components Only use the power source indicated on the marking label If you are not sure contact your dealer or the Power Company The unit uses a three wire ground cable which...

Страница 5: ...jam 11 CHAPTER 2 BIOS SETUP 13 About the Setup Utility 13 Entering the Setup Utility 14 BIOS navigation keys 14 Using BIOS 15 Standard CMOS features 16 Advanced BIOS Features 18 Hard Disk Boot Priori...

Страница 6: ...re you begin 36 Upgrading the hard drive 37 APPENDIX 39 Troubleshooting 39 Tips for Troubleshooting 39 The Power On Self Test 39 Beep Errors at POST 39 Beep Message Errors at POST 40 General Problems...

Страница 7: ...necting a cash drawer on page 7 Powering the machine on and off on page 8 Installing the thermal paper roll on page 9 Using the feed button on page 10 Clearing a thermal printer paper jam on page 11 U...

Страница 8: ...age contents After you unpack the device check that the following items are included If any item is missing or appears damaged contact your dealer immediately PT 6210 E Adapter Power Cable 3 thermal p...

Страница 9: ...describes the parts and connectors on the machine Front right view 1 5 2 Figure 1 2 Front right view Component Description 1 Power Button 2 10 4 inch TFT LCD 5 wire Resistive touch 3 IO Panel 4 LED Po...

Страница 10: ...T E D Rear view 4 1 Figure 1 3 Rear view Component Description 1 2x20 VFD customer display 2 80mm thermal receipt printer with cutter and control board 3 Printer paper exit 4 Roller gear door 5 Print...

Страница 11: ...re 1 4 I O connectors 6 3 2 1 4 5 7 8 9 10 Connector Description 1 COM4 port 2 COM3 port 3 COM2 port 4 LAN port RJ 45 5 PS 2 keyboard port 6 12V power connector 7 RJ 11 cash drawer port 8 VGA port 9 C...

Страница 12: ...necting peripheral devices Connecting peripheral devices Peripheral devices such as a printer or scanner can be connected to the machine Refer to the user manual of the device you are connecting for i...

Страница 13: ...cate the I O panel that is at the bottom of the machine 2 Connect the RJ 11 cable from the cash drawer to the RJ 11 connec tor on the I O Panel Cashdrawer The cash drawer RJ 11 connector is DC 24V Ens...

Страница 14: ...lug into an electrical outlet AC100 240 V 3 Press the power button it s at the bottom left of the machine The power LED turns on 4 To turn off the machine shut down the operating system The main power...

Страница 15: ...Pull a portion of the paper over the printer output part 4 Close the cover and press it down until you feel a click After installation the printer will automatically feed a few lines For the papre typ...

Страница 16: ...use the feed button Press the feed button once and one line paper is fed Hold on to the feed button and it keeps feeding paper It will stop when you release it Hold on to the feed button before you p...

Страница 17: ...1 Clearing a thermal printer paper jam To clear a thermal printer paper jam 1 Remove the small cover from the top case of the thermal printer 2 Try rotating the roller gear manu ally to free the paper...

Страница 18: ...12 C H A P T E R 1 G E T T I N G S TA R T E D...

Страница 19: ...n page 23 Power Management Setup on page 28 PnP PCI Configurations on page 29 PC Health Status on page 31 Frequency Voltage Control on page 32 Other BIOS Options on page 33 About the Setup Utility The...

Страница 20: ...menu F1 Displays a screen that describes all key functions F5 Loads previously saved values to CMOS F6 Loads a minimum configuration for troubleshooting F7 Loads an optimum set of values for peak perf...

Страница 21: ...the highlight to other options When an option is highlighted execute the option by pressing Enter Some options lead to pop up dialog boxes that prompt you to verify that you wish to execute that opti...

Страница 22: ...ory This field displays the amount of conventional memory detected by the system during boot Extended Memory This field displays the amount of extended memory detected by the system dur ing boot Total...

Страница 23: ...ensation is a feature whereby the HDD uses a stronger magnetic field to write data in sectors that are closer to the center of the disk In CAV recording in which the disk spins at a constant speed the...

Страница 24: ...ond and Third boot devices Boot Up Numlock Status This field is used to select power on state for NumLock Small Logo EPA Show This item enables you to show the company logo on the bootup screen Phoeni...

Страница 25: ...T380815AS 2 Bootable Add in Cards Item Help Move Enter Select PU PD Value F10 Save ESC Exit F1 General Help F5 Previous Values F6 Fail Safe Defaults F7 Optimized Defaults Figure 2 5 Hard Disk Boot Pri...

Страница 26: ...twork Boot Priority 1 Legacy Lan Card Item Help Move Enter Select PU PD Value F10 Save ESC Exit F1 General Help F5 Previous Values F6 Fail Safe Defaults F7 Optimized Defaults Figure 2 6 Network Boot P...

Страница 27: ...column addresses and manufacturer CAS Latency Time When the DRAM Timing Selectable is set to Manual this field is adjustable When synchronous DRAM is installed the number of clock cycles of CAS laten...

Страница 28: ...Port 4 This item is used to enable disable the LAN4 PCI Express Port 5 This item is used to enable disable the LAN5 PCI Express Port 6 This item is used to enable disable the LAN6 PCI E Compliancy Mo...

Страница 29: ...Port 3 4 5 6 These items allow you to select an address for the third and fourth serial ports The default setting is 3E8 2E8 4F8 4E8 Serial Port 3 4 5 6 Use IRQ These items allow you to select an cor...

Страница 30: ...supported On Chip Primary Secondary PCI IDE Use this item to enable or disable the PCI IDE channels that are integrated on the mainboard IDE Primary Secondary Master Slave PIO Each IDE channel suppor...

Страница 31: ...t Setting Combined Mode will make PATA and SATA combined Max of 2 IDE drives in each channel primary master slave secondary master slave Enhanced Mode allows max of 6 IDE drives supported SATA Only wi...

Страница 32: ...efault setting is 3F8 IRQ4 2F8 IRQ3 PWRON After PWR Fail This feature allows you to set the power on action to be taken when the system recovers from a power failure Figure 2 11 SuperIODevice submenu...

Страница 33: ...USB 1 0 Controller This item must be enabled to use the Universal Serial Bus ports on the mainboard USB 2 0 Controller The USB 2 0 Controller item allows USB 2 0 functionality USB Operation Mode This...

Страница 34: ...er down the system can be resumed by Wake Up Alarms This item lets you install a software power down that is controlled by the normal power button on your system If the item is set to Instant Off then...

Страница 35: ...any PnP configuration data stored in the BIOS Setup is cleared from memory Maximum Payload Size This feature determines the maximum TLP Transaction Layer Packet payload size that can be supported by t...

Страница 36: ...ned to PCI Device IRQ 15 assigned to PCI Device Item Help Move Enter Select PU PD Value F10 Save ESC Exit F1 General Help F5 Previous Values F6 Fail Safe Defaults F7 Optimized Defaults IRQ Resources T...

Страница 37: ...particular setting Shutdown Temperature This item allows setting the shutdown temperature Once enabled the machine will automatically shutdown when the temperature reaches the limit specified Phoenix...

Страница 38: ...Interference The Spread Spectrum function reduces the EMI generated by modulating the pulses so that the spikes of the pulses are reduced to flatter curves If you do not have any EMI problem leave the...

Страница 39: ...d optimized defaults for all appropriate items in the Setup Utility The optimized defaults place demands on the system that may be greater than the performance level of the components such as the CPU...

Страница 40: ...SWORD DISABLED Press any key to continue 4 Press any key You are prompted to confirm the password Confirm Password 5 Type the password again and press Enter or press Enter if you are deleting a passwo...

Страница 41: ...ectrical shorts If the LCD breaks and fluid gets onto your hands or into your eyes immediately wash with water and seek medical attention Only qualified personnel should perform repairs on the PT 6210...

Страница 42: ...tools can prevent you from accidentally damaging the internal components Most of the electrical and mechanical connections can be disconnected by using your fingers It is recommended that you do not...

Страница 43: ...through the operating system 2 Disconnect the power cord from the power outlet 3 Remove the one screw 4 Pull out the hard drive tray 5 Disconnect the power cable and SATA cable from the hard drive 6 R...

Страница 44: ...38 C H A P T E R 3 U P G R A D I N G C O M P O N E N T S...

Страница 45: ...chnical support or for passing on to service personnel Use some other electrical device to confirm that the electrical outlet is working Ensure all connections are securely attached The Power On Self...

Страница 46: ...Have the PT 6210 E serviced HARD DISK S FAIL 40 HDD controller diagnostics failed Have the PT 6210 E serviced HARD DISK S FAIL 20 HDD initialization error Have the PT 6210 E serviced HARD DISK S FAIL...

Страница 47: ...An unidentified message is displayed Reboot the computer and run the BIOS Setup Utility Confirm the Setup Utility parameters If the same message is displayed after booting up again have the PT 6210 E...

Страница 48: ...em you should have the terminal serviced Pack the terminal in the original carton See Unpacking the PT 6210 E on page checklist of the steps you took when trying to fix the problem The information may...

Страница 49: ...port 24V 1 PS2 Keyboard port 1 RJ 45 LAN port 4 USB ports 1 DC 12V 1 VGA port OS WEPOS POSReady Windows XP Pro Windows XP embedded Adaptor AC 100V 240V DC12V 12 5A 150 watt power adaptor Temperature Q...

Страница 50: ...G CO LTD Original paper No TF77KS E NIPPON PAPER INDUSTRIES CO LTD Original paper No KT55 Koehler Notes 1 Print quality may differ depending on paper type 2 Use the certified paper Otherwise proper pr...

Отзывы: