background image

17

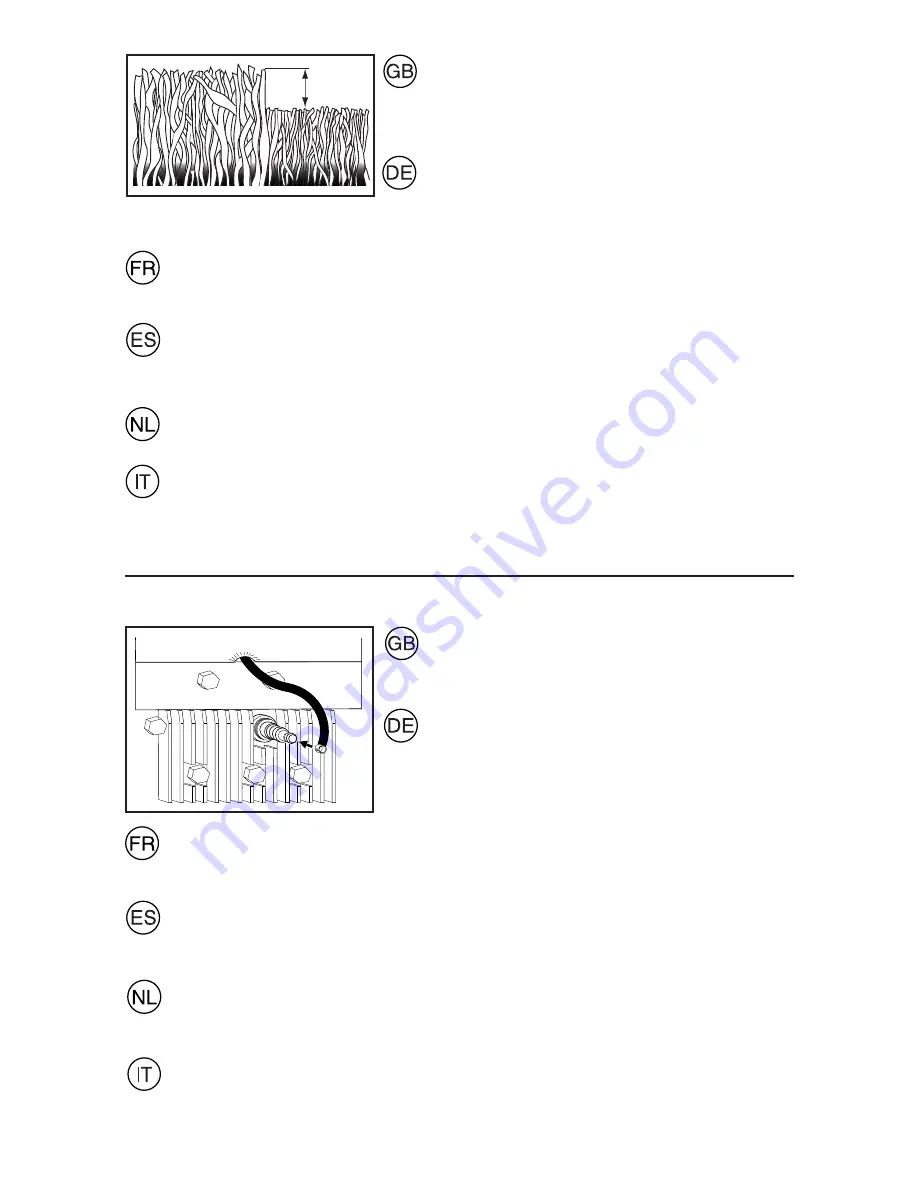
Au cours de la période de croissance intensive, coupez l'herbe au moins deux fois par semaine.  Ne jamais 
couper plus de 1/3 de la hauteur de l'herbe, particulièrement en période de sécheresse.  Tondez la première fois 
avec la tondeuse réglée sur une position haute de coupe.  Vérifi ez le résultat et abaissez ensuite à la hauteur 
souhaitée.  Si l'herbe est très haute, passez la tondeuse lentement, éventuellement, la passer deux fois.

Cuando la hierba crece rápidamente es necesario cortar el césped doa veces por semana.  No es conveniente 
cortarla en más de una tercera parte de su largo, sobre todo en perfodos secos.  El primer corte se hace 
con el cortacésped en una de sus posiciones más altas y, después de obsérvar el resultado, se ajusta a la 
altura deseada.  Si la hierba está muy alta se recomienda pasar el cortacésped a poca velocidad o cortar 
el césped dos veces seguidas.
    
Maai het gazon twee maal per week in de grootste groeiperiode.  Niet meer dan 1/3 van de totale lengte 
maaien, vooral niet in een droge periode.  Indien het gras erg lang is, eerst in de hoogste maaistand maaien, 
daarna oop de gewenste maaihoogte instellen.  Eventueel twee maal maaien.

Falciare l'erba 2 volte la settimana nel periodo della massima crescita.  Non tagliare mai più di 1/3 della 
lunghezza dell'erba, specialmente nei periodi di siccità.  La prima volta, faciare con il tosaerba regolato ad 
una delle maggiori altezze.  Controllare il risultato e portare quindi il tosaerba all'altezza desiderata.  Se l'erba 
è molto alta, falciare lentamente, eventualmente faciare 2 volte.

Mow the lawn twice weekly during the most active periods of 
growth.  Never cut more than 1/3 of the length of the grass, 
especially during dry periods.  Mow with a high cutting height 
setting the fi rst time.  Examine the result and lower the mower 
to the desired setting.  Mow slowly or mow the grass twice if it 
is very long.

Mähen Sie das Gras bei starkem Wachstum zweimal wöchentlich.  
Mähen Sie niemals mehr als 1/3 der Graslänge.  Dies gilt be-
sonders für trockene Perioden.  Mähen Sie danach das Resultat 
und stellen Sie dann die erwuunschte Schnitthöhe ein.  lst das 
Gras besonders hoch, fahren Sie langsam mit dem Rasenmäher.  
Mähen Sie gegebenenfalls zweimal.

MAX 1/3

Maintenance

Always remove the spark plug lead

 before repair, cleaning or 

main te nance work.  After 5 hours running time, tighten screws 
and nuts.  Check the oil.  The 

spark plug

 must be 

at the highest 

point

 on the mower when it is tilted up.

Wartung

Ziehen Sie immer das Zündkerzenkabel ab

, bevor Sie mit 

der Reparatur, Reinigung oder mit Wartungsarbeiten beginnen.  
Nach den ersten 5 Betreibstunden alle Schrauben und Muttern 
überprüfen.  Ölstand kontrollieren.  Wenn der Rasenmäher 
gekippt wird, müssen sich 

die Zündkerze an der höchsten 

Stelle 

befi nden. 

Entretien

Toujours débrancher la bougie 

avant réparation, nettoyage ou entretien.  Après 5 heures d'utilisation, 

resserrer vis et écrous.  Vérifi er l'huile.  Lorsque la tondeuse est inclinée sur le côté, il faut que la 

bougie


occupe la position 

la plus élevée

.

Inspeccion

Desconéctese siempre el cable del encendido de la bujía 

antes de hacer una reparación, limpieza o 

trabajo de mantenimiento.  Vovler a apretar tuercas y tornillos después de cinco horas de trabajo.  Contrólose 
el aceite.  Si se coloca el cortacésped de lado, el punto más alto debe ser 

la bujía.

Onderhoud

Voordag u begint met schoonmaken, reparaties of afstellen, 

altijd eerst de bougiekabel losmaken.  

Bouten 

en moeren kontroleren ma vijf draaiuren.  Oliepeil kontroleren en zonodig bijvullen.  Als de maaier op de 
zijkant wordt gelegd, zorg dan dat 

de bougie 

naar 

boven

 zign gericht.

Manutenzione

Manutenzione: Staccare sempre il cavo di accensione

 prima di riparazioni, pulizie o lavori di menutenzione.  

Dopo 5 ore di funzionamento stringere viti e dadi.  Controllare l'olio.  Piegando la falciatrice sul fi ancolare 
attenzione che 

la candela sia il punto più alto.

Содержание PP6553D

Страница 1: ...ions carefully and make sure you understand them before using this machine Anleitungshandbuch Bitte lesen Sie diese Anleitungen sorg fältig durch und vergewissern Sie sich daß Sie diese verstehen bevor Sie die Maschine in Betrieb nehmen Instructieboekje Lees deze instructies aandachtig en zorg dat u ze begrijpt voordat u deze machine gebruikt Manuale di istruzioni Prima di utilizzare la macchina l...

Страница 2: ...ONTAGGIO 11 13 REGOLAZIONE 14 AVVIAMENTO ED ARRESTO 15 16 USO DELLA FALCIATRICE 17 MANUTENZIONE 17 20 INFORMAZIONI GENERICHE 20 CONTENTS SAFETY RULES PAGE 3 8 TECHNICAL DATA 9 OVERVIEW 10 ASSEMBLY 11 13 ADJUSTMENTS 14 START AND STOP 15 16 USE 17 MAINTENANCE 17 20 GENERAL INFORMATION 20 INHALTSVERZEICHNIS SICHERHEITSREGELN SEITE 3 8 TECHNISCHE DATEN 9 ÜBERSICHT 10 MONTIEREN 11 13 EINSTELLUNG 14 STA...

Страница 3: ...nd from the area to be mowed Neveroperatethelawnmowerwithdefectiveguards or without safety devices for example deflectors and or grass catchers in place Do not change the engine governor settings or over speed the engine Operating the engine at excessive speed may increase the hazard of personal injury Disengage all blade and drive clutches before starting the engine Start the engine or switch on ...

Страница 4: ...nRasenmäherniemitdefektenSchutzab deckungen oder nicht in Position befindlichen Schutz vorrichtungen wie beispielsweise Leitblechen und oder Grasfänger Die Einstellung des Drehzahlreglers nicht ändern und die Drehzahl des Motors nicht über die Werkspezifikationen heraufsetzen Der Betrieb des Motors bei zu hohen Drehzahlen kann die Gefahr von Körperverletzungen vergrößern Vor dem Starten der Maschi...

Страница 5: ...r la lame immobile si la tondeuse à gazon doit être inclinée pour le transport lorsqu elle traverse des surfaces autres que le gazon et lorsque vous transportez la tondeuse à gazon d un endroit à l autre N utilisez jamais la tondeuse à gazon avec des pro tections défectueuses ou sans dispositif de sécurité comme par exemple des déflecteurs ou bacs à herbe en place Conserverlerégimederotationdumote...

Страница 6: ...arde el motor el silenciador el comportamiento de la batería limpios de césped hojas y de demasiado grasa Verifiquefrecuentementeelrecogedordelcéspedpara ver si hay uso o deterioración Para la seguridad reemplace las partes que estén usadas o dañadas Si el tanque del combustible debe ser vaciado hágalo afuera I Instrucción Lea todas las instrucciones cuidadosamente Famil iarícese completamente con...

Страница 7: ...andstoftank afgetapt moet worden moet dit buiten worden gedaan I Training Lees de instructies aandachtig Zorg dat u vertrouwd bentmetdebedieningselementenenhetjuistegebruik van de machine Laat kinderen of mensen die niet bekend zijn met de instructies de maaimachine niet gebruiken Het is mogelijk dat plaatselijke voorschriften een beperking stellen aan de leeftijd van de bestuurder Maainooitterwij...

Страница 8: ...a da falciare Non utilizzare mai la macchina con protezioni difet tose oppure in assenza di dispositivi di sicurezza ad esempio deflettori e o separatori di erba Non modificare le impostazioni del regolatore del motore né far operare il motore a velocità eccessive Le velocità eccessive possono aumentare il pericolo di infortuni Disinnestare tutte le lame e le frizioni prima di avviare il motore Av...

Страница 9: ...t se trouver sur votre machine ou dans les publications fournies avec le produit Ap prenez à comprendre la signification de ces symboles Estos símbolos pueden aparecer sobre su unidad o en la literatura proporcionada con el producto Aprenda y comprenda sus significados Deze symbolen kunnen op uw machine of in de bij het produkt geleverde documentatie aanwezig zijn Lees en begrijp de betekenis Simb...

Страница 10: ...10 2 3 1 9 4 7 7 6 5 ...

Страница 11: ...Schutz der Abbildung entsprechend anbringen und mit mitgelieferten Befestigungsteilen sichern HINWEIS Die Montage des Fußschutzes ist für den sicheren Betrieb dieser Maschine erforderlich Installez le protecteur de pieds arrière Placez le protecteur comme montré et assurez le avec les attaches fournies REMARQUE Vous devez installer le protecteur de pieds arrière pour que l usage de la machine soit...

Страница 12: ...n der korrekten Stellung festgehalten Assemblage et montage du collecteur d herbe Mettez en place le collecteur d herbe avec sa partie dure vers le bas Passez les fixations plastiques par dessus le cadre Le collecteur se met en place en appuyant le volet au cadre Armado y montaje del colector de hierba Montar el marco en el colector de hierba con la parte dura de éste hacia abajo Poner los ganchos...

Страница 13: ...a Tondeuse POUR LE RAMASSAGE ARRIÈRE Le ramasse herbe est installé POUR LE BROYAGE La volet arrière 1 est fermé POUR ÉJECTER La volet arrière 1 est fermé Le déflecteur de décharge 2 est installé Para Convertir la Segadora PARA EL ENSACADO TRASERO El recogedor del césped instalado PARA EL ACOLCHAMIENTO La tapa posterior 1 cerrado PARA NO RECOGER LA HIERBA La tapa posterior 1 cerrado La protección c...

Страница 14: ...ue estar todas ajustadas a la misma altura pues si no el corte es desigual Het instellen De maaimachine kan op verschillende maaihoogtes worden ingesteld Stel de gewenste maaihoogte in d m v de hendel bij het respectievelijke wiel Druk de hendel tegen het wiel en regel de maaihoogte Alle wielen moeten op dezelfde hoogte ingesteld zijn anders maait de machine ongelijkmatig Regolazione Il tosaerba p...

Страница 15: ...or que ya ha estado funcionando por ajgunos minutos Presionar el mando contra el manillar y tirar rápidamente del mango de arranque Soltar lentamente el cordón de arranque Poner en marcha el motor soltando el mando NOTA En tiempo más frio puede ser necesario repetir los pasos del cebado En tiempo más caluroso el cebar demasiado puede hacer que se ahoge el motor y no va a arrancar Si se ahoga el mo...

Страница 16: ...oli pietre etc Drive Forward drive is engaged 1 and disengaged 2 with the clutch bar at the top of the handle Select ground speed with gear shift lever 3 The farther toward the handle the lever is pulled the faster the unit will travel Lauf Das Ein 1 und Asschalten 2 des Antribes geschieht mit Hilfe des Kupplungsbügels zuoberst am Handgriff MitHilfedesSchalthebels 3 dieFahrgeschwindigkeitwählen Je...

Страница 17: ...r mow the grass twice if it is very long MähenSiedasGrasbeistarkemWachstumzweimalwöchentlich Mähen Sie niemals mehr als 1 3 der Graslänge Dies gilt be sonders für trockene Perioden Mähen Sie danach das Resultat und stellen Sie dann die erwuunschte Schnitthöhe ein lst das Gras besonders hoch fahren Sie langsam mit dem Rasenmäher Mähen Sie gegebenenfalls zweimal MAX 1 3 Maintenance Always remove the...

Страница 18: ...ollo annuale All fine della stagione Rettifica e bilanciamento della lama Rimuovere il cavo di accensione Inserire e rimuovere la lama solamente indossando guanti di protezione Smontare la lama e consegnarla ad una officina di servizio per la rettifica ed il bilanciamento Stringere bene le viti nel rimontaggio Regularly Stop the engine and unscrew the dipstick The level should be between FULL and ...

Страница 19: ... l olio al termine di ogni stagione oppure dopo 25 ore di esercizio Scaldare il motore spengerlo e staccare il cavo della candela Togliere il tappo di scarico sotto il motore e far uscire tutto l olio Rifornire con olio nuovo SAE 30 1 Cleaning of air filter Slacken the screw remove the lid and remove the filter cartridge Reinigung des Luftfilters Schrauben lösen Deckel abnehmen und Filtereinsatz h...

Страница 20: ...ión al suelo permanece invariada la correa de transmisión está desgastada y se tiene que sustituir AVISO Si el segadora comienza a arrastrarse delantero el cable impulsor es demasiado tensado Rote tornillo de apriete manual a la derecha para aflojar el cable impulsor Soms kan de basissnelheid afnemen Corrigeer als volgt Draai de duimschroef 1 naar links om de kabel te spannen De basissnelheid moet...

Отзывы: