


28
GB
3. Plug the battery charger (18) into a
mains outlet.
4. When the battery is fully recharged un-
plug the battery charger (18) from the
mains.
5. Remove the battery (17) from the
charger (18).
Turning on and off
Maintain a fi rm stand and hold the
appliance well with both hands and
at some distance away from your
body. Before turning on the appli-
ance, check that it will not touch any
objects.
1. To turn on, use your thumb to actuate
the switch lock (3), then press the On/
Off switch (2). Release the switch lock.
2. To turn off, release the On/Off switch
(2). There is no continuous operation
mode.
After turning off the appli-
ance, the trimming assembly
will keep revolving for some
time. Allow the trimming as-
sembly to come to a stand-
still. Keep hands and feet
away. Risk of injury!
Remove grass cuttings regularly
from the spool to make sure that cut-
ting is not impaired.
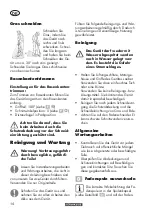
Trimmer settings
To adjust the auxiliary handle:
The auxiliary handle can be set to various
positions. Adjust the handle so that the
spool cap is tilted slightly forward as you
work (see picture below “cutting grass”).
Loosen the screw (27) in the handle and
move the auxiliary handle (5) to your
favourite position. Tighten the screw in
the handle. The latching steps integrated
into the holder prevent the handle
changing position unintentionally.
To adjust the height:
The telescopic shaft allows you to adjust
the appliance to your personal size.
Loosen the threaded bush (8). Adjust
the telescopic shaft (9) to the correct
length and tighten the threaded bush.
To adjust the cutting angle:
Changing the cutting angle lets you trim
grass at places that a diffi cult to reach,
e.g. under benches or wall offsets.
Press the push button (11) on the motor
housing and tilt the telescopic tube (9).
There are 5 positions (see also “Work-
ing Instructions”).
Cutting angle position 1 - 15°
Cutting angle position 2 - 30°
Cutting angle position 3 - 45°
Cutting angle position 4 - 60°
Cutting angle position 5 - 75°
Function as a lawn trimmer:
Cutting angle position 1 - 4
(rotary position 0°)
Function as a lawn edge trimmer:
Cutting angle position 5
(rotary position 180°)
To adjust the handle rod:
The handle rod (6) can be turned by 180°
(see “Work instructions”).
Содержание PRTA 20-Li C3
Страница 119: ...119 BG X 20 V TEAM...
Страница 120: ...120 BG...
Страница 121: ...121 BG PARKSIDE a...
Страница 122: ...122 BG Parkside X 20 V Team 1 15 10 15 2 12 10 3 12 19 4 27 5 5 5 26 4 6 27 26 7 5 27...
Страница 123: ...123 BG 1 17 17a 2 17 17 17b 1 17 2 17 18 3 18 4 18 5 17 18 1 3 2 2 2 27 5...
Страница 124: ...124 BG 8 9 11 9 5 1 15 2 30 3 45 4 60 5 75 1 4 0 5 180 90 180 7 6 0 180 6 0 1 4 16 24 14...
Страница 125: ...125 BG 23 24 180 5 u...
Страница 126: ...126 BG 14 13 1 17 2 13 20 3 14 4 22 5 13 6 21 7 20 8 23 1 24 24...
Страница 127: ...127 BG 1 25 2 14 14 0 C 45 C 2012 19...
Страница 128: ...128 BG www grizzlytools shop 131 5 1 8 91099416 12 37 46 47 91099417 14 9 13600210 16 38 91099405...
Страница 129: ...129 BG 17 17 17 17 2 2 u 14 13 u 17 17...
Страница 130: ...130 BG 3 II 3...
Страница 131: ...131 BG IAN 419713_2204 BG 0800 12220 info kaufland bg IAN 419713_2204 20 63762 33 3 II III...
Страница 141: ...141 20220915_rev02_mt...
Страница 142: ...27 8 9 9 15 1 75 5 11 7 6 16 27 5 4 26 5 2 3 4...
Страница 143: ......