background image

14

GB

IE

NI

Kickback causes and how to 
avoid them

  Caution - kickbacks! Be aware that 

you may experience kickback while 
working with the device. There is a 
risk of injury. Kickbacks can be avo-
ided through taking the appropriate 
care and using the correct sawing 
technique.

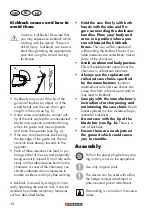
b

a

Bild 1

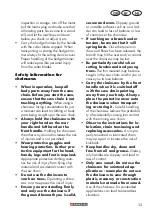
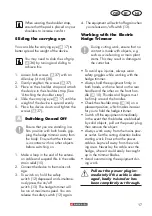
•  Kickbacks may occur if the tip of the 

guide rail touches an object, or if the 
wood bends and the saw chain gets 
caught in the cut (see Fig. b).

•  Under some circumstances, contact with 

tip of the rails can lead to an unexpected 
backwards reaction movement during 
which the guide rails move upwards 
and strike the operator (see Fig. a).

•  If the saw chain becomes stuck along 

the top edge of the guide rail, the rail 
can kick back heavily towards to the 
operator.

•  Each of these reactions can lead to you 

losing control of the saw and potentially 
being seriously injured. Do not rely exclu-
sively on the safety devices built into the 
chainsaw. As user of the chainsaw, you 
should undertake various measures to 
enable accident- and injury-free working.

A kickback is caused by wrongly or incor-
rectly operating the electric tool. It can be 
avoided by suitable cautionary measures, 
such as described below:

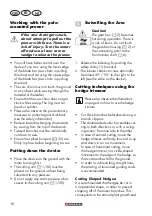
•  Hold the saw irmly with both 

hands with thumbs and in

-

gers surrounding the chainsaw 
handles. Place your body and 
arms in a position where you 
can withstand the kickback 
forces.

 The user will be capable of 

withstanding the kickback forces if sui-
table measures are undertaken. Never 
let go of the chainsaw.

• 

Avoid an abnormal body posture.


This will enable better control over the 
chainsaw in unforeseen situations. 

  Always use the replacement 

rails and saw chains speciied 

by the manufacturer.

 Incorrect 

replacement rails and saw chains can 
cause the chain to break apart and/or 
may lead to kickback.

  Comply with the manufacturer’s 

instructions for sharpening and 
maintaining the saw chain.

 Depth 

limiters placed too low increase the po-
tential for kickbacks.

• 

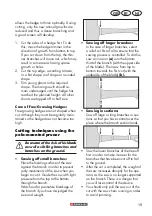
Do not saw with the tip of the 
blade bar (see Fig. b).

 There is a 

risk of kickback.

•  Ensure there are no objects on 

the ground which could cause 
you to stumble.

Assembly

  Pull out the power plug before carry-

ing out any work on the equipment.

  Use only original parts.

  The device can be used with either 

the hedge trimmer attachment or 
pole-mounted pruner attachment.

  Dismantling is carried out in reverse 

order.

Содержание PHSHE 900 A1

Страница 1: ...EXTENDABLE HEDGE TRIMMER POLE PRUNER PHSHE 900 A1 LANGSTIEL HECKENSCHERE HOCHENTASTER Originalbetriebsanleitung EXTENDABLE HEDGE TRIMMER POLE PRUNER Translation of the original instructions IAN 304288...

Страница 2: ...ourself with all functions of the device Klappen Sie vor dem Lesen die Seite mit den Abbildungen aus und machen Sie sich anschlie end mit allen Funktionen des Ger tes vertraut GB IE NI Translation of...

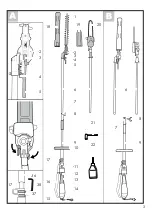
Страница 3: ...3 A B 1 2 3 4 5 6 6 8 8 9 9 10 11 36 38 37 12 13 14 15 16 17 17 18 20 19 7 7 2 3 4 5 21 22...

Страница 4: ...4...

Страница 5: ...r quality and subjected to a inal inspection The functionality of your equip ment is therefore guaranteed It cannot be ruled out that residual quantities of lubri Translation of the original EC declar...

Страница 6: ...or their property The manufacturer is not liable for damages caused by unspeciied use or incorrect operation The blade bar must be checked regularly for wear and reground A blunt blade bar causes the...

Страница 7: ...insula tion and does not require earthing The device is equipped with a hedge trimmer attachment with blade and saw chain and a pole mounted pruning attach ment with blade bar and saw chain The device...

Страница 8: ...ple times during which the power tool is turned off and times when the tool is turned on but is running idle Notes on Safety This section describes the basic safety rules when working with the device...

Страница 9: ...that you can shut off the equipment immediately in an emergency Inap propriate use of the device may result in serious injury If an accident or fault occurs during opera tion immediately switch off th...

Страница 10: ...the cord for carrying pull ing or unplugging the power tool Keep cord away from heat oil sharp edges or mov ing parts Damaged or entangled cords increase the risk of electric shock When operating a po...

Страница 11: ...off Any power tool that cannot be controlled with the switch is dangerous and must be repaired Disconnect the plug from the power source and or the bat tery pack from the power tool before making any...

Страница 12: ...tion servicing or work on the hedge trimmer adjusting the working position of the cutting unit leaving the hedge trimmer unattended Always ensure that the hedge trimmer is properly placed in one of th...

Страница 13: ...es the risk of injury Ensure you are standing irmly and only use the chainsaw if the ground beneath you is solid secure and even Slippery ground or unstable surfaces such as on a lad der can lead to l...

Страница 14: ...ly operating the electric tool It can be avoided by suitable cautionary measures such as described below Hold the saw irmly with both hands with thumbs and in gers surrounding the chainsaw handles Pla...

Страница 15: ...ds at an angle of approx 45 degrees in order to be able to guide the saw chain 20 more easily onto the chain sprocket 29 4 Place the blade bar 28 and saw chain 20 onto the rail bolts 30 When the nose...

Страница 16: ...motor cool down before illing with chain oil Over lowing oil can cause a ire Swivelling Out the Blade Beam 1 Hold the safety blade beam A 1 on the handle to adjust the blade beam 5 2 Unlock the safet...

Страница 17: ...e hedge trimmer will be run at maximum speed You can release the safety switch 12 again 4 The equipment will switch off again when you release on off switch 13 Working with the Electric Hedge Trimmer...

Страница 18: ...ed to any pressure Do not apply any static pressure what soever to the cutting unit A 1 20 Swivelling the Arm Caution The gear box A 2 becomes hot during operation There is a risk of burns Do not touc...

Страница 19: ...Place the locating surface of the saw against the branch in order to prevent jerky movements of the saw when you begin to cut it Guide the saw with light pressure from the top to the bottom through th...

Страница 20: ...described in this manual should always be carried by our Service Centre Use only original parts Pull out the power plug before carry ing out any work on the equipment Wear gloves while handling the b...

Страница 21: ...w chain Never attach a new saw chain onto worn teeth or onto a damaged or worn blade bar 1 Switch the device off and remove the mains plug 2 Release the nut 26 and remove the chain wheel cover 27 3 Re...

Страница 22: ...e in the protective cover A 18 19 provided in a dry location and out of reach of children You can hang up the device for storage using the handgrip for adjusting the cut ter bar A 1 Empty the oil tank...

Страница 23: ...Blades A 1 are blunt Have the blades A 1 sharpened or replaced Service Centre Blades A 1 are notched Have the blades A 1 checked or replaced Service Centre Too much friction due to lack of lubrication...

Страница 24: ...pro duced in accordance with strict quality guidelines and conscientiously checked prior to delivery The guarantee applies for all material and manufacturing defects This guarantee does not extend to...

Страница 25: ...ipment sent carriage forward or by bulky goods express or other special freight will not be accepted We will dispose of your defective devices free of charge when you send them to us Service Center GB...

Страница 26: ...37 S gekette montieren 37 Inbetriebnahme 38 Kettenschmierung 38 Ausschwenken des Messerbalkens 38 Ausschwenken des Hochentasters 39 Schultergurt befestigen 39 Original EG Konformit tserkl rung 51 Exp...

Страница 27: ...verantwortlich Der Hersteller haftet nicht f r Sch den die durch bestimmungswidrigen Gebrauch oder falsche Bedienung verursacht wurden Der Messerbalken ist regelm ig auf Abnutzung zu kontrollieren un...

Страница 28: ...er t besitzt als Antrieb einen Elektromotor Das Ger t ist zur Sicherheit schutzisoliert und ben tigt keine Erdung Das Ger t ist ausgestattet mit einem He ckenscheren Aufsatz mit Sicherheitsmes serbalk...

Страница 29: ...r angegebene Schwingungsemissions wert ist nach einem genormten Pr fverfah ren gemessen worden und kann zum Ver gleich eines Elektrowerkzeugs mit einem anderen verwendet werden Der angegebene Schwingu...

Страница 30: ...ertl nge vol 120 ml ltankvolumen Allgemeine Sicherheitshinweise Bevor Sie mit dem Ger t arbeiten machen Sie sich mit allen Bedientei len gut vertraut ben Sie den Um gang mit dem Ger t und lassen Sie s...

Страница 31: ...Ablenkung k nnen Sie die Kontrolle ber das Ger t verlieren Elektrische Sicherheit Vorsicht So vermeiden Sie Unf lle und Verletzungen durch elektri schen Schlag Der Anschlussstecker des Elek trowerkzeu...

Страница 32: ...der Geh rschutz verringert das Risiko von Verletzungen Vermeiden Sie eine unbeab sichtigte Inbetriebnahme Ver gewissern Sie sich dass das Elektrowerkzeug ausgeschaltet ist bevor Sie es an die Strom ve...

Страница 33: ...gt ist Lassen Sie besch digte Teile vor dem Einsatz des Ger tes reparieren Viele Unf lle haben ihre Ursache in schlecht gewarteten Elektrowerkzeu gen Halten Sie Schneidwerkzeuge scharf und sauber Sorg...

Страница 34: ...ine Brandgefahr zu vermindern achten Sie darauf dass der Motor frei von Ablagerungen und Laub ist Stellen Sie immer sicher dass alle Griffe und Sicherheitseinrichtungen bei Gebrauch der Heckenschere a...

Страница 35: ...festem sicherem und ebenem Grund stehen Rutschiger Untergrund oder instabile Standl chen wie auf einer Leiter k nnen zum Verlust des Gleichgewichtes oder zum Verlust der Kontrolle ber die Kettens ge f...

Страница 36: ...seinrichtungen Als Benutzer einer Kettens ge sollten Sie verschiedene Ma nahmen ergreifen um unfall und verletzungsfrei arbeiten zu k nnen Ein R ckschlag ist die Folge eines falschen oder fehlerhaften...

Страница 37: ...ontieren Beachten Sie die korrekte Laufrich tung der S gekette Diese ist auf der Kettenradabdeckung 27 und oberhalb des Schienenbolzens 30 angegeben Spannen Sie die S gekette nach den ersten 5 6 Schni...

Страница 38: ...der S gekette ab da die S gekette schneller stumpf wird Zu wenig l erkennen Sie an Rauch entwicklung oder Verf rbung des Schwertes Sobald der Motor l uft lie t das l zum Schwert Ketten l einf llen Pr...

Страница 39: ...chnalle am Schultergurt Achten Sie beim Tragen des Schul tergurts darauf dass sie das Pad auf Ihrer Schulter platzieren f r einen h heren Tragekomfort Trage se verschieben Sie k nnen die Trage se A 17...

Страница 40: ...egen Sie das Kabel nie ber die Hecke wo es leicht von den Messern erfasst werden kann Vermeiden Sie die berbeanspru chung des Ger tes w hrend der Ar beit Ziehen Sie sofort den Netz stecker wenn das Ka...

Страница 41: ...f und ab Bewegen Sie beim waagrechten Schnitt die Heckenschere sichelf rmig zum Rand der Hecke damit abgeschnittene Zweige zu Boden fallen Um lange gerade Linien zu erhalten empiehlt es sich Schn re z...

Страница 42: ...tten ab damit Sie eine Kontrol le ber den Aufschlagort haben S gen Sie die unteren ste am Baum zuerst ab um ein Herabfallen der ge schnittenen ste zu erleichtern Nach Beenden des Schnittes erh ht sich...

Страница 43: ...Heckenschere vor jedem Gebrauch auf offensichtliche M ngel wie lose abgenutzte oder be sch digte Teile Pr fen Sie den festen Sitz der Schrauben im Messerbalken Schneiden Sie nicht mit stumpfen oder a...

Страница 44: ...ie den Netzstecker 2 L sen Sie die Mutter 26 und nehmen Sie die Kettenradabdeckung 27 ab 3 Nehmen Sie die alte S gekette 20 ab Das Montieren und Spannen der neuen S gekette ist im Kapitel Montage be s...

Страница 45: ...er t mit mitgeliefer ter Schutzabdeckung A 18 19 trocken und au erhalb der Reichweite von Kin dern auf Lagern Sie das Ger t liegend oder gegen Umfallen gesichert Sie k nnen das Ger t zur Lagerung am H...

Страница 46: ...t werden Nach Ablauf der Garantiezeit anfallende Reparaturen sind kostenplichtig Garantieumfang Das Ger t wurde nach strengen Qualit ts richtlinien sorgf ltig produziert und vor Anlieferung gewissenha...

Страница 47: ...liegen gegen Berechnung von unserer Service Niederlassung durchf hren lassen Sie erstellt Ihnen gerne einen Kos tenvoranschlag Wir k nnen nur Ger te bearbeiten die ausreichend verpackt und frankiert e...

Страница 48: ...Service Center Kohleb rsten abgenutzt Motor defekt Ger t arbeitet mit Unterbrechungen Netzkabel besch digt Netzkabel berpr fen ggf Wech sel durch unser Service Center Interner Wackelkontakt Reparatur...

Страница 49: ...49...

Страница 50: ...61000 3 2 2014 EN 61000 3 3 2013 EN 62321 2009 We additionally conirm the following in accordance with the 2000 14 EC emissions guideline sound power level Hedge trimmer Pole mounted pruner guarantee...

Страница 51: ...00 3 3 2013 EN 62321 2009 Zus tzlich wird entsprechend der Ger uschemissionsrichtlinie 2000 14 EC best tigt Schallleistungspegel Heckenscheren Aufsatz Hochentaster Aufsatz garantiert 103 dB A 104 dB A...

Страница 52: ...52...

Страница 53: ...53 20181203_rev02_sh Explosionszeichnung Exploded Drawing PHSHE 900 A1 informativ informative...

Страница 54: ...C E 5 3 3 4 4 10 23 9 25 32 33 11 34 21 31 35 26 20 30 29 28 27 24 D...

Страница 55: ......

Страница 56: ...GRIZZLY TOOLS GMBH CO KG Stockst dter Stra e 20 DE 63762 Gro ostheim GERMANY Last Information Update Stand der Informationen 11 2018 Ident No 75021207112018 GB IE NI IAN 304288...

Отзывы: