Parkside PFE 50 A1 Скачать руководство пользователя страница 11

PFE 50 A1

GB

IE

 7


Press the on/off switch on the handle   to start 
the pump, drawing paint into the roller via the 
hose (depending on the type of paint, this can 
take up to 1 minute).


Once the paint has reached the paint roller   

 and this has soaked with color, you can start 

painting.


Turn off the on/off switch 


while painting.


Press the on/off switch   when you need to 
re-color of the paint roller    .

Work breaks of up to 4 hours


Switch off the appliance.


Place the paint roller     immediately into a 
plastic bag and tie it air-tight.


Leave the intake hose in the paint.

Longer work breaks


Switch off the appliance.


Place the paint roller     in a bucket filled 
with water.


Leave the intake hose   in the paint.


Sprinkle a little water onto the surface of the 
paint in the paint container to stop it from form-
ing a skin.

Shutting down and cleaning

Thorough cleaning is essential for proper 
operation of the paint application appliance. 
No warranty claims will be accepted for 
insufficient or improper cleaning.

NOTE


Only use water for cleaning. Ideally, use luke-
warm water with a little dishwashing liquid.


Switch off the appliance on the main switch   
(“O”).


Scrape the paint roller     off on the edge of 
the paint container.


Remove the paint roller     by pressing the 
locks on the roller bracket  .


Hold the paint roller     firmly with a cloth 
and push the cap   downwards to lever it out 
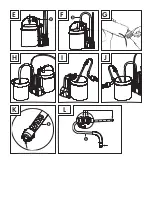
(see fig. G). Pull the inner roller   out of the 
paint roller    .


Clean all parts of the paint roller     in luke- 
warm water.


Hang the end of the intake hose   in a bucket 
of water (see fig. H).


Switch on the appliance on the main switch   
(“I”).


Hold the roller bracket   over the paint bucket 
and press the on/off switch   to pump the 
paint out of the hose into the paint bucket (see 
fig. I).


Switch the pump off again as soon as water 
starts coming out of the roller bracket  .


Hang the roller bracket   in a bucket of water 
(see fig. J). If available, you can also hang the 
roller bracket   in an empty bucket. This will 
prevent dirty water from being pumped back 
into the system and improves the cleaning 
effect.


Press the on/off switch   to start the self-
cleaning process. Circulate water through the 
appliance for about 10 minutes to clean it. If 
necessary, replace the water.

NOTE


It is possible that minor paint residues remain 
in the hose. This is normal and has no nega-
tive influence on future work.

 CAUTION!


After cleaning, pump all of the water out of 
the appliance and the hose. If any water 
remains in the pump, there is a risk of ice 
damage if the temperature falls below 0°C.


Remove the roller bracket   from the handle  .


Wipe all parts thoroughly to assure proper 
functioning.

Содержание PFE 50 A1

Страница 1: ...3 ELECTRIC PAINT ROLLER PFE 50 A1 ELECTRIC PAINT ROLLER Translation of the original instructions ELEKTRISK MALERRULLE Overs ttelse af den originale driftsvejledning ELEKTRO FARBROLLER Originalbetriebs...

Страница 2: ...ite 21 Before reading unfold the page containing the illustrations and familiarise yourself with all functions of the device F r du l ser vend siden med billeder frem og bliv bekendt med alle apparate...

Страница 3: ...A B C D X...

Страница 4: ...E F G H I J K L...

Страница 5: ...paint rollers 5 Working procedures 5 Preparation for work 6 Prepare the surface to be painted 6 Prepare the paint 6 Prepare paint roller 6 Preparable coating materials 6 Non workable coating material...

Страница 6: ...ler 20 mm Inner roller Cap Roller bracket On o switch pump Handle with supply hose Base unit Height adjustable paint bucket attachment Intake hose Main switch Mains plug Extension adapter Paint roller...

Страница 7: ...es such as in the presence of ammable liquids gases or dust Power tools create sparks which may ignite the dust or fumes c Keep children and bystanders away while operating a power tool Distractions c...

Страница 8: ...se are connected and properly used Use of dust collection can reduce dust related hazards 4 Power tool use and care a Do not force the power tool Use the correct power tool for your application The co...

Страница 9: ...ower tool nameplate Power tools marked with 230 V can also be operated on a 220 V circuit Always place the base unit and paint bucket on a level surface When working on a ladder or a sloping surface t...

Страница 10: ...asy assembling apply a thin coat of lubricating grease at the marked points see g K L NOTE You can also attach standard extensions for paint rollers to the handle can be bought separately in DIY store...

Страница 11: ...Remove the paint roller by pressing the locks on the roller bracket Hold the paint roller rmly with a cloth and push the cap downwards to lever it out see g G Pull the inner roller out of the paint ro...

Страница 12: ...ivery Please retain your receipt as proof of purchase In the event of a warranty claim please contact your Customer Service unit by telephone This is the only way to guarantee the free return of your...

Страница 13: ...kompernass lidl ie IAN 270773 Importer KOMPERNASS HANDELS GMBH BURGSTRASSE 21 44867 BOCHUM GERMANY www kompernass com Translation of the original Conformity Declaration We KOMPERNASS HANDELS GMBH docu...

Страница 14: ...PFE 50 A1 10 GB IE...

Страница 15: ...visninger til maleruller 15 Arbejdsanvisninger 15 Arbejdsforberedelse 16 Forberedelse af over aden 16 Forberedelse af malingen 16 Forberedelse af malerulle 16 Malinger som kan bearbejdes 16 Malinger s...

Страница 16: ...net til erhvervsm ssig brug Udstyr Malerulle 20 mm Indvendig rulle Lukkekappe Rulleb jle T nd slukknap til pumpe H ndtag med materialeslange Basisenhed H jderegulerbar holder til malingspand Sugeslang...

Страница 17: ...nder sig br nd bare v sker gasser eller st v Elv rkt j danner gnister som kan ant nde st vet eller dampene c Hold b rn og andre personer p afstand n r elv rkt jet bruges Hvis du bliver distraheret ka...

Страница 18: ...onteres opsugnings og opsam lingsanordninger skal disse tilsluttes og anvendes korrekt Anvendelse af denne type anordninger neds tter st vrisikoen 4 Anvendelse og h ndtering af elv rkt j a Overbelast...

Страница 19: ...s med oplys ningerne p elv rkt jets typeskilt Elv rkt jer m rket med 230 V kan ogs drives ved 220 V Stil altid basisenheden og malingspanden p en j vn over ade Ved anvendelse p en stige eller et skr n...

Страница 20: ...n af h ndtaget se g B For at sikre korrekt montage p f res der p de markerede steder et tyndt lag sm refedt se g K L BEM RK P produktets h ndtag kan der fastg res et almindeligt forl ngerskaft til mal...

Страница 21: ...vand til reng ringen Der kan med fordel benyttes lunkent vand med lidt opva skemiddel Sluk for produktet ved at s tte hovedafbryderen p O Stryg malerullen af over malingspanden Tag malerullen af rull...

Страница 22: ...ikke h ndtaget i vand ved reng ring Om n dvendigt t rres ogs de vrige dele af produktet af Opbevaring OBS Opbevar altid produktet t mt og t rt et frostfrit sted Stil produktet s ledes at uvedkommende...

Страница 23: ...nges ikke af denne garanti Garantiperioden forl nges ikke hvis der g res brug af garantien Det g lder ogs for udskiftede og reparerede dele Skader og mangler som even tuelt fore ndes allerede ved k b...

Страница 24: ...Maskindirektivet 2006 42 EC Elektromagnetisk kompatibilitet 2014 30 EU RoHS direktivet 2011 65 EU Anvendte harmoniserede standarder EN 60745 1 2009 A11 2010 EN 50580 2012 A1 2013 EN 55014 1 2006 A2 20...

Страница 25: ...ce 25 Erg nzende Sicherheitshinweise f r Farbroller 25 Arbeitshinweise 25 Arbeitsvorbereitung 26 Streich che vorbereiten 26 Farbe vorbereiten 26 Farbwalze vorbereiten 26 Verarbeitbare Beschichtungssto...

Страница 26: ...bestimmt Ausstattung Farbwalze 20 mm Innenrolle Verschlusskappe Rollerb gel Ein Ausschalter Pumpe Handgri mit Materialschlauch Grundger t H henverstellbare Farbeimerbefestigung Ansaugschlauch Hauptsch...

Страница 27: ...are Fl ssigkeiten Gase oder St ube be nden Elektrowerkzeuge erzeugen Funken die den Staub oder die D mpfe entz nden k nnen c Halten Sie Kinder und andere Personen w h rend der Benutzung des Elektrower...

Страница 28: ...iert werden k nnen vergewissern Sie sich dass diese angeschlossen sind und richtig verwendet werden Die Verwendung einer Staubabsaugung kann Gef hrdungen durch Staub verringern 4 Verwendung und Behand...

Страница 29: ...Mit 230 V gekennzeichnete Elektrowerkzeuge k nnen auch an 220 V betrieben werden Stellen Sie die Basiseinheit und den Farbeimer immer auf eine ebene Fl che Beim Betrieb auf einer Leiter oder einem sch...

Страница 30: ...n in den Handgri siehe Abb B Um eine einwandfreie Montage zu gew hrleis ten tragen Sie an den markierten Stellen eine d nne Schicht Gleitfett auf siehe Abb K L HINWEIS Am Handgri des Ger tes kann eine...

Страница 31: ...achge m er Reinigung werden keine Garantiean spr che bernommen HINWEIS Verwenden Sie zur Reinigung nur Wasser Vorteilhaft ist lauwarmes Wasser mit etwas Sp lmittel Schalten Sie das Ger t am Hauptschal...

Страница 32: ...lich ab um eine einwandfreie Funktion zu gew hrleisten WARNUNG Tauchen Sie den Handgri bei der Reini gung nicht in Wasser ein Wischen Sie nach Bedarf auch die restlichen Teile des Ger tes ab Lagerung...

Страница 33: ...r ersetzte und reparierte Teile Eventuell schon beim Kauf vorhandene Sch den und M ngel m ssen sofort nach dem Auspacken gemeldet werden sp testens aber zwei Tage nach Kaufdatum Nach Ablauf der Garant...

Страница 34: ...nrichtlinie 2006 42 EC Elektromagnetische Vertr glichkeit 2014 30 EU RoHS Richtlinie 2011 65 EU Angewandte harmonisierte Normen EN 60745 1 2009 A11 2010 EN 50580 2012 A1 2013 EN 55014 1 2006 A2 2011 E...

Страница 35: ...270773 KOMPERNASS HANDELS GMBH BURGSTRASSE 21 44867 BOCHUM DEUTSCHLAND GERMANY www kompernass com Last Information Update Tilstand af information Stand der Informationen 03 2016 Ident No PFE50A1 11201...

Отзывы: