background image

10

GB

Failure to follow the above instruction may 

cause people or animals to suffer eye 

injuries and/or to lose their sight� Even a 

weak LED light beam is capable of causing 

eye damage�


z

Assembly

Please note:

 remove all packaging material 

from the product� Protect easily damaged 

surfaces before setting up the product�

Please note:

 fully unwind the mains power 

cable� Route the mains power cable in such 

a way that nobody can tread on it or trip 

over it�


z

Setting up the tripod stand


„

Loosen the hand screw (tripod base) 

8

 by 

turning it anticlockwise� 

RISK OF TRAPPING/PINCHING! 

To 

avoid injuries when unfolding the legs, take 

care not to put your hands between the 

tripod base and the legs�


„

Take hold of the tripod base 

6

 at the point 

where the legs are attached, level with the 

hand screw (tripod base) 

8

, and press it 

downwards so that the legs fold out� Once 

the tripod base 

6

 is pushed down as far 

as it will go and the legs are fully extended, 

re-tighten the hand screw (tripod base) 

8


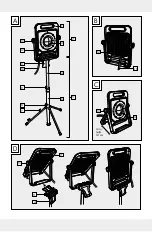
by turning it clockwise (see Fig� A)�


z

Setting the height of the 

tripod stand


„

Loosen the hand screw (telescopic pole) 

9


by turning it anticlockwise (see Fig A)� 


„

Set the tripod stand 

5

 to the desired 

height by pulling up or pushing down the 

telescopic pole 

4

 (see Fig� A)� 


„

Firmly tighten the hand screw (telescopic 

pole) 

9

 by turning it clockwise to fix the 

tripod stand 

5

 at the desired height (see 

Fig� A)�  


z

Mounting the work 

floodlight on the tripod 

stand

RISK OF ELECTRIC SHOCK!


Unplug the mains plug from the 

power outlet socket before mounting 

the floodlight on the tripod stand.


„

Open the mounting clamp 

11

 at the top of 

the telescopic pole 

4

 so that the locking 

handle is facing towards you (see Fig� D)� 


„

Loosen the hand screw (folding bracket) 

13


so that you can fold the floodlight and the 

inner bracket to the rear out of the way� 

Then locate the floodlight 

2

 centrally on 

the open mounting clamp 

11

 with the aid 

of the handle 

1

 (see Fig� D)�

Please note:

 make sure that the back of the 

floodlight is facing the locking handle. 

Otherwise it is not possible to close the 

mounting clamp�

Please note:

 take care to ensure the mains 

power cable is not trapped�


„

Fold down the two rear clips of the 

mounting clamp over the outer folding 

bracket of the floodlight, which is now 

seated in the mounting clamp (see Fig� D)� 

Next, fold down the front clip of the 

mounting clamp over the two rear clips 

previously folded down, so that they 

interlock (see Fig� D)�


„

Press down the locking handle of the 

mounting clamp 

11

 to fix the mounting 

bracket in place (see Fig� D)�


„

Now position the floodlight and inner 

folding bracket centrally over the mounting 

clamp and fix them in position by 

tightening the hand screw 

13

 (see Fig� D)�


z

Operation without tripod 

stand

RISK OF ELECTRIC SHOCK!


Unplug the mains plug from the 

power outlet socket before 

attempting to alter the position of the 

Содержание 366811 2010

Страница 1: ...PRACOVN REFLEKTOR SO STAT VOM Pokyny pre obsluhu a bezpe nostn pokyny CZ PRACOVN LED REFLEKTOR SE STATIVEM Provozn a bezpe nostn pokyny SI DELOVNI LED REFLEKTOR S STOJALOM Navodila za uporabo in varno...

Страница 2: ...namte se v emi funkcemi v robku SK Pred pre tan m vyklopte stranu s obr zkami a n sledne sa obozn mte so v etk mi funkciami v robku DE AT CH Klappen Sie vor dem Lesen die Seite mit den Abbildungen aus...

Страница 3: ...A B C D 1 2 3 4 5 6 9 11 10 13 14 12 7 8 11 2 11 13 4 10 12 13 min najm 10 cm...

Страница 4: ...p 24 i enje 24 Odstranjevanje med odpadke 24 Garancija 24 Servisna slu ba 25 GB HU Introduction 7 Explanation of symbols 7 Intended use 8 Specifications supplied 8 Description of parts 8 Technical dat...

Страница 5: ...noh ho stat vu 36 Zapnutie vypnutie 37 istenie 37 Likvid cia 37 Z ruka 37 Servis 38 Einleitung 39 Zeichenerkl rung 39 Bestimmungsgem e Verwendung 40 Lieferumfang 40 Teilebeschreibung 40 Technische Dat...

Страница 6: ...dren Caution Risk of skin burns from hot surfaces Warning Risk of electric shock b a Dispose of packaging and product in an environmentally friendly manner Not suitable for indoor lighting Lamp suitab...

Страница 7: ...general indoor lighting in the home z zSpecifications supplied 1 work floodlight 1 tripod stand telescopic pole and tripod base 1 instruction manual z zDescription of parts 1 Handle 2 Floodlight 3 LE...

Страница 8: ...y Never use the product if it has any signs of damage Protect the mains power cable from sharp edges mechanical stress and hot surfaces When connecting or disconnecting the cable to from the power sup...

Страница 9: ...kwise to fix the tripod stand 5 at the desired height see Fig A z zMounting the work floodlight on the tripod stand RISK OF ELECTRIC SHOCK Unplug the mains plug from the power outlet socket before mou...

Страница 10: ...t is very dirty dampen the cloth slightly z zDisposal b a Note the labels on the packaging materials when sorting the waste they are marked with abbreviations a and numbers b with the following meanin...

Страница 11: ...are discouraged from or warned of in the manual must be avoided under all circumstances The product is intended for private household use only and not for commercial activities The warranty is void if...

Страница 12: ...at let s balesetvesz ly csecsem kre s gyermekekre Vigy zat g svesz ly forr fel letek miatt Vigy zat ram t s vesz lye b a A csomagol st s a k sz l ket k rnyezetbar t m don juttassa hullad kba Nem csak...

Страница 13: ...k nem alkalmas a h ztart sban helyis g megvil g t s ra z zA csomag tartalma 1 db munkareflektor 1 db h roml b llv ny teleszk pos ny l s h rom l b elem 1 db haszn lati utas t s z zAlkot r szek le r sa...

Страница 14: ...ati k belt hogy arra senki ne l phessen r s abban senki ne tudjon megbotlani KER LJE AZ ELEKTROMOS RAM T S MIATTI LETVESZ LYT A h l zati csatlakoztat s el tt ellen rizze a term ket hogy nincs e rajta...

Страница 15: ...sz tny ltak h zza meg a rec zett fej csavart h rom l b elem 8 az ramutat j r s val megegyez ir nyba ford tva l sd az A k pet z zA h roml b llv ny magass g nak be ll t sa Csavarja ki a rec zett fej csa...

Страница 16: ...lektor bekapcsol s hoz ll tsa a BE KI kapcsol gombot 14 I ll sba Az jb li kikapcsol shoz ll tsa BE KI kapcsol gombot 0 ll sba l sd a B k pet z zTiszt t s RAM T S VESZ LYE Minden tiszt t s el tt h zza...

Страница 17: ...cia nem terjed ki olyan term kr szekre amelyek ki vannak t ve a szok sos elhaszn l d snak s ez rt kop alkatr sznek sz m tanak ill a t r keny elemek s r l seire pl kapcsol akkumul tor vagy veg alkatr s...

Страница 18: ...19 HU IAN 366811_2010 Esetleges k rd seihez tartsa mag n l igazol sk ppen a v s rl si nyugt t s a cikksz mot pl IAN 123456 A haszn lati utas t s aktu lis v ltozat t itt tal lja meg www citygate24 de...

Страница 19: ...t opeklin zaradi vro ih povr in Opozorilo Nevarnost elektri nega udara b a Embala o in napravo odstranite na okolju prijazen na in Ni primerno za razsvetljavo prostorov Svetilke za grobo delovanje Dol...

Страница 20: ...ement 1 x navodila za uporabo z zOpis sestavnih delov 1 Ro aj 2 aromet 3 LED modul 4 Teleskopska palica 5 Trino no stojalo 6 Trino ni element 7 Navijanje kabla 8 Vijak z narebri eno glavo trino ni ele...

Страница 21: ...ite pred ostrimi robovi mehanskimi obremenitvami in vro imi povr inami Kadar priklju ujete ali odklapljate napajanje se dotikajte samo izoliranega predela omre nega vti a Pred monta o demonta o ali i...

Страница 22: ...eskopska palica 9 mo no privijte v smeri urnega kazalca da pritrdite trino no stojalo 5 na eleni vi ini glejte sl A z zMonta a delovnega arometa na trino no stojalo NEVARNOST ELEKTRI NEGA UDARA Preden...

Страница 23: ...brez kosmov Pri trdovratni umazaniji krpo rahlo navla ite z zOdstranjevanje med odpadke b a Pri razvr anju odpadkov upo tevajte ozna evanje embala nih materialov ki so ozna eni s kraticami a in tevilk...

Страница 24: ...javnostim ki jih navodila za uporabo ne priporo ajo ali je na njih opozorjeno Izdelek je namenjen samo za zasebno in komercialno uporabo Garancija preneha veljati v primeru zlorabe ali nepravilne upor...

Страница 25: ...onski tevilki Svetujemo vam da pred tem natan no preberete navodila o sestavi in uporabi izdelka 5 Kupec je dol an poobla enemu servisu predlo iti garancijski list in ra un kot potrdilo in dokazilo o...

Страница 26: ...ck m proudem b a Obal a p stroj ekologicky zlikvidujte Nevhodn k osv tlen m stnosti Sv tidla do drsn ho provozu D lka kabelu reflektor Ochrana proti vniknut prachu prachot sn proveden pln ochrana prot...

Страница 27: ...z zPopis d l 1 Rukoje 2 Reflektor 3 LED modul 4 Teleskopick ty 5 Trojnoh stativ 6 Trojnoh prvek 7 chytky pro navinut kabelu 8 R hovan roub trojnoh prvek 9 R hovan roub teleskopick ty 10 Nap jec kabel...

Страница 28: ...jte jen izolovan sti s ov z str ky P ed mont demont nebo i t n m v dy s ovou z str ku vypojte ze z suvky Pokud byste v robek del dobu nepou vali nap p ed dovolenou nebo ho cht li ustavit na jin m sto...

Страница 29: ...tativ vypojte s ovou z str ku ze z suvky Na hlav teleskopick ty e 4 otev ete up nac svorku 11 tak aby areta n rukoje sm ovala k v m viz obr D Povolte r hovan roub nakl p c dr k 13 abyste mohli reflekt...

Страница 30: ...y 20 22 pap r a lepenka 80 98 kompozitn materi ly O mo nostech likvidace vyslou il ch v robk se m ete informovat na obecn m nebo m stsk m ad V z jmu ochrany ivotn ho prost ed nevyhazujte v robek do sm...

Страница 31: ...p i neopr vn n m a neodborn m pou v n pou it s ly a u z sah kter nebyly provedeny na autorizovanou servisn pobo kou Zpracov n v p pad z ruky K zaji t n rychl ho zpracov n va z le itosti se i te pros m...

Страница 32: ...ebezpe enstvo ohrozenia ivota a razu pre bato at a deti Pozor Nebezpe enstvo pop lenia na hor cich povrchoch Varovanie Nebezpe enstvo z sahu elektrick m pr dom b a Obal a zariadenie zlikvidujte ekolog...

Страница 33: ...cnosti z zRozsah dod vky 1x pracovn reflektor 1x trojnoh stat v teleskopick ty a trojno ka 1x n vod na obsluhu z zPopis dielov 1 Rukov 2 Reflektor 3 LED modul 4 Teleskopick ty 5 Trojnoh stat v 6 Stre...

Страница 34: ...st te ak ko vek po kodenia Chr te sie ov k bel pred ostr mi hranami mechanickou z a ou a hor cimi povrchmi Pri zap jan do elektrick ho pr du a odp jan sa dot kajte len izolovan ch ast elektrickej z st...

Страница 35: ...iahnite ot an m v smere hodinov ch ru i iek m trojnoh stat v 5 zafixujete v po adovanej polohe pozri obr A z zMont pracovn ho reflektora na trojnoh stat v NEBEZPE ENSTVO Z SAHU ELEKTRICK M PR DOM Pred...

Страница 36: ...te iadne rozp adl benz n a pod Tieto l tky by mohli v robok po kodi Na istenie pou vajte such utierku ktor nezanech va vl kna V pr pade siln ho zne istenia utierku jemne navlh ite z zLikvid cia b a Pr...

Страница 37: ...ava v etky pokyny uveden v n vode na obsluhu Je nutn bezpodmiene ne zabr ni elom pou itia a manipul ci m od ktor ch sa v n vode na obsluhu odr dza alebo pred ktor mi sa varuje Produkt je ur en v lu ne...

Страница 38: ...bens und Unfallgefahr f r Kleinkinder und Kinder Vorsicht Verbrennungsgefahr durch hei e Oberfl chen Warnung Stromschlaggefahr b a Entsorgen Sie Verpackung und Ger t umweltgerecht Nicht zur Raumbeleuc...

Страница 39: ...r keine Haftung Das Produkt ist nicht f r den gewerblichen Einsatz bestimmt Das Produkt ist nicht f r die Raumbeleuchtung im Haushalt geeignet z zLieferumfang 1 x Arbeitsstrahler 1 x Dreibeinstativ Te...

Страница 40: ...Verwenden Sie das Netzkabel nicht als Tragegriff Verlegen Sie das Netzkabel so dass niemand darauf treten oder dr ber stolpern kann VERMEIDEN SIE LEBENS GEFAHR DURCH ELEKTRISCHEN SCHLAG berpr fen Sie...

Страница 41: ...ifen Sie das Dreibeinelement 6 an der Stelle wo die Beine auf H he der R ndelschraube Dreibeinelement 8 verbunden sind und dr cken Sie dieses nach unten sodass sich die Beine auseinanderfalten Wenn si...

Страница 42: ...12 f r mindestens 10 cm auseinander siehe Abb C Fixieren Sie die Position indem Sie die R ndelschraube Klappb gel 13 am Strahler festziehen Stellen Sie den Strahler an einer gew nschten Position auf z...

Страница 43: ...Produkt zur ck Mit Reparatur oder Austausch des Produkts beginnt kein neuer Garantiezeitraum Garantiezeit und gesetzliche M ngelanspr che Die Garantiezeit wird durch die Gew hrleistung nicht verl nger...

Страница 44: ...il Ein als defekt erfasstes Produkt k nnen Sie dann unter Beif gung des Kaufbelegs Kassenbon und der Angabe worin der Mangel besteht und wann er aufgetreten ist f r Sie portofrei an die Ihnen mitgetei...

Страница 45: ...IAN 366811_2010 citygate24 GmbH Lange M hren 1 20095 Hamburg GERMANY 03 2021 Model No 1006 AS MIX Paper FSC C146112...

Отзывы: