GB
IE
28
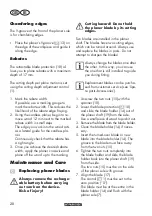
Chamfering edges
The V-groove at the front of the planer sole
is for chamfering edges.
·
Place the planer’s V-groove (
13) on
the edge of the workpiece and guide it
along the edge.
Rebates
The retractable blade protection (18) al-
lows you to plane rebates with a maximum
depth of 17 mm.
The cutting depth per plane motion is set
using the cutting depth adjustment control
(1).
1. Mark the rebate width.
If possible, use a marking gauge to
mark the rebate width. This reduces the
likelihood of the rebate edge fraying.
2. Using the cordless planer, begin to re
-
move wood 1-2 mm next to the marked
rebate width in small steps.
The edge you work into the wood acts
as a lateral guide for the cordless pla-
ner.
Continuously check that the rebate has
a right angle.
3. Once you achieve the desired rebate
width, apply the planer crosswise and
plane off the wood up to the marking.
Maintenance and Care
Replacing planer blades
Always remove the recharge-
able battery before carrying
out work on the device.
Risk of injury!
Cutting hazard! Do not hold
the planer blade by its cutting
edges.
Two blades are installed in the planer
shaft. The blades have two cutting edges,
which can be turned around. Always use
and replace the blades in pairs. Do not
attempt to sharpen the blades!
Always change the blades one after
the other. In this way, you can use
the one that is still installed to guide
you during fitting.
Replacement blades can be purcha-
sed from customer service (see ‘Spa-
re parts/accessories’).
1. Unscrew the two nuts (15) with the
spanner (10).
2. Lower the blade protection (
18)
and slide the blade holder (14) out of
the planer shaft (19) from the side.
Use a small piece of wood to push it out.
3. Remove the blade from the blade holder.
4. Clean the blade holder (14) if neces-
sary.
5. Insert the turned-over blade or new
blade into the blade holder (14). The
groove in the blade must face away
from the two nuts (15).
6. Tighten the two nuts completely into
the blade holder and slide the blade
holder back into the planer shaft (19)
from the side.
The two nuts (15) must be on the side
of the planer sole with groove.
7. Align the blade (17).
The control (
1) must be set to the
zero position (“0”).
The blade must be at the centre in the
blade holder (14) and flush with the
planer sole (7).

