Parkside 331932_1907 Скачать руководство пользователя страница 13

8

GB/IE/NI

• Try to keep emissions as low as possible, for example by 

limiting your working time. In this regard, all the operational 
cycle phases must be taken into consideration (such as the 
times when the tool is switched off or running idle).

8.  Before starting the equipment

• Open the packaging and remove the device carefully.
• Remove the packaging material as well as the packaging 

and transport bracing (if available).

• Check that the delivery is complete.
• Check the device and accessory parts for transport damage.
• If possible, store the packaging until the warranty period has 

expired.

ATTENTION
The device and packaging materials are not toys! 
Children must not be allowed to play with plastic 
bags, film and small parts! There is a risk of swal-
lowing and suffocation!

• The equipment must be set up where it can stand securely. 

Secure the machine on a workbench or a base frame with 4 
screws (not included in delivery) using the holes on the fixed 
saw table (15).

• Pull out the pre-installed tilt protection (36) completely and 

secure it with an Allen key (D).

• Adjust the adjusting screw (38) to the level of the tabletop to 

avoid wobbling of the machine. 

• All covers and safety devices have to be properly fitted be-

fore the equipment is switched on.

• It must be possible for the blade to run freely.
• When working with wood that has been processed before, 

watch out for foreign bodies such as nails or screws, etc.

• Before you press the ON/OFF switch check that the saw 

blade is fitted correctly. Moving parts must run smoothly.

• Before you connect the equipment to the power supply make 

sure the data on the rating plate are dentical to the mains 
data.

8.1  Checking the moving saw blade guard safety 

device (5)

The saw blade guard protects against accidental contact with 
the saw blade and from chips flying around.

Check function

To do so, fold the saw downwards:
• The saw blade guard must provide free access to the saw 

blade without touching other parts.

• When folding the saw upwards into the starting position, the 

saw blade guard must cover the saw blade automatically.
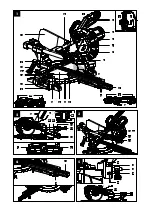
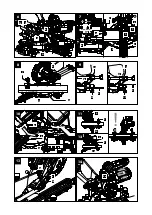
9.  Attachment

9.1  Attaching the crosscut, drag and mitre saw 

(fig.1/2/4/5)

• In order to adjust the rotary table (14), loosen the handle 

(11) approximately 2 turns and pull up the latched position 
lever (35) with your index finger.

• Turn the rotary table (14) and pointer (12) to the desired 

angle measurement on the scale (13) and use the handle 
(11) to secure it.

• By slightly pushing down the machine head (4) while pull-

ing out and removing the locking bolt (23) from the motor 
mount, the locking bolt (23) will be secured in the top posi-
tion and the saw will be unlocked from the bottom position.

• Turn the locking bolt (23) 90 degrees to secure it in the un-

locked position. 

• Swing the machine head (4) up.
• It is possible to secure the clamping devices (7) to the left or 

right on the fixed saw table (15). Insert the clamping devices 
(7) in the holes on the rear side of the stop rail (16) and se-
cure it with the star grip screws (7a). For 0°- 45° mitre cuts, 
the clamping device (7) must only be mounted on the right 
side (see fig. 11-12).

• It is possible to tilt the machine head (4) a max. 45° to the 

left by loosening the set screw (22).

• Workpiece supports (8) must always be secured and used 

during work. Set the desired table size by loosening the set 
screw (9). Then tighten the set screw (9) again.

9.2 Sawdust bag (fig. 1/22)

The saw is equipped with a debris bag (17) for sawdust and 
chips.
Squeeze together the metal ring on the dust bag and attach it 
to the outlet opening in the motor area.
The debris bag (17) can be emptied by means of a zipper at 
the bottom.

9.2.1 Connection to an external dust extractor

• Connect the vacuum hose with the dust extraction spout.
• The industrial vacuum cleaner must be suitable for the mate-

rial being worked.

• When vacuuming dust that is especially detrimental to health 

or carcinogenic, use a special vacuum cleaner.

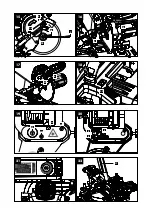
9.3  Precision adjustment of the stop for crosscut 

90° (fig. 1/2/5/6)

Tools required:


-

Allen key 6 mm


-

Open-ended spanner SW13 (not included in the scope of 
delivery)

• No stop angle included.

• Lower the machine head (4) and secure it using the locking 

bolt (23).

• Loosen the set screw (22).
• Position the angle stop (A) between the saw blade (6) and 

the rotary table (14).

• Loosen the lock nut (26a).
• Adjust the adjusting screw (26) until the angle between the 

saw blade (6) and rotary table (14) is 90°.

• Tighten the lock nut (26a) again.
• Subsequently check the position of the angle indicator. If 

necessary loosen the pointer (19) using a Philips screwdriv-
er, set to position 0° on the angle scale (18) and re-tighten 
the retaining screw.

Содержание 331932_1907

Страница 1: ...g sikkerhedsinstruktioner Overs ttelse af den originale driftsvejledning DK IE NI SCIE ONGLET RADIALE Consignes d utilisation et de s curit Traduction des instructions d origine FR BE BE SLIDING COMPO...

Страница 2: ...lie end mit allen Funktionen des Ger tes vertraut DE AT CH F r du l ser vend siden med billeder frem og bliv bekendt med alle apparatets funktioner DK Before reading unfold the page containing the ill...

Страница 3: ...2 4 3 5 24 25 23 23 11 35 27a 26a 20 27 22 26 36 D 1 1 10 2 4 5 7 12 13 14 15 17 7 11 8 9 35 16b 8 37 22 16a 21 22 19 18 3 6 24 7a 7a 24a 16 32 38 2...

Страница 4: ...re saw Scie onglet mixtes 220 240 V 50 Hz 4800 min 1 S1 1700 W S6 25 2000 W 210 mm x 30 mm x 2 6 mm manu factu red 07 2 019 S Nr PZK S 2000 B2 10 6 7 13 9 8 8 14 11 12 19 18 14 6 1 14 2 6 4 16a 3 A ma...

Страница 5: ...S 2000 B2 1 1 2 2 3 3 4 4 5 5 6 6 7 7 8 8 9 9 10 10 11 11 12 12 13 13 A B C D E F G H I J K L IAN 3319 32_1 907 Kapp und Zugs ge Mitre saw Scie ongle t mixtes 220 240 V 50 Hz 4800 min 1 S1 1700 W S6 2...

Страница 6: ...4 Scope of delivery 4 5 Intended use 4 6 Safety information 4 7 Technical data 7 8 Before starting the equipment 8 9 Attachment 8 10 Operation 9 11 Maintenance 10 12 Transport 11 13 Storage 11 14 Elec...

Страница 7: ...observe the operating instructions and safety instructions GB IE NI Wear safety goggles GB IE NI Wear ear muffs GB IE NI Wear a breathing mask GB IE NI Important Risk of injury Never reach into the ru...

Страница 8: ...t in a plastic cover to protect it from dirt and moisture Read the instruction manual each time before operat ing the machine and carefully follow its information The machine can only be operated by p...

Страница 9: ...strial applications Our warranty will be voided if the equipment is used in commercial trade or industrial businesses or for equivalent purposes 6 Safety information General power tool safety warnings...

Страница 10: ...r tools Keep cutting tools sharp and clean Properly maintained cutting tools with sharp cutting edges are less likely to bind and are easier to control Use the power tool accessories and tool bits etc...

Страница 11: ...t the plug from the power source and or remove the battery pack Then work to free the jammed material Continued sawing with a jammed workpiece could cause loss of control or damage to the mitre saw r...

Страница 12: ...pressed when inserting the plug in an outlet Use the tool that is recommended in this manual In doing so your machine provides optimal performance Hands may never enter the processing zone when the ma...

Страница 13: ...handle 11 approximately 2 turns and pull up the latched position lever 35 with your index finger Turn the rotary table 14 and pointer 12 to the desired angle measurement on the scale 13 and use the h...

Страница 14: ...he set screw for workpiece support 9 Perform cutting as described in sections 10 4 to 10 7 10 4 Crosscut 90 and turntable 0 fig 1 2 7 In the case of cutting widths up to approx 100 mm it is possible t...

Страница 15: ...ide Open the set screw 16b for the moveable stop rail 16a and push the moveable stop rail 16a outwards The moveable stop rail 16a must be fixed far enough in front of the innermost position that the d...

Страница 16: ...ser mount the front cover by tightening both screws 32b by hand 11 7 Service information Please note that the following parts of this product are sub ject to normal or natural wear and that the follow...

Страница 17: ...isposal and recycling The equipment is supplied in packaging to prevent it from being damaged in transit The raw materials in this packaging can be reused or recycled The equipment and its accessories...

Страница 18: ...ssive noise Coils damaged motor defective Arrange for inspection of the motor by a specialist The motor does not reach its full power Circuits in the network are overloaded lamps other motors etc Do n...

Страница 19: ...is rendered null and void if any attempt is made to tamper with the device The guarantee is valid for a period of 3 years starting from the purchase date of the device Guarantee claims should be submi...

Страница 20: ...Leveringsomfang 18 5 Korrekt anvendelse 18 6 Sikkerhedsoplysninger 18 7 Tekniske data 21 8 F r ibrugtagning 22 9 Opbygning 22 10 Betjening 23 11 Vedligeholdelse 24 12 Transport 25 13 Opbevaring 25 14...

Страница 21: ...ejledningen og sikkerhedsanvisningerne f r ibrugtagning DK Brug beskyttelsesbriller DK Brug h rev rn DK Brug ndedr tsv rn i st vede omgivelser DK Vigtigt Risiko for personskade Grib aldrig ind i den k...

Страница 22: ...verholdes af alle operat rer inden arbejdet p begyndes Der m kun arbejde personer ved maskinen der er uddannet i brugen af maskinen og som er gjort bekendt med de mulige farer ved arbejdet Aldersgr ns...

Страница 23: ...hvis maskinen bruges i kommercielle h ndv rks eller industrivirksomheder eller til tilsvarende form l 6 Sikkerhedsoplysninger Generelle sikkerhedsforskrifter for elv rkt j m ADVARSEL L s alle sikkerh...

Страница 24: ...oner bruge elv rkt jet som ikke er fortrolige med det eller som ikke har l st denne vejledning Elv rkt jer er farlige i h nderne p uerfarne personer Elv rkt jer og indsatsv rkt jer skal plejes om hygg...

Страница 25: ...er ind i den roterende klinge n Det afsk rne stykke m ikke presses ind mod den roterende savklinge Hvis der er begr nset plads f eks hvis der bruges l ngdeanslag kan det af sk rne stykke kile sig fast...

Страница 26: ...ften Sundhedsfare som f lge af str m hvis der bruges elektriske tilslutningsledninger der ikke lever op til g ldende regler Desuden kan der v re ikke benbare tilbagev rende risici selv om alle foranst...

Страница 27: ...besv ret inden du aktiverer T nd Sluk kontak ten Kontroll r at dataene p typeskiltet stemmer overens med lysnetdataene f r maskinen tilsluttes 8 1 Kontrol af sikkerhedsanordningen bev gelig savklingeb...

Страница 28: ...t Til det form l l snes fingerm trikken p skruen 24a Indstil den nskede sk redybde ved at dreje skruen 24 ind eller ud Sp nd derefter igen fingerm trikken 24a p skruen 24 Kontroll r indstillingen ud f...

Страница 29: ...ltgeringssk ring Pas p Den forskydelige anslagsskinne 16a skal til geringssk ring vippet savehoved fikseres i den yderste position Venstre side L sn l seskruen 16b p den forskydelige anslagsskinne 16a...

Страница 30: ...den fast skal du mon tere den forreste afd kning og sp nde de to skruer 32b h ndfast til 11 7 Serviceinformationer V r opm rksom p at f lgende dele p produktet slides som f lge af brug eller uds ttes...

Страница 31: ...skadiget under transporten R varerne i denne emballage kan genbruges eller genanvendes Udstyret og dets tilbeh r er lavet af forskellige typer af materia ler s som metal og plast Defekte komponenter s...

Страница 32: ...d Motor st jer for meget Viklinger beskadiget motor defekt F motoren kontrolleret af en fagmand Motor n r ikke op p fuld hastighed Str mkredse i lysnetanl gget overbelastet lam per andre motorer mv Un...

Страница 33: ...tage som f lge af korrekt funktion af apparatet Garantien erkl res ugyldige hvis der g res fors g p at manipulere med enheden Garantien er gyldig i en periode p 3 r fra k bsdatoen af enheden Garantikr...

Страница 34: ...e de livraison 32 5 Utilisation conforme 32 6 Consignes de s curit 32 7 Caract ristiques techniques 36 8 Avant la mise en service 36 9 Montage 37 10 Utilisation 38 11 Maintenance 39 12 Transport 40 13...

Страница 35: ...es consignes de s curit et respectez les FR BE Portez des lunettes de protection FR BE Portez une protection auditive FR BE Portez un masque anti poussi re FR BE Attention Risque de blessure Ne mettez...

Страница 36: ...umidit aupr s de la machine Avant de commencer travailler avec la machine chaque utilisateur doit lire le manuel d utilisation puis le suivre attentivement Seules les personnes form es l utilisation d...

Страница 37: ...utilisation en espace clos Veillez au fait que nos appareils n ont pas t con us pour tre utilis s dans un environnement professionnel industriel ou arti sanal Nous d clinons toute responsabilit si l a...

Страница 38: ...especter les r gles de s curit applicables aux outils lectriques m me une fois parfaitement familiaris avec l utilisation de cet outil lectrique Toute manipu lation n gligente peut entra ner des bless...

Страница 39: ...ni aucun corps tranger h N utilisez pas la scie tant que la table n est pas d gag e de tous les outils de bois etc l excep tion de la pi ce Les petites chutes les morceaux de bois d tach s ou d autres...

Страница 40: ...d origine ou dans des protections sp ciales Portez des gants pour une prise en main plus s re et pour r duire encore le risque de bles sures 17 Avant d utiliser les lames veillez ce que tous les disp...

Страница 41: ...ur e de fonctionnement effective est de 25 du cycle La pi ce scier doit avoir une hauteur de 3 mm et une largeur de 10 mm au minimum Veillez ce que la pi ce scier soit toujours fix e avec le dispositi...

Страница 42: ...re Rapprochez les extr mit s du collier ressort du sac collecteur de sciure et placez le sur l embouchure de l embout situ l arri re du moteur Le sac collecteur de sciure 17 peut tre vid gr ce une fer...

Страница 43: ...t e mobile 16a Resserrez les vis de blocage 16b Placez la t te de la machine 4 en position haute Poussez la t te de la machine 4 vers l arri re avec la poi gn e 1 et fixez la ventuellement cette posit...

Страница 44: ...xer le plateau tournant Desserrez la manette de blocage 22 A l aide de la poign e 1 inclinez la t te de la machine 4 vers la gauche l angle souhait voir galement le point 10 6 ce sujet Resserrez la vi...

Страница 45: ...s une usure li e l utilisation et sont donc des consommables non couverts par la garantie Pi ces d usure Charbons lame de scie insert de table sac collecteur de sciure Ne font pas partie de l ensemble...

Страница 46: ...troduit dans le circuit des mati res premi res L appareil et ses accessoires sont en mat riaux divers comme par exemple des m taux et mati res plastiques Les appareils d fectueux ne doivent pas tre je...

Страница 47: ...ndommag s moteur d fectueux Faites contr ler le moteur par un sp cialiste Le moteur ne fonctionne pas plein r gime Circuit de l installation lectrique surcharg lampes autres moteurs etc N utilisez auc...

Страница 48: ...influence ext rieure comme par exemple les dommages dus une chute ainsi que l usure normale conforme l utilisation Ceci est particuli rement valable pour les accumulateurs pour lesquels nous offrons...

Страница 49: ...ringsomvang 47 5 Doelmatig gebruik 47 6 Veiligheidswaarschuwingen 47 7 Technische gegevens 51 8 V r ingebruikneming 51 9 Montage 52 10 Bediening 53 11 Onderhoud 54 12 Vervoer 55 13 Opbergen 55 14 Elek...

Страница 50: ...ksaanwijzing en veiligheidsinstructies lezen en naleven NL BE Draag een veiligheidsbril NL BE Draag een gehoorbeschermer NL BE Draag een stofmasker NL BE Let op Lichamelijk gevaar Niet in het draaiend...

Страница 51: ...onen die over het gebruik van de machine en de daarmee verbonden gevaren zijn ge nstrueerd mogen de ma chine bedienen Respecteer de vereiste minimumleeftijd Als aanvulling op de veiligheidsvoorschrift...

Страница 52: ...Gehoorschade bij niet gebruik van de nodige gehoorbe schermer Bij gebruik in gesloten vertrekken komt houtstof vrij dat scha delijk is voor de gezondheid Houd er rekening mee dat onze toestellen overe...

Страница 53: ...ren kunnen worden vastge grepen door bewegende delen Als stofafzuig en opvanginrichtingen kunnen worden gemonteerd moeten deze worden aan gesloten en juist worden toegepast Het gebruik van een stofafz...

Страница 54: ...lag vastklemmen Zorg er altijd voor dat er langs de zaaglijn geen spleet is tus sen het werkstuk de aanslag en de tafel Ge bogen of kromgetrokken werkstukken kunnen verdraaien of verschuiven waardoor...

Страница 55: ...sen om de boring van zaagbladen te verkleinen 14 Zorg ervoor dat de bevestigde pasringen voor de borging van het zaagblad dezelfde diameter hebben en dat ze minimaal 1 3 van de snijdiameter hebben 15...

Страница 56: ...en tijd met een constante belasting en een uitlooptijd De cyclusduur bedraagt 10 minuten en de relatieve inschakelduur bedraagt 25 van de cyclustijd Het werkstuk moet minimaal een hoogte van 3 mm en e...

Страница 57: ...arna de stel schroef 9 weer vast 9 2 Spaanopvangzak fig 1 22 De zaag is voorzien van een opvangzak 17 voor spanen Knijp de uiteinden van de metalen klem van de stofzak samen en breng de zak aan op de...

Страница 58: ...de aanslagrails 16a en het zaagblad 6 niet met elkaar in botsing kunnen komen Draai de vastzetschroeven 16b weer vast Machinekop 4 naar de bovenste stand brengen Machinekop 4 aan de handgreep 1 naar...

Страница 59: ...Met de handgreep 1 de machinekop 4 naar links buiten en op de gewenste hoek van de schaal instellen zie daartoe ook punt 10 6 De borgschroef 22 weer vastdraaien De bewerking uitvoeren als onder punt 1...

Страница 60: ...aterialen Slijtstukken koolborstels zaagblad tafelinzetstukken spaan opvangzakken niet verplicht bij de leveringsomvang begrepen 12 Vervoer Vastzetgreep 11 aanhalen om de draaitafel 14 te ver grendele...

Страница 61: ...p teruggebracht worden Het toestel en zijn accessoires bestaan uit diverse materialen zoals b v metaal en kunststof Ontdoe u van defecte onderde len op de inzamelplaats waar u gevaarlijke afvalstoffen...

Страница 62: ...an De motor maakt te veel lawaai Wikkelingen beschadigd motor defect Laat de motor controleren door een vakman De motor bereikt het maxi male vermogen niet Groep van stroomnet overbelast lampen andere...

Страница 63: ...ie zich bij het doelmatig gebruik van het apparaat voordoet Er kan geen aanspraak op garantie worden gemaakt als op het apparaat reeds ingrepen werden uitgevoerd De garantieperiode bedraagt 3 jaar en...

Страница 64: ...59 GR CY 1 60 2 61 3 1 22 61 4 62 5 62 6 62 7 66 8 67 9 67 10 68 11 70 12 71 13 71 14 71 15 72 16 73 17 74 18 90...

Страница 65: ...60 GR CY 1 GR CY GR CY GR CY GR CY GR CY GR CY GR CY II...

Страница 66: ...G nzburger Stra e 69 D 89335 Ichenhausen VDE0100 DIN 57113 VDE 0113 3 1 22 1 2 3 4 5 5a 6 7 7a 8 9 10 11 12 13 14 15 16 16a 16b 17 18 19 20 21 22 23 24 24a 25 26 90 26a 90 27 45 27a 45 28 29 30 31 32...

Страница 67: ...62 GR CY 4 2 x 7 2 8 17 6 mm C 3 mm D 5 6 m 1 2...

Страница 68: ...63 GR CY 3 4...

Страница 69: ...64 GR CY a b 100 mm c d e f 100 mm g h i j k...

Страница 70: ...65 GR CY l m n o p q r E s 1 2 3 4 5 6 EN 847 1 7 HSS 8 9 10 11 12 13 14 1 3 15 16 17 18 19 20...

Страница 71: ...22 23 24 25 2 7 220 240 V 50Hz g S1 1700 Watt S6 25 2000W n0 4800 min 1 210 x 30 x 2 6 mm 24 s 3 mm 45 0 45 0 45 90 340 x 65 mm 45 240 x 65 mm 2 x 45 240 x 38 mm II ca 12 15 kg 2 650 nm 1 mW S6 10 25...

Страница 72: ...67 GR CY EN 62841 LpA 96 5 dB A KpA 3 dB LWA 109 5 dB A KWA 3 dB 8 15 4 36 D 38 8 1 5 9 9 1 1 2 4 5 14 11 2 35 14 12 13 11 4 23 23 23 90 4 7 15 7 16 7a 0 45 7 11 12...

Страница 73: ...0 1 2 5 6 6 mm SW13 4 23 22 A 6 14 26a 26 6 14 90 26a 19 0 18 9 4 45 1 2 5 9 10 6 mm SW13 4 23 14 0 16a 16b 16a 16a 16a 16a 6 8 mm 16a 16a 6 22 1 4 45 45 b 6 14 27a 27 6 14 45 27a 19 45 18 10 10 1 18...

Страница 74: ...4 16a 90 16b 16a 16a 16a 16a 6 8 mm 16a 6 16b 4 4 1 16 14 7 15 3 2 21 4 1 6 21 4 1 4 6 2 1 10 5 90 0 45 1 7 8 0 45 16a 90 16b 16a 16a 16a 16a 6 8 mm 16a 6 16b 11 35 14 11 12 13 15 11 14 10 4 10 6 0 4...

Страница 75: ...19 18 22 10 4 10 7 0 45 0 45 2 4 12 0 45 0 45 16a 16b 16a 16a 16a 16a 6 8 mm 16a 6 16b 4 14 11 11 14 10 5 11 22 1 4 10 6 22 10 4 11 m 11 1 11 2 5 11 3 10 1 2 3 4 11 4 50 10 6 mm 21 11 5 1 2 14 17 4 23...

Страница 76: ...71 GR CY 30 28 30 28 28 29 6 31 28 29 31 6 5 5 5a 5a 6 6 45 10 6 11 6 19 20 32 32b 32a E 6 32b 11 7 12 11 14 4 23 20 15 8 9 13 5 30 C 14 VDE DIN EN 61000 3 11 a Z Zmax 0 339 b 100 A a b...

Страница 77: ...72 GR CY VDE DIN 220 240 V 25 m 1 5 15 2012 19...

Страница 78: ...73 GR CY 16...

Страница 79: ...4003 0 00 Min e mail GR service GR scheppach com e mail CY service CY scheppach com GR CY GEORGE C SOLOMONIDES SON LTD PO BOX 56236 169 LEONTIOS A GR 3305 LIMASSOL CYPRUS www lidl service com QR Lidl...

Страница 80: ...mfang 78 5 Bestimmungsgem e Verwendung 78 6 Sicherheitshinweise 78 7 Technische Daten 82 8 Vor Inbetriebnahme 83 9 Aufbau 83 10 Bedienung 84 11 Wartung 85 12 Transport 86 13 Lagerung 86 14 Elektrische...

Страница 81: ...und Sicherheitshinweise lesen und beachten DE AT CH Schutzbrille tragen DE AT CH Geh rschutz tragen DE AT CH Bei Staubentwicklung Atemschutz tragen DE AT CH Achtung Verletzungsgefahr Nicht in das lau...

Страница 82: ...beachtet werden An dem Ger t d rfen nur Personen arbeiten die im Gebrauch des Ger tes unterwiesen und ber die damit verbundenen Ge fahren unterrichtet sind Das geforderte Mindestalter ist einzu halten...

Страница 83: ...bei Nichtverwendung des n tigen Geh r schutzes Gesundheitssch dliche Emissionen von Holzst uben bei Ver wendung in geschlossenen R umen Bitte beachten Sie dass unsere Ger te bestimmungsgem nicht f r d...

Страница 84: ...uck oder lange Haare k nnen von sich bewegenden Teilen erfasst wer den Wenn Staubabsaug und auffangeinrichtun gen montiert werden k nnen sind diese anzu schlie en und richtig zu verwenden Verwendung e...

Страница 85: ...werden g Pr fen Sie das Werkst ck vor dem Schneiden Wenn das Werkst ck gebogen oder verzo gen ist spannen Sie es mit der nach au en gekr mmten Seite zum Anschlag Stellen Sie immer sicher dass entlang...

Страница 86: ...hlegiertem Schnellarbeitsstahl HSS 8 Verwenden Sie nur S gebl tter deren h chstzul ssige Drehzahl nicht geringer ist als die maximale Spindeldreh zahl der Kapp und Zugs ge und die f r den zu schnei de...

Страница 87: ...omagnetisches Feld Dieses Feld kann unter bestimmten Umst nden aktive oder passive medizinische Implantate be eintr chtigen Um die Gefahr von ernsthaften oder t dlichen Verletzungen zu verringern empf...

Страница 88: ...Durch leichtes Dr cken des Maschinenkopfes 4 nach un ten und gleichzeitiges Herausziehen und Drehen des Siche rungsbolzens 23 aus der Motorhalterung wird der Siche rungsbolzen 23 in der oberen Stellu...

Страница 89: ...e mit der gleichen L nge kann der L ngenanschlag 37 aufgeklappt werden Sie k nnen den L ngenanschlag 37 auf der rechten und auf der linken Seite nutzen Klappen Sie den L ngenanschlag 37 nach oben L se...

Страница 90: ...Schnitt dass zwischen den Anschlag schienen 16a und dem S geblatt 6 keine Kollision m g lich ist Feststellschraube 16b wieder anziehen Maschinenkopf 4 in die obere Stellung bringen Den Drehtisch 14 a...

Страница 91: ...en Das S geblatt 6 vom Innenflansch 31 abnehmen und nach unten herausziehen Flanschschraube 28 Au enflansch 29 und Innenflansch 31 sorgf ltig reinigen Das neue S geblatt 6 in umgekehrter Reihenfolge w...

Страница 92: ...gleicher Kennzeichnung Ein Aufdruck der Typenbezeichnung auf dem Anschlusskabel ist Vorschrift Wenn die Netzanschlussleitung dieses Ger tes besch digt wird muss sie durch eine besondere Anschlussleit...

Страница 93: ...or macht zu viel L rm Wicklungen besch digt Motor defekt Motor durch einen Fachmann kontrollieren lassen Der Motor erreicht volle Leistung nicht Stromkreise in Netzanlage berlastet Lampen andere Motor...

Страница 94: ...bereits Eingriffe vorgenommen wurden Die Garantiezeit betr gt 3 Jahre und beginnt mit dem Kaufdatum des Ger tes Garantieanspr che sind vor Ablauf der Garantiezeit innerhalb von zwei Wochen nachdem Sie...

Страница 95: ...HR ovime izjavljuje da postoji sukladnost prema EU smjernica i normama za sljedece artikle RS potvr uje slede u uskla enost prema smernicama EZ i normama za artikal RO declar urm toarea conformitate c...

Страница 96: ...91...

Страница 97: ...92...

Страница 98: ......

Страница 99: ......

Страница 100: ...MBH G nzburger Str 69 D 89335 Ichenhausen IAN 331932_1907 6 Last Information Update Tilstand af information Version des informations Stand van de informatie Stand der Informationen Update 12 2019 Iden...

Отзывы: