background image

Parker EME

START UP

190-120112 N1 C3 Start up März 2004

17

de

uts

ch

1.4.1.2 Testbewegungen 

ausführen

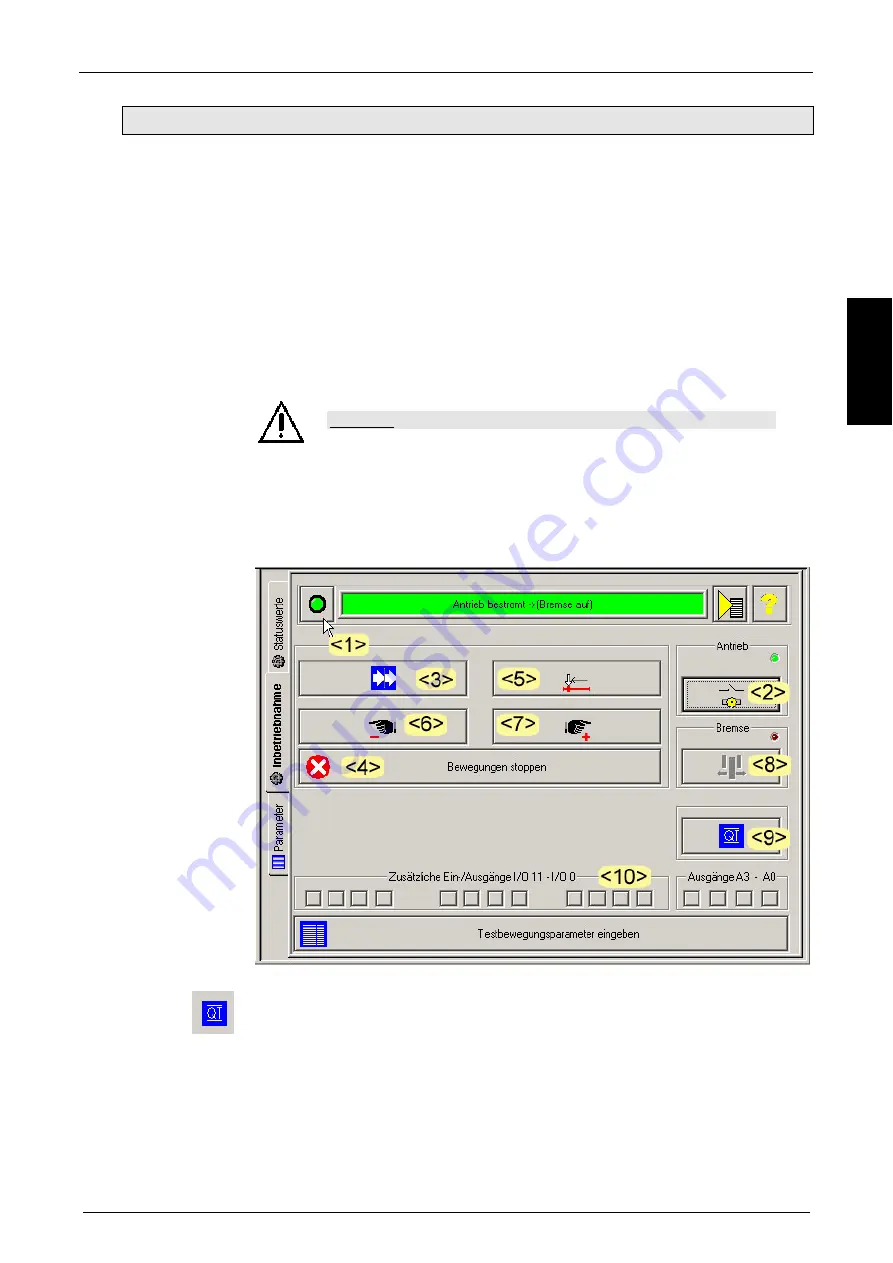
<1> Aktivieren des Inbetriebnahme-Modus.

!


Die Funktions - Buttons werden freigegeben.

!


Falls kein Fehler ansteht blickt die grüne LED an Compax3.

!


Ansonsten steht an Compax3 ein Fehler an; die rote LED leuchtet.
Prüfen Sie auf korrekte Spannungsversorgung, sowie auf Freigabe des Enable
- Eingangs an X4/3.
Der Fehler wird mit QT <9> quittiert. Ist der Fehler behoben, wird dies durch
Blinken der grünen LED angezeigt.

<2> Bestromen des Antriebs.

!


Der Motor wird bestromt.

!


Leuchten der grünen LED an Compax3.

Vorsicht!

Mit dem nächsten Schritt wird die Testbewegung gestartet, sichern
Sie den Motor entsprechend ab.

<3> Starten der gewählten Testbewegung.

!


Der Motor führt die festgelegte Testbewegung aus.

<4> Stoppen der Testbewegung.

Compax3 - Fehler können mit dem Button "QUIT" quittiert werden.


Содержание Compax3 Fluid T40

Страница 1: ...nges 05 03 04 12 17 192 120112 N1 C3 Start up March 2004 The data contained correspond to the current status at the time of printing Startup of a motor without motor load START UP 192 120112 N1 C3 Sta...

Страница 2: ...plc Electromechanical Automation 21 Balena Close Poole Dorset England BH17 DX UK Tel 44 0 1202 69 9000 Fax 44 0 1202 69 5750 E mail sales digiplan parker com mailto sales digiplan parker com Internet...

Страница 3: ...x3 moving the motor 4 1 1 2 Components required 4 1 2 Preparation 5 1 2 1 Installation of the C3 ServoManager 5 1 2 2 Required wirings 6 1 3 Configuring Compax3 8 1 3 1 Set interface PC Compax3 8 1 3...

Страница 4: ...ignment in the Compax3 installation manual 19x 120102 1 1 1 Task Setting up Compax3 moving the motor Simple and independent of the Compax3 device variant Without overhead for configuration Without spe...

Страница 5: ...or start the installation program C3Mgr_Setup_V exe and follow the instructions Minimum requirements For successful installation your PC must meet the following minimum requirements Windows NT 4 0 Int...

Страница 6: ...E For V4 device X1 400VAC Pin1 L1 Pin2 L2 Pin3 L3 Pin4 PE X3 Motor Pin1 U Pin2 V Pin3 W Pin4 PE Pin5 Motor holding brake BR Pin6 Motor holding brake BR ATTENTION Pin 5 6 must only be wired in the case...

Страница 7: ...X4 1 and X4 2 Apply 24 VDC to enable input X4 3 Connect Compax3 to PC Connect Compax3 X10 to PC COM 1 or COM2 via RS232 cable Parker cable SSK1 Connect motor to Compax3 Connect motor cable Parker cabl...

Страница 8: ...PC interface via which you established the RS232 connection Connection via SSK01 1 3 2 Set Compax3 device type In order to define the device type connected go to device selection Online device identif...

Страница 9: ...uration sequence 192 120112 N1 C3 Start up March 2004 9 english 1 3 3 Configuration sequence Select the entry Ixx Configuration from the tree Click on the Click to start complete configuration button...

Страница 10: ...ected motor see on the motor type designation plate Confirm the settings with the Next button All following configuration windows contain suitable standard values Therefore they can be acknowledged wi...

Страница 11: ...n the summary window you can name your configuration file and enter a comment Activate the control square Select download Start the download by clicking on the Finish button Acknowledge the next windo...

Страница 12: ...ry is only relevant if the device was energized before Click on the No button to close the window 1 4 Setting up Compax3 Select the entry Optimization in the tree Open the optimization window by click...

Страница 13: ...04 13 english Layout of the optimization window Segmentation Functions TABs Window1 Oscilloscope Window 2 Optimization D A Monitor Oscilloscope settings Window 3 Status display Compax3 error history G...

Страница 14: ...g Described below is the setup of a motor without load Define test motion parameters 15 Execute test motion 17 Display of the values in the oscilloscope and in the status display 19 Click on the Enter...

Страница 15: ...indow you can select a test motion profile All values entered in the general setup settings and in test motions are only suggestions which can be accepted or adapted if necessary By clicking on the Se...

Страница 16: ...rofiles Select a relative test movement Relative movement test movement 1 Absolute movement test movement 2 You can also choose an absolute test movement then you must however define a machine zero po...

Страница 17: ...ct voltage supply as well as enable of the enable input on X4 3 The error is acknowledged with QT 9 If the error is corrected the green LED will start flashing 2 Energizing the drive The motor is ener...

Страница 18: ...buttons 5 approach machine zero 6 Hand moving in negative direction 7 Hand moving in positive direction 8 Activate resp enable motor holding brake if available 9 Quit acknowledging the error after it...

Страница 19: ...3 Display of the values in the oscilloscope and in the status display Window 1 Depiction of the status values in the oscilloscope can be started by clicking on the RUN button in the oscilloscope setti...

Страница 20: ...est motion parameters 14 Display of the values in the oscilloscope and in the status display 18 Download Configuration 11 E Execute test movements 16 I Installation of the C3 ServoManager 5 P Preparat...

Страница 21: ...halten 05 03 04 12 34 190 120112 N1 C3 Start up M rz 2004 Daten entsprechen dem technischen Stand zum Zeitpunkt der Drucklegung deutsch Inbetriebnahme eines leerlaufenden Motors START UP 190 120112 N1...

Страница 22: ...Electromechanical Automation 21 Balena Close Poole Dorset England BH17 DX UK Tel 44 0 1202 69 9000 Fax 44 0 1202 69 5750 E mail sales digiplan parker com mailto sales digiplan parker com Internet www...

Страница 23: ...r bewegen 4 1 1 2 Erforderliche Komponenten 4 1 2 Vorbereitung 5 1 2 1 Installation des C3 ServoManagers 5 1 2 2 Notwendige Verdrahtungen 6 1 3 Compax3 konfigurieren 8 1 3 1 Schnittstelle PC Compax3 e...

Страница 24: ...ie Ger tezuordnung im Installations Handbuch Compax3 19x 120102 1 1 1 Aufgabe Compax3 Inbetriebnehmen Motor bewegen Einfach und unabh ngig von der Compax3 Ger tevariante Ohne Konfigurationsaufwand Ohn...

Страница 25: ...xe und folgen Sie den Anweisungen Mindestanforderungen F r eine erfolgreiche Installation muss Ihr PC folgenden Mindestsystemanforderungen entsprechen Windows NT 4 0 Intel mit Service Pack 6 Windows 2...

Страница 26: ...Ger t X1 230VAC Pin1 L Pin2 N Pin3 PE Bei V4 Ger t X1 400VAC Pin1 L1 Pin2 L2 Pin3 L3 Pin4 PE X3 Motor Pin1 U Pin2 V Pin3 W Pin4 PE Pin5 Motorhaltebremse BR Pin6 Motorhaltebremse BR ACHTUNG Pin 5 6 nur...

Страница 27: ...eigabe Eingang X4 3 mit 24 VDC belegen Compax3 mit PC verbinden Compax3 X10 ber RS232 Kabel Parker Kabel SSK1 mit PC COM 1 oder COM2 verbinden Motor an Compax3 anschlie en Motorkabel Parker Kabel MOK...

Страница 28: ...elle ber die Sie die RS232 Verbindung hergestellt haben Verbindung ber SSK01 1 3 2 Compax3 Ger tetyp einstellen Um den angeschlossenen Ger tetyp zu definieren w hlen Sie im Verzeichnisbaum Ger teauswa...

Страница 29: ...N1 C3 Start up M rz 2004 9 deutsch 1 3 3 Konfigurationsablauf W hlen Sie in der Baumstruktur den Eintrag Ixx Konfiguration aus Starten Sie durch einen Klick auf den Button Start Komplettkonfiguration...

Страница 30: ...en Motor aus Angaben auf Motortypenschild beachten Best tigen Sie die Angaben mit dem Button Weiter Alle folgenden Konfigurationsfenster enthalten passende Standardwerte Deshalb k nnen Sie mit Weiter...

Страница 31: ...hre Konfigurationsdatei zu benennen und einen Kommentar hinzuzuf gen Aktivieren Sie das Kontrollk stchen Download Dialog aufrufen Starten Sie den Download mit dem Button Fertig stellen Best tigen Sie...

Страница 32: ...t wenn das Ger t vorher bestromt war Bet tigen Sie den Button Nein um das Fenster zu schliessen 1 4 Compax3 inbetriebnehmen W hlen Sie in der Baumstruktur den Eintrag Optimierung aus Starten Sie durch...

Страница 33: ...ngs Fensters Aufteilung Funktionen TABs Fenster 1 Oszilloskop Fenster 2 Optimierung D A Monitor Oszilloskop Einstellungen Fenster 3 Statusanzeige Compax3 Fehlerhistorie Graphische Statusanzeige Fenste...

Страница 34: ...me In diesem Kapitel finden Sie Testbewegungs Parameter festlegen 15 Testbewegungen ausf hren 17 Darstellung der Werte auf Oszi und in der Statusanzeige 19 Bet tigen Sie den Button Testbewegungsparame...

Страница 35: ...Testbewegungsprofil auszuw hlen Alle eingestellten Werte der Allgemeinen Inbetriebnahme Einstellungen und der Testbewegungen sind Vorschlagswerte und k nnen bernommen oder bei Bedarf angepasst werden...

Страница 36: ...estbewegung Relative Bewegung Testbewegung 1 Absolute Bewegung Testbewegung 2 Sie haben ebenso die M glichkeit eine absolute Testbewegung zu w hlen in diesen Fall ist es jedoch erforderlich einen Masc...

Страница 37: ...ungsversorgung sowie auf Freigabe des Enable Eingangs an X4 3 Der Fehler wird mit QT 9 quittiert Ist der Fehler behoben wird dies durch Blinken der gr nen LED angezeigt 2 Bestromen des Antriebs Der Mo...

Страница 38: ...ons 5 Maschinen Null anfahren 6 Hand fahren in negative Richtung 7 Hand fahren in positive Richtung 8 Motorhaltebremse aktivieren bzw freigeben falls vorhanden 9 Quit quittieren der St rung nach der F...

Страница 39: ...rstellung der Werte auf Oszi und in der Statusanzeige Fenster 1 Darstellung der Statuswerte auf dem Oszilloskop starten durch RUN in den Oszilloskop Einstellungen Fenster 2 Oszilloskop Einstellungen F...

Страница 40: ...llung der Werte auf Oszi und in der Statusanzeige 19 Download Konfiguration 11 E Erforderliche Komponenten 4 I Inbetriebnahme 14 Installation des C3 ServoManagers 5 K Konfigurationsablauf 9 N Notwendi...

Отзывы: