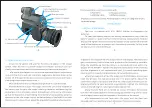
7.IR fill light brilliance control
/ Color or BW mode
6.Sleep/Power
8.Red dot switch
9.Menu / Playback
10.OK/Photo/Recording
11.Zoom / WiFi
15.Eyepiece Dioptric adjustment ring
13. SD slot/ USB / HDMI
12.Sleeve lock
14.Objective lens Focusing adjustment ring
—
4
—
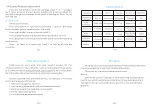
Contents Includes:
This box contains a night vision optics with,
Installation
1.Battery Installation
2.Operational instruction
—
5
—
—
7
—
1x Pard 007V
1x Hexagon wrenches
1x USB Data Cable; 1x Software package.
;
;
—
6
—
Storage card is not included. Please prepare a TF card (128g maximum)
for data storage.
The unit is supplied with 3.7V 18650 Lithium re-chargeable flat
batteries.
To Load the battery remove the battery compartment cap, slide the
battery (po polar end first) into the battery compartment. Replace
the cap and tighten firmly to ensure the battery is fully contained and both
ends of the battery are in contact with the battery terminals. Failure to do
so may result in intermittent fault.
●
Turn on the power and wait for the menu to appear in the image
screen. After the menu is present adjust the diopter to ensure you can
clearly view the screen and the information and icons contained on it.
●
To adjust the diopter first adjusts the eyepiece dioptric adjustment
ring until the menu and icon characters appearance become sharp in the
screen. (N.B this part of the start-up process does not mean you will have a
clear long range image in your view.)
●
Ensure that the rifle is unloaded and pointed in a safe direction.
●
Fit the NV007V to your rifle scope. Insert the unit into a bayonet of
the correct size for your rifle scope, rotating clockwise and ensuring the
sleeve lock clicks into place. Adjust the packing / shim on the rifle scope
so that the bayonet is a tight sliding fit. Slide the whole assembly onto the
eyepiece of the rifle scope. Adjust the barrel focus of the NV007V so that
the reticule is in sharp focus. Move the assembly forwards and backwards
to obtain a full image of the rifle scope view on the display. The object is to
get a satisfactory field of view with pushed as far forward as possible.
Align the assembly so that the reticule is centered and level within the
display of the NV007V. Tighten the bayonet clamp bolts while checking
that the alignment is still centered and level. It is worth spending some
time to get this as perfect as possible as it only needs doing once.
●
Place the eye piece of the rifle scope into the QR sleeve. Ensure you
slide the QR over the eye piece and lock it in place tightly. Adjust the
connection angel if necessary and once the rifle scope and Pard unit are
aligned perfectly to your personal requirements, tighten the fastening
screw on the QR ring for a strong and stable connection.
●
Now that the Pard unit is locked on to your rifle optic then please
turn the rifle scopes objective lens focusing adjustment ring until a crystal
clear image of your cross hairs appears in the center of the screen.
●
To disconnect the unit from your rifle optic turn the Pard unit
through a half turn and the unit will disconnect from the rifle scope.

