background image

4

F

ACILITY


AND

 U

SER

 S

AFETY

 P

RECAUTIONS

1.  Review and understand all of the warning labels affixed to this machine and on the facility 

safety sign.

2.  Be certain that the machine operation is understood before it is used. Refer to the 

instructional Procedure Label affixed to the machine. 

3.  Make sure all users are properly trained on how to use this equipment. If this machine is 

being used in a commercial setting, end users may not have access to this Owners Manual. It 
is the responsibility of the facility to instruct users as to the proper usage of the equipment as 
well as making them aware of potential hazards.

4.  Use each machine only for the intended exercise. Do not allow anyone to invent exercises not 

included on the Instructional Procedure Label or the Intended Use Label.

5.  Do not modify the machine.

6.  This equipment meets industry safety standards for stability when used for the intended 

exercise. Do not allow straps, resistance bands or other means to be attached to the 
framework of this machine to perform stretching or body weight exercises. This can result in 
machine instability and lead to serious crushing injuries.

7.  Keep children away from this equipment. Adults should closely supervise use by teenagers.

8.  It is recommended that users receive a thorough medical exam before commencing an 

exercise program. All medical issues should be reviewed to ensure that weight training will 
not aggravate pre-existing medical conditions.

9.  If the machine appears damaged or inoperable, contact a facility staff member to place an 

“OUT OF ORDER, DO NOT USE” sign on the machine until it is repaired. Only use Paramount 
supplied replacement components to service this machine.

10.  Instruct users not to wear loose or dangling clothes or have headphone wires hanging when 

using this equipment. 

11.  Do not attempt to free any jammed assemblies by yourself as this may cause injury.

12.  On Plate Loaded and Free Weight machines:

12a.  Use of spotter(s). Instruct users to seek the advice of the facility staff as to the 

appropriate use of spotters when lifting. More then one spotter may be required 
depending upon the amount of weight being lifted.

12b.  Instruct users to load weight plates evenly and carefully (one side and then the other) 

to avoid tipping equipment and crushing injuries.

12c.  If the machine is equipped with safety stops or catches, inspect them and verify their 

proper operation before use and make sure they are securely in place before using or 
exiting the machine. Be certain members are instructed on how to operate and adjust 
all safety mechanisms.

S

AFETY

Содержание FS-65

Страница 1: ...FS 65 SHOULDER PRESS ASSEMBLY MANUAL AM FS65 010913...

Страница 2: ...You for your patronage Paramount Fitness Corporation 6450 East Bandini Blvd Los Angeles CA 90040 IMPORTANT SERIOUS INJURIES TO USERS BYSTANDERS OR INSTALLERS CAN OCCUR IF THE INSTRUCTIONS AND WARNING...

Страница 3: ...HE MAIN FRAME 12 STEP 2 ASSEMBLE PRESS ARM 14 STEP 3 ASSEMBLE THE PADS 15 STEP 4 ASSEMBLE THE WEIGHT PLATES 16 STEP 5 ASSEMBLE CABLE PULLEYS 18 STEP 6 ASSEMBLE FRONT SHROUD 20 STEP 7 ASSEMBLE REAR SHR...

Страница 4: ...hould closely supervise use by teenagers 8 It is recommended that users receive a thorough medical exam before commencing an exercise program All medical issues should be reviewed to ensure that weigh...

Страница 5: ...is piece of equipment for safe access and operation Installation must meet ADA requirements for accessibility 3 Install this piece of equipment on a solid level surface that does not deviate more then...

Страница 6: ...and engaged Verify that the exercise is performed smoothly free of noise and or binding If equipped with a weight stack verify that the proper weight selector pin is in place 3 Check the function of y...

Страница 7: ...ood car polish to remove heavier dirt and grease as well as for polishing DO NOT use solvents lacquer thinner acetone or finger nail polish remover For scuffs and marks that are not removed by the abo...

Страница 8: ...CONFIGURATION MACHINE WEIGHT APPROXIMATE FLOOR LOADING 170 lbs 386 LBS 175 KG 54 LBS FT2 261 KG M2 250 lbs 466 LBS 211 KG 65 LBS FT2 315 KG M2 MACHINE WEIGHT AND FLOOR LOADING IN USE MACHINE DIMENSIO...

Страница 9: ...5 Use this table to measure bolts and set collar spacing Weight Plate Cartons Depending upon your order this machine can be assembled with either a 170 lb or 250 lb weight stack For a 170 lb weight st...

Страница 10: ...S CAP 000X TOP CAP 1 2 FS65 SHD 100X FRONT SHROUD 1 3 FS SHD 150X REAR SHROUD 1 4 FS54 UPR 000X UPRIGHT 1 5 FS GRD 100X GUIDE ROD 2 6 FS54 PAD 100X SEAT PAD 1 7 FS PAD 000X BACK PAD 1 8 FS BKT 000 GUI...

Страница 11: ...CE 1 3 FS54 MFR 400X FRAME REAR BRACE 1 4 FS65 ARM 000X PRESS ARM 1 5 FS64 SFR 000X SEAT FRAME 1 6 FS64 AXL 000 AXLE PRESS ARM 1 7 FS SBR 000X SELECTOR BAR 1 8 FS65 CBL 000X CABLE 1 9 FS65 HWR 000X HA...

Страница 12: ...SEMBLE LAST BE SURE TO PROPERLY ORIENT BRACE 5 NOTE SOME ITEMS SHOWN MAY BE PRE ASSEMBLED ITEM PART NUMBER DESCRIPTION QTY 1 FS54 MFR 400X FRAME REAR BRACE 1 2 FS54 UPR 000X ASSY UPRIGHT FRAME 1 3 FS6...

Страница 13: ...13 STEP 1 ASSEMBLE THE MAIN FRAME 10 6 7 9 8 x2 10 6 7 9 8 x2 DETAIL A DETAIL B DETAIL C DETAIL D 10 6 7 9 8 x3 10 6 7 9 8 x2...

Страница 14: ...axle and hardware 2 Fully tighten hardware ITEM PART NUMBER DESCRIPTION QTY 1 FS65 ARM 000X ASSY PRESS ARM 1 2 FS64 AXL 000 AXLE 1 3 FS51 MFR 040 WASHER LARGE OD 2 4 C 445 SCREW HH 3 8 X 1 2 5 C 749 W...

Страница 15: ...6 8 7 x2 2 1 3 9 4 6 8 7 x3 ITEM PART NUMBER DESCRIPTION QTY 1 FS64 SFR 000X SEAT FRAME 1 2 FS54 PAD 100X SEAT PAD 1 3 FS PAD 000X BACK PAD 1 4 C 446 SCREW HH 3 8 X 1 1 4 3 5 C 451 SCREW HH 3 8 X 2 3...

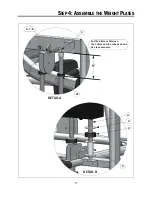
Страница 16: ...collars 5 Attach guide rod to top frame with Guide Rod Bracket as shown ITEM PART NUMBER DESCRIPTION QTY 1 FS BKT 000 GUIDE ROD BRACKET 2 2 FS BMP 001 BUMPER WEIGHT STACK 2 3 FS GRD 100X GUIDE ROD ASS...

Страница 17: ...17 STEP 4 ASSEMBLE THE WEIGHT PLATES Set the distance between the Collars and the tube as shown Use tape measure DETAIL A DETAIL B 6 7 8 1 11 3 2 5 5 9...

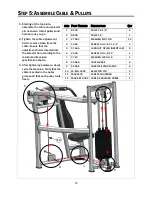
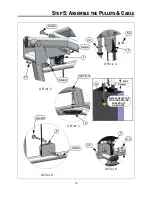
Страница 18: ...ion shown 3 After tightening hardware slowly cycle the machine Verify that the cable is seated in the pulley groves and that each pulley turns freely ITEM PART NUMBER DESCRIPTION QTY 1 B 900 PULLEY 4...

Страница 19: ...19 STEP 5 ASSEMBLE THE PULLEYS CABLE 7 7 7 7 7 9 4 8 3 9 5 8 3 4 3 5 3 4 3 5 3 9 4 8 3 9 5 8 3 9 6 7 8 3 1 9 5 8 3 11 1 1 1 2 INSTALL SELECTOR CABLE BOLT PIN RING AROUND 1 25mm AS SHOWN MAX 10...

Страница 20: ...TION QTY 1 FS65 SHD 100X SHROUD FRONT 1 2 C 445 SCREW HEX HEAD 3 8 X 1 4 3 C 749 WASHER LOCK 3 8 4 4 C 754C WASHER FLAT 3 8 4 1 Assemble the front shroud as shown 2 Operate the machine and make sure t...

Страница 21: ...WASHER FLAT 3 8 4 4 C 766A NUT NYLOCK JAM 3 8 2 1 Set the lower screws of the shroud into the lower brackets on the upright frame 2 Then align the holes for the brackets at the top of the shroud 3 Ass...

Страница 22: ...3 1 3 2 ITEM PART NUMBER DESCRIPTION QTY 1 FS BKT OO1 BRACKET TOP CAP 2 2 FS CAP 000X TOP CAP 1 3 C 675D SCREW BUTTON HEAD 1 4 X 1 2 8 1 Assemble the bracket to the top cap as shown 2 Assemble the top...

Страница 23: ...E 01250 for pounds LBL WSM 01250 for kilograms 4 Remove the backing from the label to expose the adhesive Carefully locate the label on the shroud so that it is centered between the edge and the bend...

Страница 24: ...OIDED COULD CAUSE SERIOUS INJURY OR DEATH PRIOR TO USING THE EQUIPMENT READ THE WARNING LABELS AND INSTRUCTION PLACARDS AFFIXED TO EACH MACHINE IF YOU ARE UNSURE ON HOW TO USE A MACHINE SEEK THE ASSIS...

Страница 25: ...ing TriFlowTM brand 2 Verify that all adjustments can be made into each position Verify that the adjustment pin inserts freely into each position and is fully engaged 3 Place the selector pin into the...

Страница 26: ...the wide variation of flooring on which the unit can be installed contact a qualified contractor to determine an appropriate fastening system for your floor Use 3 8 diameter hardware 10 mm to anchor t...

Страница 27: ...ed to misuse abuse modifications not authorized by Paramount or any damage caused by improper handling natural disasters acts of God or servicing by non Authorized Dealers This includes but is not lim...

Страница 28: ...Paramount Fitness Corporation 6450 E Bandini Blvd Los Angeles CA 90040 3185 Phone 1 323 721 2121 Fax 323 724 2000 1 800 721 2121 www paramountfitness com...

Отзывы: