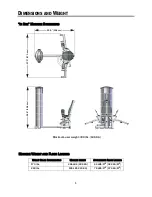
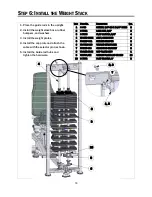
Paramount Fitness FS-52 Скачать руководство пользователя страница 22

22

S

TEP

 9: I

NSTALL


THE

 F

RONT

 S

HROUD

4

1, 2, 3

X4

I

TEM

P

ART

 N

O

.

D

ESCRIPTION

QTY.

1

C 445

SCREW, 3/8”-16 X 1” HHCS

4

2

C  749

LOCK  WASHER

4

3

C 754C

FLAT WASHER

4

4

FS52-SHD-200X

FRONT SHROUD

1

1. Place the front shroud into position.

2. Align the holes and assemble the 

hardware. 

3. Tighten all the hardware.

Содержание FS-52

Страница 1: ...FS 52 INNER OUTER THIGH ASSEMBLY MANUAL AM FS52 05 13 14 ECN00231A...

Страница 2: ...You for your patronage Paramount Fitness Corporation 6450 East Bandini Blvd Los Angeles CA 90040 IMPORTANT SERIOUS INJURIES TO USERS BYSTANDERS OR INSTALLERS CAN OCCUR IF THE INSTRUCTIONS AND WARNING...

Страница 3: ...STEP 3 ASSEMBLE THE LEFT ARM 15 STEP 4 ASSEMBLE THE PADS 16 STEP 5 ASSEMBLE THE CONNECTING PLATE 17 STEP 6 INSTALL THE WEIGHT STACK 18 STEP 7A INSTALL THE CABLES 19 STEP 7B INSTALL THE CABLES 20 STEP...

Страница 4: ...equipment Adults should closely supervise use by teenagers 8 It is recommended that users receive a thorough medical exam before commencing an exercise program All medical issues should be reviewed t...

Страница 5: ...is piece of equipment for safe access and operation Installation must meet ADA requirements for accessibility 3 Install this piece of equipment on a solid level surface that does not deviate more then...

Страница 6: ...and engaged Verify that the exercise is performed smoothly free of noise and or binding If equipped with a weight stack verify that the proper weight selector pin is in place 3 Check the function of y...

Страница 7: ...ood car polish to remove heavier dirt and grease as well as for polishing DO NOT use solvents lacquer thinner acetone or finger nail polish remover For scuffs and marks that are not removed by the abo...

Страница 8: ...4 cm IN USE MACHINE DIMENSIONS Maximum user weight 300 lbs 136 KG WEIGHT STACK CONFIGURATION MACHINE WEIGHT APPROXIMATE FLOOR LOADING 170 lbs 455 LBS 206 KG 66 LBS FT2 322 KG M2 250 lbs 535 LBS 243 KG...

Страница 9: ...ght Plate Cartons Weight plates are packaged 4 per box You should have 4 boxes of weights This will give you a total of 16 weight plates The weight plates are available in two different sizes 10 lbs a...

Страница 10: ...P 1 2 FS GRD 200X GUIDE ROD 2 3 FS SHD 250X REAR SHROUD 1 4 FS52 SHD 200X FRONT SHROUD 1 5 FS52 UPR 000X UPRIGHT FRAME 1 6 FS BKT 000 GUIDE ROD BRACKET 2 7 FS WSB 000 WEIGHT STACK BASE 2 8 FS52 PAD 10...

Страница 11: ...0X ARM RETAINING ASSEMBLY 1 6 FS52 MFR 300X THIGH PAD PLATES 2 7 FS52 AXL 000X AXLE RIGHT ARM 1 8 FS52 MFR 400X SLEEVE AXLE SPACER 1 9 FS52 PLT 400X ARM CONNECT PLATE 1 10 FS52 CVR 100X COVER CAM 1 11...

Страница 12: ...wn A B D F C ITEM PART NO DESCRIPTION QTY 1 C 445 SCREW 3 8 16 X 1 3 2 C 450 SCREW 3 8 16 X 2 1 2 2 3 C 749 LOCKWASHER 3 8 4 4 C 449 SCREW 3 8 16 X 2 1 4 1 5 C 754C FLAT WASHER 3 8 8 6 C 766A LOCK NUT...

Страница 13: ...FRAME COMPONENTS 7 7 7 7 7 8 1 3 7 5 12 12 8 6 7 5 X3 8 2 7 5 10 8 2 7 5 10 8 4 3 7 5 10 11 10 DETAIL B DETAIL D DETAIL F DETAIL A DETAIL C NOTE MAKE SURE THIGH PAD PLATE IS ORIENTED AS SHOWN BEFORE I...

Страница 14: ...FS STP 001 BUMPER STOP 1 2 1 7 8 5 6 4 CAM CABLE CONNECTION HERE X4 X4 3 9 STOP WILL BE ADJUSTED LATER PRE ASSEMBLE BEFORE INSERTING INTO MAIN ASSEMBLED FRAME 1 Assemble the cam to the axle and tighte...

Страница 15: ...he hardware 3 Install the roll pin using a hammer Make sure the arm is able to be in the position shown ITEM PART NO DESCRIPTION QTY 1 FS52 ARM 000X LEFT ARM 1 2 FS52 MFR 300X THIGH PAD PLATES 1 3 FS5...

Страница 16: ...3 HHCS 2 4 C 749 LOCK WASHER 3 8 8 5 C 754C FLAT WASHER 3 8 8 6 C 955A BASE BOLT COVER 8 7 C 955S BOLT COVER SILVER 8 8 FS52 PAD 100X SEAT PAD 1 9 F252 PAD 200X THIGH PAD 2 10 FS PAD 000X BACK PAD 1...

Страница 17: ...PLT 400X PLATE ARM CONNECTION 1 2 C 766A LOCK NUT 3 8 16 2 3 C 754C WASHER FLAT 3 8 2 4 D583 THRUST WASHER 2 1 2 3 4 D558 Bushing 1 Assemble the connection arm and hardware as shown The arms will hav...

Страница 18: ...in as shown 5 Install the Guide rod hubs and tighten the hardware 1 3 7 9 10 5 6 8 4 2 3 ITEM PART NO DESCRIPTION QTY 1 C 449 SCREW 3 8 16 X 2 1 4 HHCS 2 2 C 766A LOCK NUT 3 8 2 3 C 754C FLAT WASHER 3...

Страница 19: ...eys and hardware as you go along 2 After assembly make sure the cable and pulleys can move freely 3 Tighten ALL the hardware ITEM PART NO DESCRIPTION QTY 1 B 900 PULLEY 4 1 2 DIA 3 2 C 448 SCREW 3 8 1...

Страница 20: ...4 1 2 DIA 1 2 C 448 SCREW 3 8 16 X 1 3 4 HHCS 1 3 C 802 SCREW M4 X 20mm PAN HD 1 4 C 754C FLAT WASHER 3 8 2 5 C 766A LOCKNUT 3 8 16 1 PLACE THE SELECTOR PIN IN THE CAP PLATE ADJUST THE ARMS TO A MIDDL...

Страница 21: ...52 CVR 200X SMALL COVER CAM 1 3 C 680A SCREW BUTTON HD 1 4 20 X 1 2 6 4 C 749 LOCKWASHER 3 8 6 5 C 754C FLAT WASHER 3 8 6 6 FS STP 001 STOP ADJUSTABLE 2 1 Place the Cam Cover into place and loosely as...

Страница 22: ...ITEM PART NO DESCRIPTION QTY 1 C 445 SCREW 3 8 16 X 1 HHCS 4 2 C 749 LOCK WASHER 4 3 C 754C FLAT WASHER 4 4 FS52 SHD 200X FRONT SHROUD 1 1 Place the front shroud into position 2 Align the holes and as...

Страница 23: ...50X REAR SHROUD 1 5 C 754C FLAT WASHER 3 8 4 6 FS CAP 000X TOP CAP UPRIGHT 1 7 FS BKT 001 TOP CAP BRACKET 2 1 Set the lower screws of the shroud into the lower brackets on the upright frame 2 Then ali...

Страница 24: ...E 01250 for pounds LBL WSM 01250 for kilograms 4 Remove the backing from the label to expose the adhesive Carefully locate the label on the shroud so that it is centered between the edge and the bend...

Страница 25: ...OIDED COULD CAUSE SERIOUS INJURY OR DEATH PRIOR TO USING THE EQUIPMENT READ THE WARNING LABELS AND INSTRUCTION PLACARDS AFFIXED TO EACH MACHINE IF YOU ARE UNSURE ON HOW TO USE A MACHINE SEEK THE ASSIS...

Страница 26: ...the guide rods and seat adjustment tubes with a teflon spray lubricant Paramount recommends using TriFlowTM brand 2 Adjust the foot plate through each position Verify that the adjustment pin inserts f...

Страница 27: ...the wide variation of flooring on which the unit can be installed contact a qualified contractor to determine an appropriate fastening system for your floor Use 3 8 diameter hardware 10 mm to anchor t...

Страница 28: ...ot authorized by Paramount or any damage caused by improper handling natural disasters acts of God or servicing by non Authorized Dealers This includes but is not limited to the relocation of the prod...

Страница 29: ...NOTES...

Страница 30: ...NOTES...

Страница 31: ......

Страница 32: ...Paramount Fitness Corporation 6450 E Bandini Blvd Los Angeles CA 90040 3185 Phone 1 323 721 2121 Fax 323 724 2000 1 800 721 2121 www paramountfitness com...

Отзывы: