Paramount Fitness FPT19134 Скачать руководство пользователя страница 5

ASSEMBLY INSTRUCTIONS

1

.

NOTE: It is best to use TWO PEOP

/

E for assembly of this

gas fire pit. 

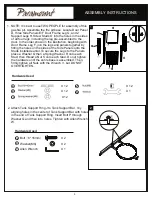
Assemble the fire pit base: Locate Door Panel

D, three Side Panels E

/F

 Door Frame Leg 

G

, and 2

Support


Legs


H

.Screw Studs O into the holes in the sides

of all


four legs, including the leg pre-assembled to the

door. In


the order shown in the illustration, beginning with

Door


Frame Leg 

F

, join the legs and panels together by

fitting


the holes on the sides of the Side Panels onto the

Studs


installed earlier.To secure the Legs to the Panels,

place a


Washer Q then a Spring Washer R onto each

Stud, then


thread a Nut S onto each Stud. Do not tighten

the


hardware until the entire base is assembled. Then,

firmly


tighten all Nuts with the Wrench V, but DO NOT

OVERTIGHTEN.

Hardware Used

O
Q
R

S
V

ASSEMBLY INSTRUCTIONS

1

X 1

X 1

X 1

X 1

X 1

O

SRQ

QRS

O

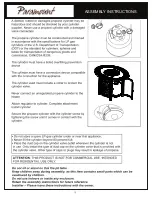
Attach Tank Support Ring 

J


to Tank Support Bar  

I


by 

aligning holes in the center of Tank Support Bar with holes 

in the end of Tank Support Ring. Insert Bolt P through 

Washer Q and then into  holes. Tighten with Allen Wrench 

W.

2

.

2

Hardware Used

Bolt

6 *

16

mm

) 

Washer(M6)


Allen Wrench

X 1

P
Q
W

P

Q

F

E

D

G

H

H

E

Содержание FPT19134

Страница 1: ...Model FPT19134 ULC PY12A E Item FP 452 1 065 003 3 1 5...

Страница 2: ...2 Page 3 Page Page 5 Page 1 WARRANTY 3...

Страница 3: ...QUANTITY Removable Burner Cover 1 Table Top 1 Burner 1 1 2 RRU 3DQHO 3DQHOs 1 1 2 1 B A C D E F I G J H 1 K L K Door Frame Leg Tank Support Bar Tank Support Ring Support Leg Protective Cover Fire Gla...

Страница 4: ...stimated Assembly Time 60 minutes Tools Required for Assembly not included Phillips screwdriver w medium blade Leak Detection Solution Q P O M R N Washer M6 Qty 18 Bolt 6x16mm Qty 6 Stud 8x30mm Qty 5...

Страница 5: ...Studs installed earlier To secure the Legs to the Panels place a Washer Q then a Spring Washer R onto each Stud then thread a Nut S onto each Stud Do not tighten the hardware until the entire base is...

Страница 6: ...into the hole Tighten with Allen Wrench W 4 Hardware Used Bolt 6 16mm Washer M6 Allen Wrench X 3 X 3 X 1 P Q W 3 4 Place Table Top C so underside faces up Screw 4 Studs M into the holes on the Table...

Страница 7: ...QJ 3XW WKH 5HPRYDEOH XUQHU RYHU RQ WKH XUQHU ZKHQ QRW LQ XVH KHQ WKH ILUH SLW LV QRW LQ XVH RU DIWHU XVH ZKHQ WKH ILUH SLW KDV FRROHG 203 7 FRYHU LW ZLWK WKH 3URWHFWLYH RYHU K 2 127 387 7 3527 7 9 5 3...

Страница 8: ...U PXVW EH VWRUHG RXWGRRUV LQ D ZHOO YHQWLODWHG DUH D RXW RI WKH UHDFK RI FKLOGUHQ GLVFRQQHFWHG F OLQGHU PXVW KDYH GXVW FDSV WLJKWO LQVWDOOHG DQG PXVW QRW EH VWRUHG LQ D EXLOGLQJ JDUDJH RU DQ RWKHU HQF...

Страница 9: ...ASSEMBLY INSTRUCTIONS...

Страница 10: ...your opinion about your purchase and we want you to tell everyone about it Just leave a review for the product on the retailers website where you made your purchase or at www jrhome com and fill in th...

Страница 11: ...City Ville Province Province Postal Code Code postal Daytime Phone No t l phone jour Evening Phone No t l phone soir E Mail Address Courriel Product Produit Place of Purchase Lieu de l achat Date of...

Отзывы: