3.
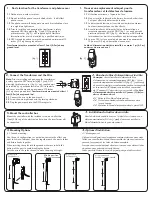
Mount the controller box
4.
Mounting Options
4.
Options d’installation
3.
Installation du boîtier de contrôle
Mount the controller with the included screw on a wall within
1foot (30.5cm) of the electrical outlet where the transformer will
be connected.
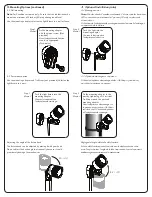
4.1 Ground mounting
Use the posts configurations as per below to create the effect you
want to achieve. To mount the parts together, push the posts, spikes
and fixture heads together.
When inserting the spike into the ground make sure to hold the
bottom of the post to avoid breaking the fixture.
Pass the wire in the spike channel to make the wire go straight.
4.1 Montage au sol
Utilisez les configurations des poteaux comme ci-dessous pour créer
l’effet que vous voulez obtenir. Pour assembler les pièces, poussez les
poteaux, les piquets et les têtes de fixture ensemble.
Lorsque vous insérez le piquet dans le sol assurez-vous de tenir le bas
du poteau pour éviter de casser la fixture.
Faites passer le fil dans le canal du piquet pour que le fil soit droit.
Fixer le boîtier de contrôle au mur à l’aide de la vis incluse à une
distance maximale de 30.5cm (1 pied) d’où seront installés le
bloc d’alimentation et la prise de courant.
2.
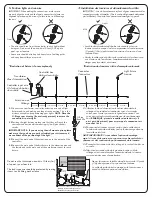
Connect the Transformer and the Wire
2.
Branchez le bloc d’alimentation et le câble
Note:
Prior to installing and powering the transformer,
a safety approved GFCI receptacle (fig. 1) and GFCI
watertight protective cover (fig. 2)– not supplied must
be installed by a qualified electrician. GFCI receptacle
and cover must be mounted a minimum of 12 inches
(0.3 m) above ground level.
Transformer must me mounted at least 1
foot (0.3m) above ground level.
2.1
Connect the wire to the power pack.
2.2
Screw the watertight connector by turning clockwise.
2.3
Plug the power pack into the GFCI receptacle.
Remarque:
Avant d’installer et d’alimenter le bloc
d’alimentation, un réceptacle approuvé GFCI (fig. 1) et un
couvercle de protection étanche GFCI (fig. 2) - (non fourni)
doivent être installés par un électricien qualifié. Le réceptacle
et le couvercle GFCI doivent être installés à un minimum
de 12 pouces (0,3 m) au-dessus du niveau du sol.
Le bloc
d’alimentation doit être installé à 12 pouces (0,3 m) au-
dessus du niveau du sol.
2.1
Reliez le fil au bloc d’alimentation.
2.2
Vissez le connecteur étanche en tournant dans
le sens horaire.
2.3
Branchez le bloc d’alimentation dans la prise GFCI.
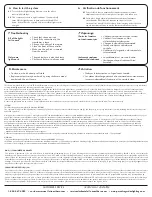
Low position
Position basse
4”
8”
8”
8”
4”
8”
Middle position
Position moyenne
High Position
Position haute
Not recommended
Position non-recommandée
1. Find a location for the transformer and photo sensor
1. Trouver un emplacement adéquat pour le
transformateur et le détecteur de lumière
1.1
Outdoor use, weather resistant.
1.2
Do not install the photo sensor behind shrubs. It will affect
photo sensor.
1.3
The photo sensor will not operate properly if installed too close
to a nighttime light source.
1.4
Prior to installing and powering the transformer, a safety
approved GFCI receptacle (fig. 1) and GFCI watertight
protective cover (fig. 2)– not supplied by NII Northern
International Inc. must be installed by a qualified electrician.
1.5
GFCI receptacle and cover must be mounted a minimum of 12
inches (0.3 m) above ground level.
Transformer must me mounted at least 1 foot (0.3m) above
ground level.
1.1
Utilisation extérieure, à l’épreuve de l’eau.
1.2
Ne pas installer le détecteur de lumière derrière des buissons.
Ceci peut affecter le détecteur de lumière.
1.3
Le détecteur de lumière est sensible aux lumières nocturnes.
Son fonctionnement peut en être affecté.
1.4
Avant d’installer et d’alimenter le bloc d’alimentation, un
réceptacle approuvé sécurité DDFT (fig. 1) et une housse de
protection étanche GFCI (fig. 2)- non fourni par NII Northern
International Inc. doit être installé par un électricien qualifié.
1,5
La prise GFCI et le couvercle doit être monté un minimum de
12 pouces (0,3 m) au-dessus du niveau du sol.
Le bloc d’alimentation doit être installé à au moins 1 pi (0,3 m)
au-dessus du niveau du sol.
(fig. 1)
(fig. 2)


