background image

11

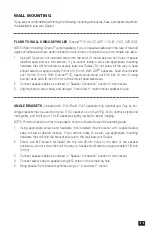
WALL MOUNTING

If you are not comfortable performing the following mounting procedures, have a professional perform
the installation 

(see your Dealer).

FLUSH TO WALL USING KEYHOLES 

(Cinema™ 70, 90, CC, ADP, 110 L/R, 110 C, 220, 330

)

NOTE: 

When mounting Cinema

center speakers, if you run speaker cable down the face of the wall,

apply self-adhesive bumper pads (included) to rear corners of enclosure to accommodate the cable.

1.  Using #10 screws (not included) screw into the stud. (If model has two key holes, measure 

distance apart and use two screws). If you cannot locate a stud, use appropriate mounting
hardware that will hold screws securely 

(see your Dealer). Do not screw all the way in, head

should stand out approximately 3/8 inch (9.5 mm). With ADP

speakers, head should stand

out 1/8 inch (3 mm). With Cinema™ CC, head should stand out 5/16 inch (8 mm). If using
bumper pads add 1/8 inch (3 mm) to the amount head stands out.

2.

Connect speaker cables as outlined in “Speaker Connection” section of this manual. 

3.  Align keyhole to screw head, and using an “in and down” motion mount speaker to wall.

ANGLE BRACKETS 

(included with 110 L/R and 110 C speakers only, optional use

) (Figs. 5a, 5b)

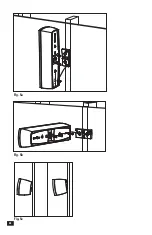
Angle brackets may be used to tilt your 110 C speaker up or down (Fig. 5c) to optimize clarity and
intelligibility, and to tilt your 110 L/R speakers slightly inward for better imaging.

NOTE: 

Position bracket so that the speaker’s sound is directed toward the listening area.

1.  Using appropriate screws and hardware (not included) mount bracket with supplied safety 

strap to stud at desired location. If you cannot locate to a stud, use appropriate mounting 
hardware that will hold the bracket securely to the wall 

(see your Dealer).

2.

Screw two #12 screws (included) into the two 60-mm holes in the back of the speaker 
enclosure—do not screw them all the way in, heads should stand out approximately 1/8 inch 
(3 mm). 

3.

Connect speaker cables as outlined in “Speaker Connection” section of this manual. 

4.

Connect safety strap to speaker using #12 screw in the remaining hole.

5.

Hang speaker from bracket keyholes using an “in and down” motion.

Содержание Cinema 110 L/R

Страница 1: ...gm Cinema Compact Theater CT will make in your music and home theater system Our speakers are the product of countless hours of comprehensive research and development and will reward you with exceptional sound for many years To ensure proper installation please read this manual and follow all instructions If you have further questions contact your Authorized Paradigm Dealer or visit the Q A page o...

Страница 2: ...LAGE ET LE TRAITEMENT DES DECHETS Dans le respect de la directive WEEE Waste Electrical Electronic Equipment mise en place par les institutions Européennes à compter du 13 Août 2005 nous souhaitons vous informer que nos enceintes peut contenir des matières devant faire l objet d une procédure de recyclage ou de traitement approprié des déchets Dans cette optique Paradigm Electronics Inc fabricant ...

Страница 3: ... Speaker Placement 9 Wall Mounting 11 Speaker Connection 12 The Subwoofer 12 Subwoofer Placement 12 Subwoofer Connection 13 Setting Subwoofer Controls 13 Limited Warranty 14 TABLE OF CONTENTS The lightning flash with arrowpoint within an equilateral triangle warns of the presence of uninsulated dangerous voltage within the product s enclosure that may be of sufficient magnitude to constitute a ris...

Страница 4: ...oduct and to protect it from overheating and these openings must not be blocked or covered The openings should never be blocked by placing the product on a bed sofa rug or other similar surface This product should not be placed in a built in installation such as a bookcase or rack unless proper ventilation is provided or the manufacturer s instructions have been adhered to 9 Power Sources This pro...

Страница 5: ...e fallen into product If the product has been exposed to rain or water If the product does not operate normally by following the operating instructions Adjust only those controls that are covered by the operating instructions as an improper adjustment of other controls may result in damage and will require extensive work by a qualified technician to restore the product to its normal operation If t...

Страница 6: ...4 X 3 4 X X 3 4 X or SPEAKER PLACEMENT AND CONNECTION POSITIONNEMENT ET RACCORDEMENT DES ENCEINTES Fig 1 Fig 2 ...

Страница 7: ...5 Fig 4c Fig 4e Fig 4d Fig 3 Fig 4a Fig 4b Placing the 110 C on a TV or shelf Installation de l enceinte 110 C sur une télévision ou une étagère ...

Страница 8: ...Fig 5b Fig 5c Fig 5a 6 ...

Страница 9: ...7 Fig 8 1 2 Fig 6 Fig 7 ...

Страница 10: ... power your subwoofer will draw when producing its maximum power output However the actual wattage draw will vary with the bass content of the program material HOW TO AVOID SPEAKER DAMAGE Use an appropriate amplifier At high volumes a very powerful amplifier can overdrive your speakers and damage them On the other hand if your amplifier isn t powerful enough it can produce clipping distortion that...

Страница 11: ...Direct Radiating Surrounds should be kept well away from the listening area for optimal surround sound performance ADP Surrounds are designed to be used with their drivers firing toward the front and back walls to ensure a large reverberant soundfield nameplate points towards listening area Surround speakers may be wall mounted see section on Wall Mounting mounted on Paradigm speaker stands or pla...

Страница 12: ...ield an ADP speaker is also the best choice for the rear channel in a 6 1 surround sound system Place one ADP in the center behind the listening area Fig 4d with drivers firing towards the side walls nameplate points toward listening area 7 1 Surround Configuration optional extra see Dealer Direct Radiating Rears Position behind the listening area one speaker slightly right and other slightly left...

Страница 13: ...d in Speaker Connection section of this manual 3 Align keyhole to screw head and using an in and down motion mount speaker to wall ANGLE BRACKETS included with 110 L R and 110 C speakers only optional use Figs 5a 5b Angle brackets may be used to tilt your 110 C speaker up or down Fig 5c to optimize clarity and intelligibility and to tilt your 110 L R speakers slightly inward for better imaging NOT...

Страница 14: ...80o relative to your speakers SUBWOOFER PLACEMENT We recommend positioning your subwoofer close to the wall between the front speakers Corner placement Fig 7 provides the most bass but sometimes at the expense of accuracy A subwoofer placed near a wall usually provides a good balance of quantity and accuracy SPEAKER CONNECTION Turn your amplifier OFF before connecting speakers This will avoid dama...

Страница 15: ...oofer are out of phase they work against each other through the crossover region and bass is reduced If bass sounds weak or dislocated change the phase according to the instructions in point 4 below When adjusting your subwoofer remember that bass should not be overbearing the subwoofer should not draw attention to itself but it shouldn t be thin or difficult to hear either Use the following set u...

Страница 16: ...l damage or any abnormal conditions The product including cabinet has been tampered with or damaged by an unauthorized service facility The serial number has been removed or defaced Owner Responsibilities Provide normal reasonable operating care and maintenance Provide or pay for transportation charges for product to service facility Provide proof of purchase your sales receipt given at time of pu...

Страница 17: ... maison Nos enceintes acoustiques sont le produit d innombrables heures de recherche et de développement approfondis et elles vous fourniront un son exceptionnel pendant de nombreuses années Pour une installation adéquate lire ce manuel et suivre toutes les instructions Pour toute autre question contacter un revendeur Paradigm autorisé ou consulter la page Questions Réponses de notre site Internet...

Страница 18: ...duit cette tension est suffisante pour constituer un risque de choc électrique Le point d exclamation dans un triangle équilatéral signale à l utilisateur la présence d instructions d utilisation ou d entretien importantes dans les documents qui accompagnent le produit AVERTISSEMENT POUR MINIMISER LE RISQUE DE CHOC ÉLECTRIQUE NE PAS ÔTER LE CAPOT OU LE PANNEAU ARRIÈRE IL N Y A À L INTÉRIEUR AUCUN ...

Страница 19: ...r un lit canapé tapis ou toute autre surface similaire Ne pas placer ce produit dans une enceinte préfabriquée par exemple une bibliothèque ou un support en l absence d une ventilation adéquate conforme aux prescriptions du fabricant 9 Sources d énergie Ce produit doit être alimenté à partir d une source d électricité dont les caractéristiques correspondent aux indications de la plaque signalétiqu...

Страница 20: ...on du produit à la pluie ou à de l eau Impossibilité de fonctionnement normal du produit conformément aux instructions d utilisation Effectuer des réglages uniquement sur les organes de commande mentionnés dans les instructions d utilisation tout réglage incorrect des autres composants réglables pourrait provoquer des dommages et nécessiter un travail de réparation important par un technicien qual...

Страница 21: ...ur l alimentation du caisson des sous graves à la puissance de sortie maximale Cependant la puissance réelle peut varier en fonction des fréquences graves du signal reproduit POUR ÉVITER D ENDOMMAGER LES ENCEINTES ACOUSTIQUES Utiliser un amplificateur adéquat À volume élevé un amplificateur trop puissant peut solliciter excessivement les enceintes et les endommager Par contre si l amplificateur n ...

Страница 22: ... au dessus de la télévision sur une étagère ou sur un mur voir la section suivante sur l installation murale Dans le cas d installation de l enceinte 110 C sur une télévision ou une étagère il faut utiliser le support ajustable pour télévision étagère ci inclus fig 3 L installation s effectue comme suit 1 Faire passer le câble par l ouverture située sous la monture puis raccorder tel qu indiqué da...

Страница 23: ...al arrière dans une configuration ambiophonique de type 6 1 Positionner une enceinte ADPMC au centre derrière la zone d écoute fig 4d les éléments étant orientés vers les murs latéraux la plaque de firme orientée vers la zone d écoute 7 1 Configuration ambiophonique optionnel consulter le revendeur Enceintes à radiation directe arrière Positionner les enceintes derrière la zone d écoute une encein...

Страница 24: ...Aligner les trous avec les têtes de vis et d un mouvement vers le mur puis vers le bas installer l enceinte au mur FIXATION EN COIN ferrures incluses pour usage optionnel avec les enceintes de types 110 L R et 110 C Figs 5a 5b Utiliser les ferrures de fixation en coin pour incliner l enceinte C vers le haut ou vers le bas Fig 5c afin d optimiser la précision et la clarté du son et pour incliner le...

Страница 25: ...aux enceintes POSITIONNEMENT DU CAISSON DE SOUS GRAVES Il est recommandé de placer le caisson de sous graves à proximité du mur entre les enceintes avant Lorsque le caisson est placé dans un coin la fig 7 permet d obtenir les graves les plus intenses mais parfois aux dépens de la précision Le positionnement du caisson de sous graves près d un mur fournit généralement un bon équilibre entre intensi...

Страница 26: ...ces graves si les enceintes avant et le caisson de sous graves sont en parfaite opposition de phase il se produit une compensation annulation dans la plage de chevauchement des fréquences ce qui réduit le niveau des graves Si les fréquences graves semblent être faibles ou si le son semble être disloqué rétablir la synchronisation des phases selon les instructions du point 4 ci dessous Lors du régl...

Страница 27: ...électriques dommageables un transport dangereux des dommages matériels ou toute autre condition anormale L enceinte y compris le boîtier sont altérés ou endommagés lors d une réparation non autorisée La plaque du numéro de série du produit est enlevée ou défigurée Responsabilités du propriétaire Apporter un soin et un entretien normaux et raisonnables Assumer les frais de transport jusqu à l ateli...

Страница 28: ...w w w p a r a d i g m c o m PARADIGM ELECTRONICS INC 060607 PRINTED IN CHINA IMPRIMÉ EN CHINA ...

Отзывы: