background image

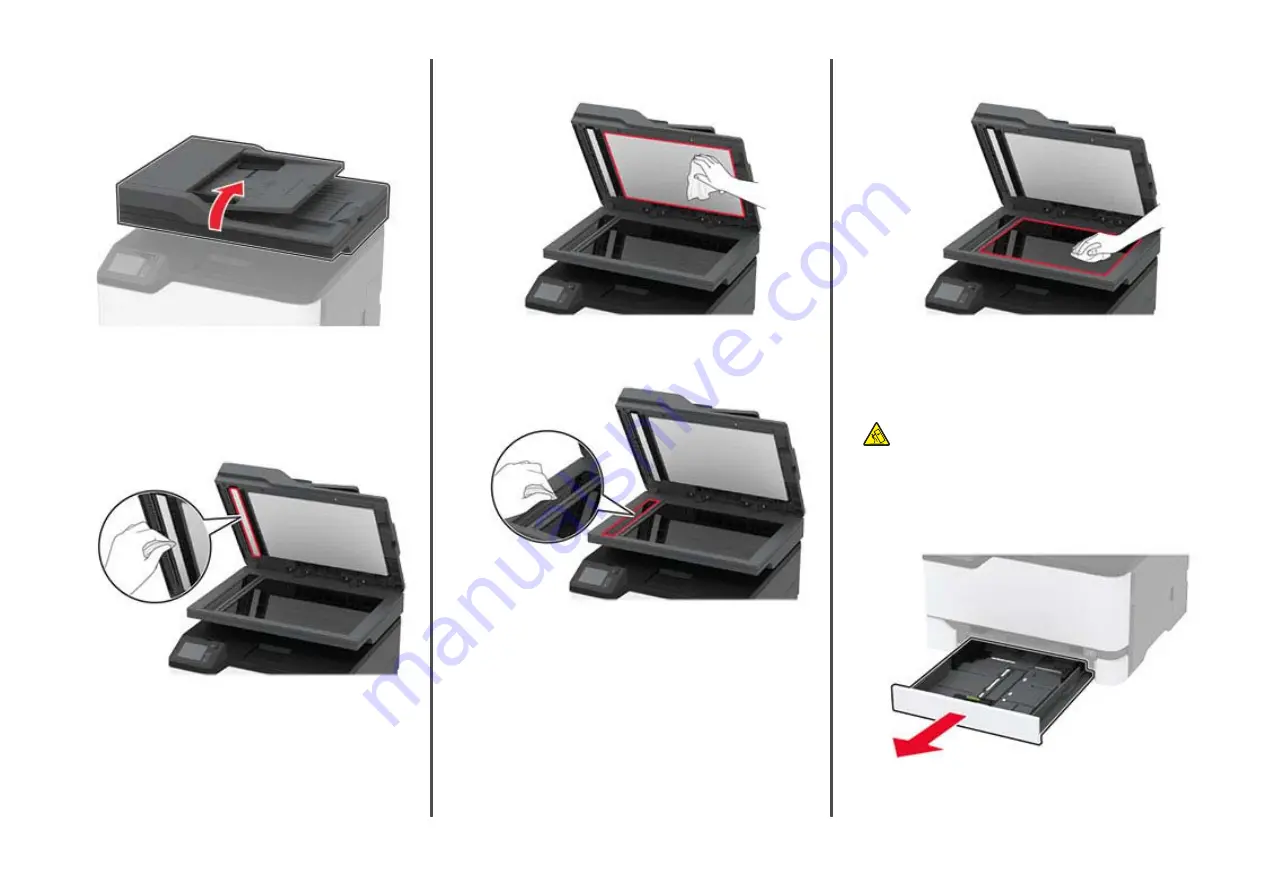
Cleaning the scanner

1

Open the scanner cover.

2

Using a damp, soft, lint-free cloth, wipe the following areas:

ADF glass pad

Note: 

In some printer models, this location has an ADF

glass instead of a pad.

Scanner glass pad

ADF glass

Scanner glass

3

Close the scanner cover.

Loading trays

CAUTION—TIPPING HAZARD: 

To reduce the risk of

equipment instability, load each tray separately. Keep all
other trays closed until needed.

1

Remove the tray.

Note: 

To avoid paper jams, do not remove trays while the

printer is busy.


4

Содержание CM2200

Страница 1: ...and then click Properties Preferences Options or Setup 3 Click Fax Enable fax and then enter the recipient number 4 If necessary con gure other fax settings 5 Send the fax job For Macintosh users 1 Wi...

Страница 2: ...o the printer wireless network on page 6 1 From your mobile device launch a compatible application or select a document from your le manager 2 Depending on your mobile device do one of the following T...

Страница 3: ...ed print cartridge 4 Unpack the new print cartridge Warning Potential Damage Do not expose the underside of the print cartridge to direct light Extended exposure to light may cause print quality probl...

Страница 4: ...s location has an ADF glass instead of a pad Scanner glass pad ADF glass Scanner glass 3 Close the scanner cover Loading trays CAUTION TIPPING HAZARD To reduce the risk of equipment instability load e...

Страница 5: ...paper jams make sure that the stack height is below the maximum paper ll indicator 4 Adjust the guides to match the size of the paper that you are loading 5 Insert the tray If necessary set the paper...

Страница 6: ...ge the SSID and password if necessary 2 Connect your mobile device to the printer wireless network Clearing jams Avoiding jams Load paper properly Make sure that the paper lies at in the tray Correct...

Страница 7: ...printer reprints jammed pages Jam locations 1 Automatic document feeder ADF 2 Standard bin 3 Manual feeder 4 Trays Jam locations 5 Door B 6 Door E Paper jam in the standard tray 1 Open door B CAUTION...

Страница 8: ...of the printer might be hot To reduce the risk of injury from a hot component allow the surface to cool before touching it 2 Remove the jammed paper Note Make sure that all paper fragments are removed...

Страница 9: ...anner and then remove the jammed paper Note Make sure that all paper fragments are removed 2 Lower the scanner Paper jam in the manual feeder 1 Remove the tray and the manual feeder 2 Remove the jamme...

Страница 10: ...SURFACE The inside of the printer might be hot To reduce the risk of injury from a hot component allow the surface to cool before touching it 2 Remove the jammed paper from any of the following areas...

Страница 11: ...e door Paper jam in the automatic document feeder 1 Remove all original documents from the ADF tray 2 Open the ADF cover 3 Remove the jammed paper Note Make sure that all paper fragments are removed 4...

Отзывы: