background image

24

You can press below buttons on the remote 

control to perform some functions directly.

[

l

]: Pause or resume playing.

[

f

/

e

]: Skip to previous or next movie.

[

d

/

c

]: Fast backward or forward.

[

n

]: Stop playing and return to the thumbnails 

view menu.

If you want to delete the highlighted movie, 

press Red button on remote control, a window 

SRSVXSRQWKHVFUHHQIRU\RXUFRQ¿UPDWLRQ

Press [

b

] to select “Yes” and delete file or 

press [

a

] to select "No” and exit without 

deleting.

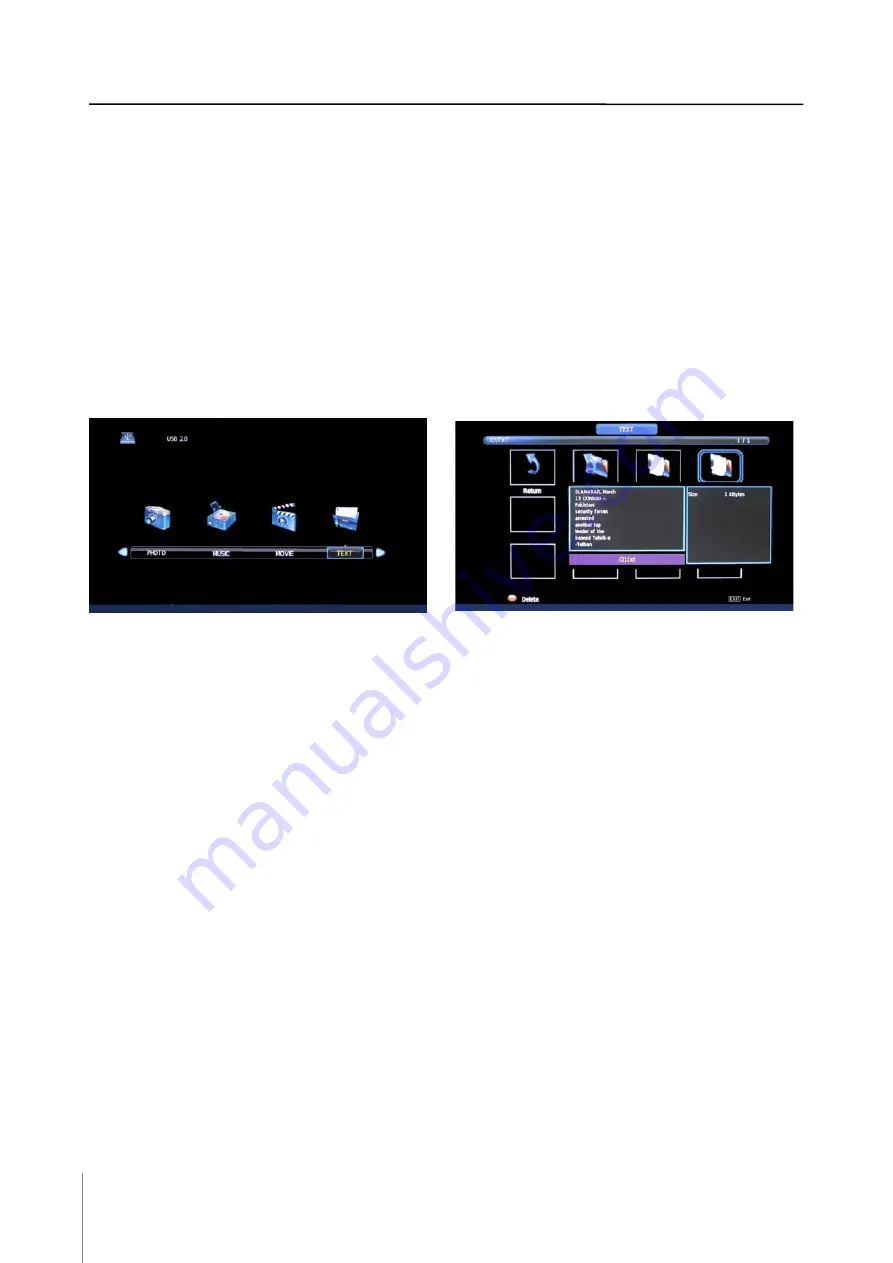
4. View text

Press [OK] to start viewing the text in full 

screen.

Press [INFO] during viewing the text. The OSD 

menu appears on the bottom of screen. Press 

[

b

/

a

] to navigate among the icons on the 

OSD menu. Highlight the desired icon on OSD 

menu and press [OK] to operate the function. 

Press [EXIT] to return to the thumbnails view 

menu.

You can press below buttons on the remote 

control to perform some functions directly.

[

f

/

e

@6NLSWRSUHYLRXVRUQH[WWH[W¿OH

[

d

/

c

]: Skip to previous page or next page.

[

n

]: Stop playing and return to the thumbnails 

view menu.

Press [

b

/

a

] to select "TEXT", then press [OK] 

to enter.

Press  [

b

/

a

@WRVHOHFWWKH¿OHIROGHU\RXZDQW

to watch in the thumbnails view menu.

Press [OK] to open the folder.

Preview of the text will be displayed on screen 

ZKLOHDWH[W¿OHLVKLJKOLJKWHG

If you want to delete the highlighted text, press 

Red button on remote control, a window pops 

XSRQWKHVFUHHQIRU\RXUFRQ¿UPDWLRQ3UHVV

[

b

@WRVHOHFW³<HV´DQGGHOHWH¿OHRUSUHVV>

a

]

to select "No” and exit without deleting.

Содержание LE-24S600F

Страница 1: ......

Страница 2: ......

Страница 3: ... TS CONTENTS Be Sure to Read 4 LED TV PANEL 6 CONNECTING TO EXTERIOR DEVICES 7 REMOTE CONTROL 9 USING THE TV FOR THE FIRST TIME 10 ATV DTV MODE MENU 18 PC MODE MENU 19 PVR FUNCTION 21 MEDIA MODE MENU 25 TROUBLE SHOOTING 27 MAINTENANCE 28 SPECIFICATIONS TV ...

Страница 4: ...er to the presence of important operating and maintenance servicing instructions in the literature accompanying the appliance Before using this product read and follow all warnings and instructions This product is not intended for use by young children or infirm persons unless they are adequately supervised by a responsible person to ensure that they use this product safely Young children should b...

Страница 5: ...not block or cover the ventilation slots at the back of the cabinet Do not push foreign objects into cabinet slots or holes The screen surface is easily scratched Do not touch the screen with hands or any hard object Do not pull the power cord when disconnecting power Turn off the switch on the socket and pull the plug not the cord Do not attempt to open this product yourself There are no user ser...

Страница 6: ...ANEL Front View 1 2 1 2 3 4 5 6 Power indicator On off button z Selecting exterior signal input SOURCE Main menu display for TV MENU Channel selecting pCHo Volume adjusting VOL 7 Remote sensor Back View 4 5 6 7 3 ...

Страница 7: ...LWLRQ PXOWL PHGLD LQWHUIDFH PC AUDIO Sound input terminal of VGA input VGA Input terminal of simulation signal of PC 6 COAXIAL OUT Coaxial audio signal out terminal 7 8 L R VIDEO AV input terminal 9 Y Pb Cb Pr Cr Component video input terminal USB USB input terminal 5 5 10 9 10 1 2 Audio output terminal DC IN DC power input terminal ...

Страница 8: ... external devices to your LED TV The rear of TV DVD L R VIDEO HDMI Camera Video recorder PC AUDIO YPbPr HDMI1 Y Pb Cb Pr Cr VIDEO R L USB VGA PC AUDIO COAXIAL OUT RF 75 HDMI2 DC IN Digital Audio System Coaxial Cable HDMI VGA L R VIDEO YPbPr HDMI ...

Страница 9: ...Notices Navigation buttons o p Up Down Move cursor in menu and adjust settings b a Left Right Move cursor in menu and adjust settings 79 5 7 0 1 2 3 4 5 6 7 8 9 OK P MODE S MODE FREEZE SLEEP SOURCE MENU EXIT INFO VOL CH REC LIST GOTO REPEAT A B X EPG FAV ZOOM TXT MIX SUBTITLE 0XOWL GLJLWV EXWWRQ Remote control indicator Picture frozen button Electronic program guide button DTV recording button Sub...

Страница 10: ...age Press this button if you want to keep the displaying of the page and press it again to exit hold state Press this button if you want to enlarge the content on the upper part of the page and press the second time to enlarge the content on the lower part of the page and the third time to resume normal display of all the contents on the page Press this button if you want to display the concealed ...

Страница 11: ...default language of this TV is English 6 The TV will start searching channels automatically from the lowest frequency When it QGV D VWDWLRQ LW ZLOO VWRUH WKLV LQ WKH UVW ORFDWLRQ DQG PRYH WR WKH QH W KHQ DXWR WXQLQJ LV FRPSOHWHG WKH 79 ZLOO GLVSOD WKH UVW VWDWLRQ IRXQG 7 Press MENU or EXIT to skip or cancel the tuning process First Time Installation OK English Español Italiano Français Deutsch Tun...

Страница 12: ...Tune Press b a to scan current program within a frequency range accurately and store the result manually AFC Set the Automatic Frequency Control to On or Off Search Press b a to start search Press b a to select channel then press OK to search programs DTV Manual Tuning Press a or OK to enter DTV Manual Tuning submenu CHANNEL MENU Return Move OK Select EXIT Exit Auto Tuning ATV Manual Tuning DTV Ma...

Страница 13: ...nnel to your favorite channel there will be a red heart at the behind of the channel selected If the current channel is already be one of your favorite channel press it again will set it to a normal one Signal Information For DTV only Press a or OK to enter Signal Information submenu This menu displays signal details including Channel number Frequency Quality and Strength Signal Information Channe...

Страница 14: ...r submenu Press b a to set the picture s tint Avaliable for NTSC video signal only Sharpness Press b a or OK to enter submenu Press b a to set the picture s sharpness Colour Temp Press b a or OK to enter Colour Temp submenu Press o p to change the colour temperature in sequence Cold v Normal v Warm Noise Reduction Press b a or OK to enter Noise Reduction submenu Press o p to change the noise reduc...

Страница 15: ...proper value of treble Bass Press b a or OK to enter submenu Press b a to set the proper value of bass Balance Press b a or OK to enter submenu Press b a to set the proper value of left and right channel speaker s balance Auto Volume Press b a or OK to set the automatic volume level to On or Off SPDIF Mode Press b a or OK to set the SPDIF mode to Auto Off or PCM SOUND MENU Return Move OK Select EX...

Страница 16: ...nu Press o p to change the sleep timer as Off 10 Min 20 Min 30 Min 60 Min 90 Min 120 Min 180 Min 240 Min You can press SLEEP repeatedly on the remote control to change the sleep timer directly Auto Standby Press b a or OK to enter submenu Press o p to change the auto standby as Off 3 Hours 4 Hours 5 Hours OSD Timer Press b a or OK to enter submenu Press o p to change the OSD timer as 5 Seconds 10 ...

Страница 17: ... UH HQWHULQJ LW WR FRQ UP WKH QHZ RQH Please enter old password Please enter new password Confirm new password Clear Cancel LOCK MENU Return Move OK Select EXIT Exit Lock System Set Password Block Program Parental Guidance Key Lock Hotel Mode Off NO BLOCK Off Block Program Press a or OK to enter Block Program submenu 1 You can add or release a lock to some special program When watch a locked progr...

Страница 18: ... OK Menu HOTEL MENU Return Move OK Select EXIT Exit Hotel Mode Source Lock Default Source Off Off 1 Default Prog Max Volume Clear Lock 100 Hotel Mode Press b a or OK to select On or Off which enables or disables below hotel mode functions Source Lock To set the input source item which you want to be locked Default Source To set the default input source when you open the TV main unit Default Prog T...

Страница 19: ... checking This process needs some seconds If it QLVKHV WKH ZRUG 68 66 ZLOO EH VKRZQ after Check PVR File System and the speed will be shown on the menu as well Now you can record and save the DTV programme Note Hard disk with built in power supply is preferred 6 SETUP MENU Press MENU to display the main menu Press b a to select SETUP in the main PHQX WKHQ SUHVV 2 RU ź WR HQWHU Aspect Ratio Press b...

Страница 20: ... the auto adjust item may not do effect You may adjust the position clock and phase manually H Offset Press b a or OK to enter submenu Press b a to adjust the position of picture in horizontal V Offset Press b a or OK to enter submenu Press b a to adjust the position of picture in vertical Size Press b a or OK to enter submenu Press b a to adjust the display size Phase Press b a or OK to enter sub...

Страница 21: ...o call out the function menu at the bottom of the screen as below and press b a to select the function you want to run then press OK to operate Or you can press relevant buttons on the remote control directly Play FB FF Prev Next Pause Stop 9 Nine Digital 15 51 00 00 59 0000 23 40 Delete Recorded List Programme OK Index INFO HI 1 HI 2 HI 3 HI 4 HI 5 Recorded List 1 Press REC LIST to display the li...

Страница 22: ...ck applies and then the relevant date Use the same method for entering the end time 3 Choose the appropriate recording mode once every day or weekly 4 Press OK to confirm your selection A schedule of all your recordings the reminder list will appear 5 Press z WR VZLWFK WKH 79 WR VWDQG E W ZLOO record your selection automatically 800 Channel 5 30 Minute Start Time End Time 20 Hour Jul Month 04 Date...

Страница 23: ...to select the submenu PHOTO MUSIC MOVIE or TEXT and press OK to FRQ UP Supported File Format Mode Type Supported Format PHOTO PNG JPEG BMP MUSIC WMA MP3 MOVIE AVI DAT MP4 MPG TEXT TXT 1 View picture Press b a to select PHOTO then press OK to enter Press b a to select Return option to return to the previous menu Select C option to enter Press OK to confirm your selection and access thumbnails view ...

Страница 24: ...ired icon on OSD menu and press OK to operate the function Press EXIT to return to the thumbnails view menu You can press below buttons on the remote control to perform some functions directly l Pause or resume playing f e Skip to previous or next picture n Stop playing and return to the thumbnails view menu 2 Play music Press b a to select MUSIC then press OK to enter Press b a WR VHOHFW WKH OH I...

Страница 25: ...ying and return to the thumbnails view menu 3 Watch movie Press OK to start viewing the movie in full screen Press INFO during viewing the movie The OSD menu appears on the bottom of screen Press b a to navigate among the icons on the OSD menu Highlight the desired icon on OSD menu and press OK to operate the function Press EXIT to return to the thumbnails view menu Press b a to select MOVIE then ...

Страница 26: ...ong the icons on the OSD menu Highlight the desired icon on OSD menu and press OK to operate the function Press EXIT to return to the thumbnails view menu You can press below buttons on the remote control to perform some functions directly f e 6NLS WR SUHYLRXV RU QH W WH W OH d c Skip to previous page or next page n Stop playing and return to the thumbnails view menu Press b a to select TEXT then ...

Страница 27: ...WKH SRZHU FRQWURO VHWWLQJV 3RZHU LV LQWHUUXSWHG 1R EURDGFDVW RQ VWDWLRQ WXQHG ZLWK DXWR DFWLYDWHG Picture appears slowly after switching on 7KLV LV QRUPDO 7KH LPDJH LV PXWHG GXULQJ WKH SURGXFW VWDUWXS process Please contact your service center if the picture has not DSSHDUHG DIWHU YH PLQXWHV No or poor color or poor picture GMXVW WKH FRORU LQ PHQX RSWLRQ HHS D VXI FLHQW GLVWDQFH EHWZHHQ WKH SURGXF...

Страница 28: ...UL RQWDO IUHTXHQF RU YHUWLFDO IUHTXHQF KHFN ZKHWKHU WKH VLJQDO FDEOH LV FRQQHFWHG RU ORRVH KHFN the input source Vertical bar or stripe on background Horizontal Noise Incorrect position RUN WKH DXWR FRQ JXUH RU DGMXVW FORFN SKDVH RU 9 SRVLWLRQ Screen color is unstable or single color KHFN WKH VLJQDO FDEOH 5HLQVWDOO WKH 3 YLGHR FDUG ...

Страница 29: ...er and a little fabric softener or dish washing detergent Wring the cloth until it s almost dry and then use it to wipe the screen 0DNH VXUH WKH H FHVV ZDWHU LV RII WKH VFUHHQ DQG WKHQ OHW LW DLU GU EHIRUH RX WXUQ RQ RXU TV Cleaning the cabinet 7R UHPRYH GLUW RU GXVW ZLSH WKH FDELQHW ZLWK D VRIW GU OLQW IUHH FORWK 3OHDVH EH VXUH QRW WR use a wet cloth Extended absence If you expect to leave your T...

Страница 30: ...r 1 Video Audio Input AV 1 PC Input VGA 1 PC Audio Input PC AUDIO 1 HDMI Input HDMI1 HDMI2 2 USB Port USB 1 Output Connections Coaxial Output Jack COAXIAL OUT 1 Earphone 1 VGA Resolutions Supported Power Requirements Power Consumption Power Input 12V 4 0A Dimension Weight Unit W stand speakers N W Unit W stand speakers LED 23 6 inch 16 9 521 28 H x 293 22 V 1920 H x 1080 V 300 cd m2 1000 1 0 2715 ...

Страница 31: ...PLD 24A3136B0 050 ...

Отзывы: