


printer shuts down. The battery should then be recharged
fully for 15 hours. When fully charged, the battery pack will
measure 14-14.5 volts, and will power the printer all the way
down to approximately 11 volts. The printer has an auto
shut-off feature which will automatically turn the printer off
after being idle for 5 minutes to conserve battery power.
NOTE:
“WARNING: LOW BATTERY” message is a warning and
may appear with some battery life remaining. Therefore the
printer can continue to be used until it shuts down.
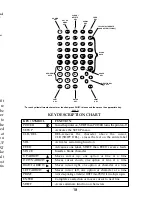
RIBBON CARTRIDGE INSTALLATION
Open the label door of the printer by inserting your finger
into the label exit slot and gently pulling up OR grasp the
label compartment cover and pull up gently. Place the
ribbon cartridge (Part Number LS3-RIB) in the ribbon
compartment with the metal tear bar facing upward and the
manual advance knob on the left (See Figure 2). Turn the
manual advance knob counterclockwise while applying
gentle downward pressure until the knob is positioned.
Continue to turn the manual advance knob while pushing
down on the screws on the metal tearbar until the ribbon
cartridge snaps onto both plastic tabs on the sides of the
rubber drive roller. Once installed, turn the manual advance
knob counterclockwise to make sure the ribbon is loaded
properly. Make sure the ribbon is between the nose of the
print head and the print shield (See Figure 2).
6
25
3
9
1**
11
1**
1**
5
11
11
1**
11
7
3
7
11
3
7
11
7
7
11
2
2
10
11
11
10
4
12
1**
16
1**
1**
7
16
16
1**
16
10
4
10
16
4
10
16
10
10
16
2
3
15
16
16
15
0.50 (12.7)
0.33 (8.5)
2.90 (73.7)
0.34 (8.5)
3.00 (76.2)
1.95 (49.5)
0.19 (4.8)
1.50 (38.1)
0.90 (22.9)
3.68 (93.5)
1.25 (31.8)
1.00 (25.4)
0.50 (12.7)
0.75 (19.1)
0.75 (19.1)
0.28 (7.0)
0.28 (7.0)
0.28 (7.0)
0.40 (10.2)
0.50 (12.7)
0.50 (12.7)
CONTINUOUS
CONTINUOUS
0.75 (19.1)
0.75 (19.1)
0.75 (19.1)
0.75 (19.1)
1313
3108
1074
3808
0876
1050
2607
3838
3823
0993
3832
2525
1313
2519
3819
1307
2507
3807
2510
2513
3813
0900
1000
3611
3811
3813
3617
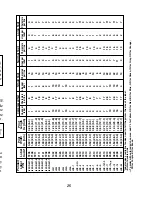
P
anduit Label P/N
Lines P
er Label / Character
s P
er Line
Label Code*
Print Width
In.
(mm)
Length In.
(mm)
Compressed T
ext
Lines per
label
Character
s
per line
Lines per
label
Character
s
per line
Lines per
label
Character
s
per line
Lines per
label
Character
s
per line
Small T
e
xt
Normal T
e
xt
Lar
g
e
T
e
xt
4
2
33**
2
34**
21**
1
16
9
41**
13
10
4
7
7
1
1
1
3
4
4
---
---
3
3
4
6
8
22
2**
28
2**
3**
11
28
28
1**
28
17
8
17
28
8
17
28
17
17
28
5
6
26
28
28
26
4
2
33**
2
34**
21**
1
16
9
41**
13
10
4
7
7
1
1
1
3
4
4
---
---
3
3
4
6
6
17
2**
22
2**
3**
9
22
22
1**
22
14
6
14
22
6
14
22
14
14
22
4
4
20
22
22
20
3
1
22**
1
23**
15**
1
11
6
28**
9
7
3
5
5
1
1
1
2
3
3
---
---
2
2
3
4
2
1
16**
1
17**
11**
1
8
4
21**
6
5
2
3
3
1
1
1
1
2
2
---
---
1
1
2
3
L3CBX##
L3CPLF
@@
L3EFPL1
L3EFPL2
L3EFPN1
L3EFPN2
L3PJ1##
L3PL1
L3PL2
L3PP2++
LC-1
LC-2
LC-3
LC-4
LC-5
LC-6
LC-7
LC-8
LC-9
LC-10
LC-11
LC-14
LC-15
LC-38
LC-39
LC-40
LC-41
0.50 (12.7)
1.23 (31.1)
0.38 (9.5)
1.50 (38.1)
0.33 (8.5)
0.40 (10.2)
0.64 (16.2)
1.50 (38.1)
1.50 (38.1)
0.25 (6.4)
1.50 (38.1)
1.00 (25.4)
0.50 (12.7)
1.00 (25.4)
1.50 (38.1)
0.50 (12.7)
1.00 (25.4)
1.50 (38.1)
1.00 (25.4)
1.00 (25.4)
1.50 (38.1)
0.31 (7.9)
0.38 (9.5)
1.50 (38.1)
1.50 (38.1)
1.50 (38.1)
1.50 (38.1)
*Label codes are distinct codes used to tell the printer the siz
e
of the label.
**Because these labels are g
enerall
y
printed in the Rotated
T
e
xt Mode
,
v
alues sho
w
n are f
o
r Rotated
T
e
xt.
##WH= White
,
CL=Clear
.
@@WH=White
,YL=Y
ello
w
,
RD=Red,
B
U
=Blue
,
GR=Green,
IG=Gra
y
,
OR=Orang
e
,
PR=Purple
,
BR=Br
o
w
n,
CL=Clear
++WH=White
,YL=Y
ello
w
,
RD=Red,
B
U
=Blue
,
GR=Green,
IG=Gra
y
,
OR=Orang
e
,
PR=Purple
,
BR=Br
o
w
n
Содержание Pan-Quik LS3E
Страница 3: ......
Страница 5: ......
Страница 9: ......
Страница 11: ......
Страница 13: ...o l y s r 4 d a e e e e t e e P o ...
Страница 15: ......
Страница 17: ...s f N r n r e e o e f ...
Страница 19: ...e s l o g n d e n E ...
Страница 21: ......
Страница 23: ... s e e d e o e n e s d d o e d o e n y ...
Страница 25: ...d d l n h t o o e e s o e ...
Страница 27: ...d l y o f r e e n e e g g n e e d e ...
Страница 29: ......


