background image

AT-JUNO-451-HDBT

43

Updating the Firmware

Updating the firmware can be completed using either the USB interface or the web GUI. Atlona recommends

using the web GUI for updating the firmware. However, if a network connection is not available, the AT-JUNO-451-

HDBT firmware can be updated using a USB-A to USB mini-B cable.

Using the Web GUI

Requirements:

•  AT-JUNO-451-HDBT

• 

Firmware file

•  Computer running Microsoft Windows

1. 

Connect an Ethernet cable from the computer, containing the firmware, to the same network where the AT-

JUNO-451-HDBT is connected.

2.  Go to the 

System page (page 40)

 in the web GUI. 


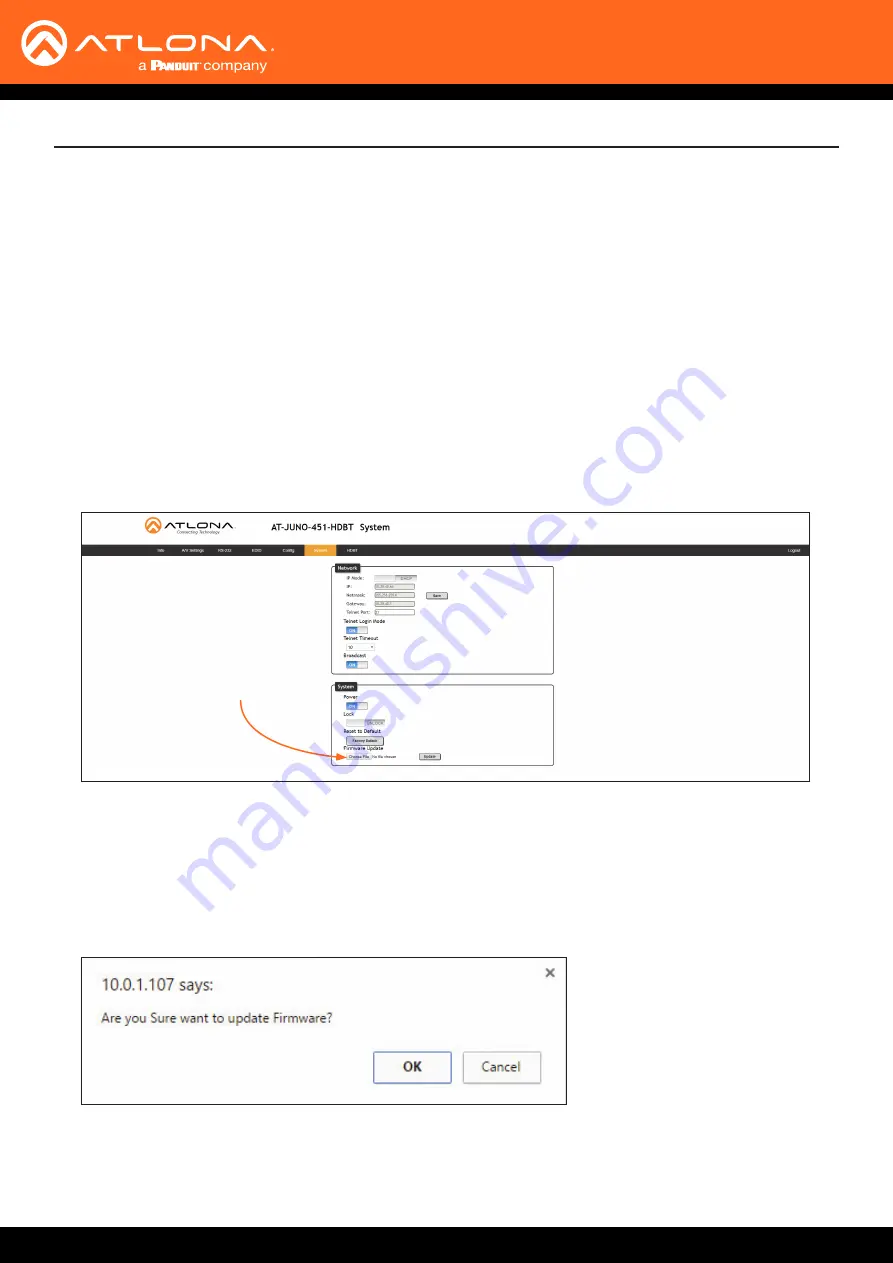
3.  Click the 

Choose File

 button, under 

Firmware Update

.

4. 

Browse to the location of the firmware file, select it, and click the 

Open

 button.

5.  Click the 

Update

 button to begin the update process.

Choose File button

6.  The following message box will be displayed. 


7.  Click the 

OK

 button to begin the firmware update process.  Click the 

Cancel

 button to cancel the process.

8. 

After the firmware update process is complete, the 

Login

 screen will be displayed.

Appendix

Содержание Atlona AT-JUNO-451-HDBT

Страница 1: ...AtlonaManuals Switchers AT JUNO 451 HDBT Four Input HDMI and HDBaseT Switcher with Auto Switching and Return Optical Audio 4K UHD ...

Страница 2: ...AT JUNO 451 HDBT 2 Version Release Date Notes 1 Jun 2018 Initial release 2 Jul 2019 Added missing factory default setting information 3 Sep 2019 Updated for 1 0 03 firmware Version Information ...

Страница 3: ...o to http www atlona com registration Sales Marketing and Customer Support Welcome to Atlona Operating Notes IMPORTANT Visit http www atlona com product AT JUNO 451 HDBT for the latest firmware updates and User Manual NOTE For HDR and 4K 60 4 4 4 content HDMI data rates exceeding 10 Gbps the AT JUNO 451 HDBT is not compatible with transmitters for the AT HDR EX 70 2PS AT HDR EX 70C KIT or AT HDR E...

Страница 4: ...erms New Products 10 years from proof of purchase date for hardware electronics products purchased on or after June 1 2013 3 years from proof of purchase date for hardware electronics products purchased before June 1 2013 Lifetime Limited Product Warranty for all cable products Limited Product Warranty Terms Refurbished B Stock Products and Discontinued Products 3 years from proof of purchase date...

Страница 5: ...icts or states do not allow the exclusion or limitation of relief special incidental consequential or indirect damages or the limitation of liability to specified amounts so the above limitations or exclusions may not apply to you Exclusive Remedy To the maximum extent permitted by law this limited product warranty and the remedies set forth above are exclusive and in lieu of all other warranties ...

Страница 6: ...s 5 Do not use this product near water 6 Clean only with a dry cloth 7 Do not block any ventilation openings Install in accordance with the manufacturer s instructions 8 Do not install or place this product near any heat sources such as radiators heat registers stoves or other apparatus including amplifiers that produce heat 9 Do not defeat the safety purpose of a polarized or grounding type plug ...

Страница 7: ...Audio 20 HDMI Output Muting 20 Optical Output Muting 20 Using the Audio Return Channel ARC 21 Switching between ARC and HDMI inputs 23 Managing Users 24 Adding Users 24 Editing Deleting Users 25 Resetting to Factory Defaults 26 Using the Front Panel 26 Using the Web GUI 26 Advanced Operation 28 RS 232 IR Control 28 Determining the Port Type 28 Cable Assembly 29 Configuration 30 IR Control 31 The W...

Страница 8: ...AT JUNO 451 HDBT 8 Appendix 43 Updating the Firmware 43 Using the Web GUI 43 Using USB 44 Default Settings 45 Specifications 46 Index 48 Table of Contents ...

Страница 9: ...the HDMI Audio Return Channel for receiving digital audio from a television and includes a TOSLINK digital audio output for sending this audio to an AV receiver or soundbar This JunoX Series switcher can be controlled via Ethernet RS 232 and IR A handheld IR remote control is included Introduction Features Package Contents 4x1 HDMI Switcher 4K UHD capability 60 Hz with 4 4 4 chroma sampling plus s...

Страница 10: ...T Input Connect a transmitter such as the AT UHD PRO3 44M to this port using an Ethernet cable 7 HDMI Inputs Connect an HD UHD source to each of these HDMI ports 8 HDMI OUT Connect an HDMI cable from this port to a display or other sink device This output supports multichannel audio 9 OPTICAL Connect an optical audio cable from this TOSLINK port to an audio output device This port is part of the A...

Страница 11: ...is button to toggle audio muting on the HDMI OUT port The Output 1 toggle switch in the web GUI will also change to reflect the current muting state Refer to A V Settings page page 35 for more information SW R1 Video 1 Video Video 2 All On Power Vol Vol Mute 1 3 2 4 5 Input Audio On Off On Off On Off The AT JUNO 451 HDBT includes an IR remote control unit allow the control of the AT JUNO 451 HDBT ...

Страница 12: ...tion Instructions Core Shielding CAT5e CAT6 CAT6a CAT7 Solid UTP unshielded N A STP sheilded Performance Rating MHz 350 500 600 800 Cable Max Distance 4K Max Distance 1080p CAT5e CAT6 295 feet 90 meters 330 feet 100 meters CAT6a CAT7 330 feet 100 meters 330 feet 100 meters 5 Connect the included four pin captive screw block to the RS 232 IR IN port Refer to RS 232 IR Control page 28 for wiring inf...

Страница 13: ...E DVD AA X DE C BN E XO R V i d e o V i d e o V i d e o V i d e o H D B a s e T E t h e r n e t V i d e o A u d i o AT UHD PRO3 44M Blu ray Player Media Player Set Top Box EDID POW ER ENTE R FNC CANC EL INFO 1 2 3 4 5 AT U HD P RO3 44M tv PO WE R INP UT FW 1 2 3 4 INP UT AT JU NO 45 1 H DB T JUN OX TM SET T OP BOX OK 224 ...

Страница 14: ...O 451 HDBT is powered 2 Connect an Ethernet cable between the LAN port of the AT JUNO 451 HDBT and the Local Area Network LAN 3 Press and hold the INPUT button on the front panel for approximately 20 seconds Release the INPUT button once the POWER button begins to flash blue and red The number of flashes will indicate the currently selected IP mode POWER button flashes Description Two Static IP mo...

Страница 15: ... IP address by the DHCP server if present The System page page 40 in the web GUI allows the AT JUNO 451 HDBT to use either DHCP or static IP mode In order to access the web GUI the IP address of the AT JUNO 451 HDBT must be known Refer to Introduction to the Web GUI page 32 1 Open the desired web browser and enter the IP address of the AT JUNO 451 HDBT 2 Log in using the required credentials The f...

Страница 16: ...ower Off Unit is not powered Press the POWER button to power the unit Check the power supply and make sure it is securely fastened to the locking connector on the rear of the unit Make sure that the power supply is connected to an available electrical outlet and that the outlet is live some outlets are controlled by a wall switch INPUT Blue The input is the currently selected active input Off The ...

Страница 17: ... to INPUT 3 Once INPUT 4 is selected and the INPUT button is pressed again the unit will return to INPUT 1 Manual input switching can also be performed under the A V Settings page page 35 of the web GUI by clicking the Input Selection drop down list and selecting the desired input In addition the x1AVx1 command can also be used Refer to the Application Programmer s Interface for more information S...

Страница 18: ...the rear panel The AT JUNO 451 HDBT will automatically switch to the port with the connected source The following rules apply to auto switching If a source is disconnected then the AT JUNO 451 HDBT will fallback to a port with an active source If all sources are disconnected then the AT JUNO 451 HDBT will retain the port of the the last connected source Auto Switching Auto switching can also be us...

Страница 19: ...content to be displayed 1 Open the desired web browser and enter the IP address of the AT JUNO 451 HDBT 2 Log in as the admin user with the required credentials The factory default username and password for the admin user are listed below Username root Password Atlona 3 Click A V Settings in the menu bar 4 Click the Input 1 toggle switch under HDCP Settings and set it to the OFF position This will...

Страница 20: ...Username root Password Atlona 3 Click A V Settings in the menu bar 4 Locate the Audio section 5 Click the Output 1 toggle switch to the OFF position When set to the OFF position the audio on the HDMI OUT port will be muted To re enable the audio for the HDMI OUT output set the toggle switch to the ON position 1 Open the desired web browser and enter the IP address of the AT JUNO 451 HDBT 2 Log in ...

Страница 21: ... dark green lines identify the audio coming from the display The instructions on the following page will reference the diagram below Ge ne ric SPEA KER SYST EMS Ge ne ric SPEA KER SYST EMS Gen eric SPEAKE R SYSTEM S AT JUNO 451 HDBT HDMI Audio Display A V Receiver Speaker System SOURCE DVD AA X DE C BN E XO R Gen eric SPEAKE R SYSTEM S Gen eric SPEAKE R SYSTEM S Ge ne ric SPEA KER SYST EMS POW ER ...

Страница 22: ...reakout toggle switch to the ARC position The default setting is SPDIF 8 Set both the Toslink and Output 1 toggle switches to the ON position 9 Setup is complete Audio from the display will now be heard over the A V receiver To disable ARC and hear the audio from the HDMI inputs set the HDMI input audio breakout toggle switch to the SPDIF position Refer to the next page for information on how to t...

Страница 23: ...ation If controlling over IP connect an Ethernet cable from the control system to the LAN port on the AT JUNO 451 HDBT Refer to the control system user manual for any necessary configuration details 2 Send the AudioARC command to set the desired operation AudioARC ARC enables ARC only audio from the downstream display is output to the OPTICAL OUT port AudioARC SPDIF disables ARC HDMI inputs are en...

Страница 24: ...he factory default username and password for the admin user are listed below Username root Password Atlona 3 Click the Config tab 4 Click the Add button under the Edit column 5 Enter the desired username and password in the Username Password Edit dialog box 6 Click the Save Change button to commit changes or click the Cancel button to return to the Config page without adding the user Once created ...

Страница 25: ...word Atlona a Click Config in the menu bar b Click the Edit button next to the user to be changed c Enter the new information for the user in the Username Password Edit dialog box d Click the Save Change button to commit changes or click the Cancel button to return to the Config page without making changes a Click the Remove button next to the user to be deleted The username and password of a user...

Страница 26: ...e POWER and INPUT buttons for more than 15 seconds 3 Release both buttons 4 The factory reset process is complete Resetting to Factory Defaults Using the Front Panel Using the Web GUI 1 Open the desired web browser and enter the IP address of the AT JUNO 451 HDBT 2 Log in as the admin user with the required credentials The factory default username and password for the admin user are listed below U...

Страница 27: ...l be displayed at the top of the screen Click OK to continue with the factory default reset procedure Click Cancel to abort the process 6 Once the factory default process is complete the web GUI Login screen will be displayed 7 The factory reset process is complete ...

Страница 28: ...o determine whether the port is DTE or DCE Determining the Port Type DTE Pin Descriptions DCE Pin Descriptions Pin Signal Description 1 DCD Data Carrier Detect 2 RxD Receive Data 3 TxD Transmit Data 4 DTR Data Terminal Ready 5 GND Ground Signal 6 DSR Data Set Ready 7 RTS Request to Send 8 CTS Clear to Send 9 RI Ring Indicator Pin Signal Description 1 DCD Data Carrier Detect 2 TxD Transmit Data 3 R...

Страница 29: ...t least 3 16 5 mm of insulation from the TxD RxD and GND wires Cable Assembly When connecting a DTE device to a DCE device a straight through cable should be used A straight through cable is wired in such a way that the pins on one side of the cable are connected to the corresponding pins on the opposite side of the cable as shown in the table below However the AT JUNO 451 HDBT will use only TxD R...

Страница 30: ... bit parity and stop bit settings These settings must correspond with the control system RS 232 settings 4 Click the Save button to commit changes Configuration RS 232 2 COM NC NO COM NC NO COM NC NO COM NC NO 12V SIG GND 12V SIG GND 12V SIG GND 12V SIG GND 1 COM PON ENT HDM I 1 2 3 4 5 6 SER IAL 1 IR OUT SER IAL 2 L R DIG ITAL COA X OUT AUD IO OUT AUD IO IN ETH ERN ET 2 3 4 VID EO OUT 48V DC FAC ...

Страница 31: ... 4 VIDE O OUT 48V DC FAC TORY RESE T IR Control System AT JUNO 451 HDBT SW 51 IR Remote Control included SW R1 Vide o 1 Vide o Vide o 2 All On Pow er Vol Vol Mut e 1 3 2 4 5 Inpu t Aud io On Off On Off On Off PO WER INPU T FW 1 2 3 4 INPU T AT JU NO 45 1 H DB T JUN OX TM 1 Remove at least 3 16 5 mm of insulation from the GND and S wires 2 Locate the included 4 pin captive screw block and open each...

Страница 32: ...ired refer to IP Configuration page 14 The default static IP address of the AT JUNO 451 HDBT is 192 168 1 254 Introduction to the Web GUI 1 Launch a web browser 2 In the address bar type the IP address of the AT JUNO 451 HDBT 3 The Login page will be displayed 4 Type root using lower case characters in the Username field 5 Type Atlona in the Password field This is the default password The password...

Страница 33: ...bar near the top of the screen is the menu bar When the mouse is moved over each menu element it will be highlighted in light orange Once the desired menu element is highlighted click the left mouse button to access the settings within the menu Menu bar In this example moving the mouse over the A V Settings menu item will highlight it Click the A V Settings menu item to display the A V Settings pa...

Страница 34: ...g the unit off using the PWOFF command will not reset this field Active Input The currently selected input The active input can be changed under the A V Settings page page 35 or by pressing and releasing the INPUT button on the front panel Signal Type Displays the input resolution of the source device Video Format Displays the video format Aspect Displays the aspect ratio of the input video source...

Страница 35: ... ON HDCP Settings Sets the HDCP reporting mode of the specified HDMI port Input 1 INPUT 1 HDBaseT Input 2 INPUT 2 Input 3 INPUT 3 Input 4 INPUT 4 Some devices will transmit HDCP content if an HDCP compliant display sink is detected Setting this value to OFF will instruct the source to send non HDCP content if possible to non HDCP display and or sink devices Note that setting this value to OFF will...

Страница 36: ...k of the unit ARC Audio being returned from the display over ARC will be output on the OPTICAL port on the AT JUNO 451 HDBT It should be noted that the audio is limited to formats supported by the SPDIF output such as PCM Dolby Digital and some formats of DTS Lossless audio formats such as Dolby TrueHD and DTS HD Master Audio are not supported by ARC or SPDIF Scaler Pass Through Click this toggle ...

Страница 37: ... 57600 115200 Data bit Sets the number of data bits used to represent each character of data The following options are available 7 or 8 Parity Sets the parity bit which can be included with each character to detect errors during the transmission of data The following options are available None Odd or Even Stop bit Sets the stop bit Stop bits are sent at the end of each character allowing the clien...

Страница 38: ...eam EDID Eight memory locations are available Once an EDID is saved to a memory location it can be access from the EDID Settings drop down lists EDID listing Default 1920x1200 DVI 1080P 2CH 3840x2160 60 4 2 0 2CH 1080P MCH 3840x2160 60 4 2 0 MCH 1080P DD 3840x2160 30 4 4 4 2CH 1080P 3D 2CH 3840x2160 30 4 4 4 MCH 1080P 3D MCH 4096x2160 60 4 2 0 2CH 1080P 3D DD 4096x2160 60 4 2 0 MCH 720P 2CH 3840x2...

Страница 39: ...ew Password Enter the new password for the root username in this field Confirm New Password Verify the new password by retyping it in this field All User Login Settings Username Displays the username Password Displays the password for the associated username Edit Click the Add button in this column to edit the username and password in the row Del Click the Remove button to delete the user in the r...

Страница 40: ...the Telnet listening port in this field Telnet Login Mode Click this toggle to set the login mode to either ON or OFF If this feature is set to ON then the AT JUNO 451 HDBT will prompt for both the username and password at the start of a Telnet session Use the same credentials as the web GUI Telnet Timeout Click this drop down list to select the timeout interval in seconds before the Telnet connec...

Страница 41: ... PWOFF and PWON commands can also be used to control the power state Reset to Default Click the Factory Default button to set the AT JUNO 451 HDBT to factory default settings Firmware Update Click the Choose File button to select the firmware file when upgrading the firmware on the AT JUNO 451 HDBT Once the firmware file is selected click the Update button Refer to Updating the Firmware page 43 fo...

Страница 42: ... cable test results TX Version The version of the Valens chip on the transmitter RX Version The version of the Valens chip on the receiver TMDS Clock Displays the pixel clock speed If no source is connected then this field will display as None Cable length Estimated This field indicates the approximate length of the Ethernet cable connected between the HDBaseT port on the AT JUNO 451 HDBT and the ...

Страница 43: ...ect an Ethernet cable from the computer containing the firmware to the same network where the AT JUNO 451 HDBT is connected 2 Go to the System page page 40 in the web GUI 3 Click the Choose File button under Firmware Update 4 Browse to the location of the firmware file select it and click the Open button 5 Click the Update button to begin the update process Choose File button 6 The following messa...

Страница 44: ... mini B cable between the PC and the firmware port on the AT JUNO 451 HDBT The unit will be powered by the USB cable 5 The USB UPDATE folder will be displayed If this folder is not displayed automatically select the USB UPDATE drive from Windows Explorer Appendix Using USB 7 Delete all files from the USB UPDATE drive if any are present 8 Drag and drop the firmware file to the drive During the firm...

Страница 45: ...h Input 1 ON ON ON ON ON ON SPDIF ON OFF RS 232 Baud rate Data bit Parity Stop bit 115200 8 None 1 EDID EDID Settings Input 1 Input 2 Input 3 Input 4 EDID Saved Output 1 Default Default Default Default Config Username default Password default root Atlona System Network IP Mode Static IP Address default Netmask Gateway Telnet Port Telnet Login Mode Telnet Timeout Broadcast System Power Lock DHCP 19...

Страница 46: ...Hz 720p 50 59 94 60Hz 576p 576i 480p 480i VESA 2560 2048 2560 1600 2048 1536 1920 1200 1680 1050 1600 1200 1600 900 1440 900 1400 1050 1366 768 1360 768 1280 1024 1280 800 1280x768 1152 768 1024 768 800 600 640 480 Color Space YUV RGB Chroma Subsampling 4 4 4 4 2 2 4 2 0 Color Depth 8 bit 10 bit 12 bit HDR HDR10 and Dolby Vision 60 Hz Audio HDMI IN HDBaseT IN PCM 2Ch LPCM 5 1 LPCM 7 1 Dolby Digita...

Страница 47: ...2 0 to 50 Storage 4 to 140 20 to 60 Humidity RH 20 to 90 non condensing Power Consumption 6 6 W Idle Consumption 5 9 W Supply Input 100 240 V AC 50 60 Hz Output 5 V DC Dimensions Inches Millimeters H x W x D 1 0 x 8 6 x 5 9 26 x 219 x 152 Weight Pounds Kilograms Device 1 82 0 82 Certification Device CE FCC Power Supply CE FCC Level VI RoHS cULus RCM CCC ...

Страница 48: ...tatement 6 Features 9 Firmware updating using the web GUI 43 using USB 44 H HDBaseT testing 42 HDCP control 19 I Input selecting 35 Input switching automatic 18 manual 17 Installation 12 IP configuration 14 40 O Operating notes 3 P Panel descriptions 10 Password default 32 R Resetting to factory defaults 26 RS 232 cable assembly 29 settings 37 S Safety information 6 Scaler pass through 36 Settings...

Страница 49: ...d names and trademarks or registered trademarks are the property of their respective owners Pricing specifications and availability subject to change without notice Actual products product images and online product images may vary from images shown here Toll free US International atlona com 877 536 3976 41 43 508 4321 ...

Отзывы: