background image

AT-UHD-CAT-4ED

14

Device Operation

EDID Management

The AT-UHD-CAT-4ED provides two EDID modes:  

INT

 and 

LEARN

.  The default EDID mode is 

INT

 mode.  In this 

mode, the AT-UHD-CAT-4ED will automatically create an EDID based on the capabilities of all connected displays.  

INT

 mode is recommended for the best results when the capabilities of all connected displays are unknown.  

INT


mode can also be used to select any of 16 EDID presets.  Refer to 

Selecting EDID Presets (page 16)

 for mor

information on this topic.  

LEARN

 mode can be used to capture an EDID from any sink device.  Once the EDID is 

learned, it will be used by the connected source device to determine what video and audio formats can be sent to 

the sink device.

1. 

Power the AT-UHD-CAT-4ED.

2.  Connect an Ethernet cable from the 

HDBaseT OUT 1

 port on the AT-UHD-CAT-4ED to a receiver (e.g. AT-UHD-

EX-100CE-RX).

3.  Connect an HDMI cable from the receiver to the display (sink) device.  Make sure that the sink device is powered.

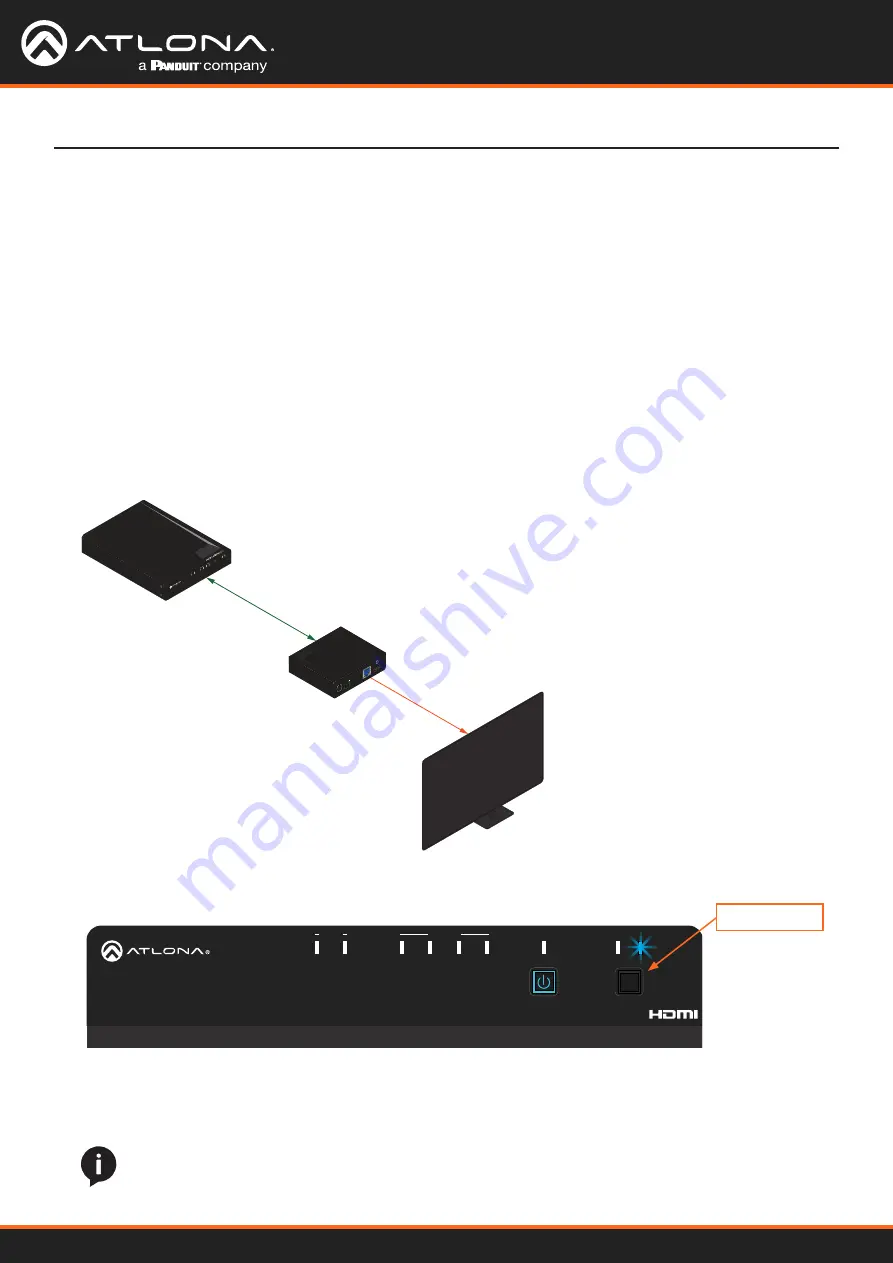
Learning an EDID using the Front Panel

HDBase

T OUT 1

HDMI

Display

AT-UHD-CAT-4ED

AT-UHD-EX-100CE-RX

4

3

2

1

OUT

IN

HDMI

HDBaseT

LOCK

EDID

POWER

AT-UHD-CA

T-4

ED

INT

LEARN

DC 48V

RS-232

HDBaseT IN

HDMI OUT

RX

TX

4. 

Press and hold the 

EDID

 button on the AT-UHD-CAT-4ED.  Release the 

EDID

 button once the 

LEARN

 LED 

indicator begins to flash rapidly.


NOTE:  

If the AT-UHD-CAT-4ED is accidentally switched to 

INT

 mode, quickly press and release the 

EDID

 button to switch back to 

LEARN

 mode.  Switching back and forth between 

INT

 and 

LEARN


mode will not erase the “learned” EDID.

TX

TX

RX

RX

4

3

2

4

3

2

1

1

RS-232

MASTER

IN

OUT

LAN

HDMI

HDBaseT OUT

DC 48V

IR

FW

TX

TX

RX

RX

RS-232

IR

TX

TX

RX

RX

RS-232

IR

TX

TX

RX

RX

RS-232

IR

TX

TX

RX

RX

RS-232

IR

4

3

2

1

OUT

IN

HDMI

HDBaseT

LOCK

EDID

POWER

AT-UHD-CAT-4ED

INT LEARN

Once the EDID is learned, it will be used by the connected source device to determine what video and audio 

formats can be sent to the sink device(s). To switch back to 

INT

 mode, quickly press and release the 

EDID


button.

EDID button

Содержание ATLONA AT-HDR-CAT-4EDLA

Страница 1: ...AtlonaManuals DistributionAmplifiers AT UHD CAT 4ED HDMI to HDBaseT Distribution Amplifier 4K UHD TM...

Страница 2: ...ion Release Date Notes 1 Mar 2019 New format 2 Mar 2021 Included instructions for Updating the Valens Firmware page 39 3 Apr 2022 Corrected wiring instructions for IR control of source and sink device...

Страница 3: ...rive San Jose CA 95134 United States Office 1 408 962 0515 Sales and Customer Service Hours Monday Friday 6 00 a m 4 30 p m PST https atlona com International Headquarters Atlona International AG To d...

Страница 4: ...the following two conditions 1 this device may not cause harmful interference and 2 this device must accept any interference received including interference that may cause undesired operation This equ...

Страница 5: ...ecting EDID Presets 16 Managing Users 17 Adding Users 17 Editing Deleting Users 18 RS 232 Control 19 Determining the Port Type 19 Cable Assembly 20 Pass through mode 21 Control mode 22 IR Control 23 C...

Страница 6: ...hannel audio compliant EDID management Intuitive GUI based configuration using integrated web server TCP IP RS 232 and IR control Easy to configure and manage with AMS Atlona Management System Field u...

Страница 7: ...control system to this port to control the AT UHD CAT 4ED 12 RS 232 IR 1 4 Connect a control system or other DTE device to these ports for pass through zone control Each of these ports uses the associ...

Страница 8: ...ports is associated to the respective HDBaseT OUT port This allows RS 232 pass through zone control of a display sink device that is connected to a PoE compatible receiver Control can be performed us...

Страница 9: ...isplay Display Display Display H D M I PO WE R LIN K FW AT UH D E X 7 0C RX AT UHD EX 70C RX H D M I PO WE R LIN K FW AT UH D E X 7 0C RX AT UHD EX 70C RX H D M I PO WE R LIN K FW AT UH D E X 7 0C RX...

Страница 10: ...ss and hold the POWER button for approximately 15 seconds Release the POWER button once the LOCK LED indicator begins to flash The number of flashes will indicate the currently selected IP mode Settin...

Страница 11: ...by the DHCP server if present The System page page 35 in the web server allows the AT UHD CAT 4ED to use either DHCP or static IP mode In order to access the web server the IP address of the AT UHD C...

Страница 12: ...e sure a secure connection exists between the HDMI port on the AT UHD CAT 4ED and the source display device Try a different HDMI cable HDBaseT 1 4 Blue Normal operation Signal integrity between the AT...

Страница 13: ...for five seconds then release The LOCK LED indicator will no longer be illuminated Using the Front Panel Using the web server TX TX RX RX 4 3 2 4 3 2 1 1 RS 232 MASTER IN OUT LAN HDMI HDBaseT OUT DC 4...

Страница 14: ...splay sink device Make sure that the sink device is powered Learning an EDID using the Front Panel HDBaseT OUT 1 HDMI Display AT UHD CAT 4ED AT UHD EX 100CE RX 4 3 2 1 OUT IN HDM I HDB aseT LOC K EDID...

Страница 15: ...o switch between LOCK and UNLOCK states 4 Click the EDID mode drop down list and select LEARN 5 Click the COPY button to copy the downstream EDID to memory The AT UHD CAT 4ED will now use the EDID of...

Страница 16: ...t The selected EDID will be used by the source before sending A V data to the display sink device NOTE If the resolution and timing limitations of all displays connected to the HDBaseT OUT ports are u...

Страница 17: ...tory default username and password for the admin user are listed below Username root Password Atlona 3 Click the Config tab 4 Click the Add button under the Edit column 5 Enter the desired username an...

Страница 18: ...Atlona a Click Config in the menu bar b Click the Edit button next to the user to be changed c Enter the new information for the user in the Username Password Edit dialog box d Click the Save Change...

Страница 19: ...ot always the case If the port type is unknown then a multimeter can be used to determine whether the port is DTE or DCE Determining the Port Type 1 Turn on the multimeter and set it to measure DC vol...

Страница 20: ...the TxD RxD and GND wires Cable Assembly When connecting a DTE device to a DCE device a straight through cable should be used A straight through cable is wired in such a way that the pins on one side...

Страница 21: ...RX TX 1 Connect the RS 232 cable from the control system to the desired RS 232 IR port on the AT UHD CAT 4ED Refer to Cable Assembly page 20 for instructions on preparing the cable 2 Connect an Ethern...

Страница 22: ...COM NC NO 12V SIG GND 12V SIG GND 12V SIG GND 12V SIG GND 1 COM PON ENT HDM I 1 2 3 4 5 6 SER IAL 1 IR OUT SER IAL 2 L R DIGI TAL COA X OUT AUD IO OUT AUD IO IN ETH ERN ET 2 3 4 VIDE O OUT 48V DC FAC...

Страница 23: ...ect the GND terminal from the AT UHD CAT 4ED to the GND terminal on the control system 4 3 2 1 OUT IN HDMI HDBaseT LOCK EDID POWER INT LEARN TX RX 4 3 2 4 3 2 1 1 STER UT HDBaseT OUT DC 48V IR FW TX T...

Страница 24: ...e but do not overtighten 5 Connect the captive screw connector to the RS 232 IR IN port of the zone to be controlled Controlling Source Devices IR Emitter RS 232 IR 1 HDBaseT HDBaseT OUT 1 IR Receiver...

Страница 25: ...button will be blue Pressing the POWER button again will place the unit into standby mode and the POWER button will be red In standby mode no video signal will pass to the display sink device However...

Страница 26: ...Web Server page 29 for more information The factory default username and password are listed below Username root Password Atlona 4 Click System in the menu bar 5 Click the Power button mode drop down...

Страница 27: ...CEC power on and power off commands by pressing the ON and OFF buttons near the bottom of the page 7 Press the POWER button on the front panel to power on or power off the display Note that the power...

Страница 28: ...he POWER button on the front panel to power on or power off both the display and AT UHD CAT 4ED Consumer Electronics Control CEC Atlona has confirmed proper CEC functionality with several current mode...

Страница 29: ...refer to IP Configuration page 10 The default static IP address of the AT UHD CAT 4ED is 192 168 1 254 Introduction to the Web Server 1 Launch a web browser 2 In the address bar type the IP address o...

Страница 30: ...AT UHD CAT 4ED 30 The Web Server 7 The Info page will be displayed 8 Click Logout on the far right side of the menu bar to log out of the web server and return to the Login page...

Страница 31: ...of firmware that the AT UHD CAT 4ED is running Always make sure to check the AT UHD CAT 4ED product page on the Atlona web site for the latest version of firmware Output 1 VALENS Version Output 4 VAL...

Страница 32: ...200 38400 56000 57600 115200 Data bit Sets the number of data bits used to represent each character of data The following options are available 7 or 8 Parity Sets the parity bit which can be included...

Страница 33: ...ed source device to determine what video and audio formats can be sent to the sink device Refer to EDID Management page 14 for more information INT EDID settings Click this drop down list to select th...

Страница 34: ...Password Enter the new password for the root username in this field Confirm New Password Verify the new password by retyping it in this field All User Login Settings Username Displays the username Pas...

Страница 35: ...e Click this toggle to set the login mode to either ON or OFF If this feature is set to ON then the AT UHD CAT 4ED will prompt for both the username and password at the start of a Telnet session Use t...

Страница 36: ...l Power on and power off commands are sent over both the HDBaseT OUT and HDMI OUT ports Reset to Default Click the Factory Default button to set the AT UHD CAT 4ED to factory default settings Firmware...

Страница 37: ...cable from the computer containing the firmware to the same network where the AT UHD CAT 4ED is connected 2 Go to the System page page 35 in the web server Appendix 3 Click the Choose File button und...

Страница 38: ...USB A to USB mini B cable between the PC and the firmware port on the AT UHD CAT 4ED 5 The USB UPDATE folder will be displayed If this folder is not displayed automatically select the USB UPDATE drive...

Страница 39: ...nect an Ethernet cable from the computer containing the firmware to the same network where the AT UHD CAT 4ED is connected 2 Go to the System page page 35 in the web server 3 Click the Choose File but...

Страница 40: ...ect the USB A to USB mini B cable between the PC and the firmware port on the AT UHD CAT 4ED 5 The USB UPDATE folder will be displayed If this folder is not displayed automatically select the USB UPDA...

Страница 41: ...for recommended cabling when using Altona products with HDBaseT The green bars indicate the signal quality when using each type of cable Higher quality signals are represented by more bars EIA TIA 568...

Страница 42: ...t Parity Stop bit 115200 8 None 1 EDID EDID lock EDID mode INT EDID settings UNLOCK INT STD Config Username default Password default root Atlona System IP Mode Static IP Address default Netmask Gatewa...

Страница 43: ...Hz 1152 870 75 Hz 1024 768 60 Hz 848x480 60 Hz 800 600 60 Hz 640 480 60 Hz Color Space YUV RGB Chroma Subsampling 4 4 4 4 2 2 4 2 0 Color Depth 8 bit 10 bit 12 bit Audio HDMI HDBaseT Pass Through For...

Страница 44: ...W 1 x Mini USB DC 48V 1 x 3 pin DIN Environmental Fahrenheit Celsius Operating Temperature 32 to 122 0 to 50 Storage Temperature 4 to 140 20 to 60 Operating Humidity RH 20 to 90 non condensing Power C...

Страница 45: ...US International atlona com 408 962 0515 41 43 508 4321 35230 R5...

Отзывы: