background image

15 


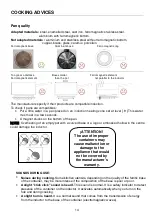
Pan dimension and types of material. 

The  cooking  zones  are,  until  a  certain  limit,  automatically  adapted  to  the  diameter  of  the  pan. 

However  the  bottom  of  this  pan  must  have  a  minimum  of  diameter  according  to  the 

corresponding cooking zone. 

To obtain the best efficiency of your hob, please place the pan well in the centre of the cooking 

zone. 

Caution!

  Certain  pans  made  of  special  materials  such  as  cast  iron,  i.e.  grill  plates,  have  low 

temperature  dissipation  property,  accumulate  significant  amounts  of  heat  that  is  conducted  by 

direct contact of the pan to the ceramic glass, causing overheating inside the appliance, which 

could lead to damages Therefore, we recommend not using very high power and using average 

ranges with this type of pan. 

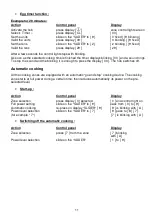
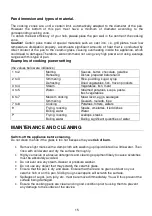
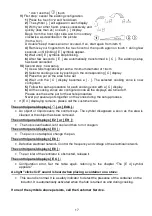
Examples of cooking power setting 

(the values below are indicative) 

1 to 2 

Melting 

Reheating 

Sauces, butter, chocolate, gelatine 

Dishes prepared beforehand 

2 to 3 

Simmering 

Defrosting 

Rice, pudding, sugar syrup 

Dried vegetables, fish, frozen products 

3 to 4 

Steam 

Vegetables, fish, meat 

4 to 5 

Water 

Steamed potatoes, soups, pasta,  

fresh vegetables 

6 to 7 

Medium cooking 

Simmering 

Meat, lever, eggs, sausages 

Goulash, roulade, tripe 

7 to 8 

Cooking 

Potatoes, fritters, wafers 

Frying, roosting 

Boiling water 

Steaks, omelettes, fried dishes 

Water 

Frying, roosting 

Boiling water 

scallops, steaks 

Boiling significant quantities of water 


MAINTENANCE AND CLEANING 

Switch-off the appliance before cleaning. 

Do not clean the hob if the glass is too hot because they are 

risk of burn. 


  Remove light marks with a damp cloth with washing up liquid diluted in a little water. Then 

rinse with cold water and dry the surface thoroughly. 

  Highly corrosive or abrasive detergents and cleaning equipment likely to cause scratches 

must be absolutely avoided. 

  Do not ever use any steam-cleaner or pressure washer. 

  Do not use any object that may scratch the ceramic glass. 

  Ensure that the pan is dry and clean. Ensure that there are no grains of dust on your 

ceramic hob or on the pan. Sliding rough saucepans will scratch the surface. 

  Spillages of sugar, jam, jelly, etc. must be removed immediately. You will thus prevent the 

surface being damaged. 

  Ensure the cooking pans are clean and in good condition prior to using them to prevent 

any damage to the surface of the device 


Содержание PI3100

Страница 1: ...INSTRUCCIONES DE USO INSTRUÇÕES DE OPERAÇÃO PI3100 PI3400 SERIAL NUMBER LABEL ...

Страница 2: ...O 8 INDICACIONES 8 VENTILACIÓN 8 PUESTA EN MARCHA Y USO DEL APARATO 9 ANTES DE LA PRIMERA UTILIZACIÓN 9 PRINCIPIO DE LA INDUCCIÓN 9 TECLAS TÁCTILES 9 ZONA DE SELECCIÓN DE POTENCIA SLIDER Y AJUSTE DE MINUTERO 9 PUESTA EN MARCHA 10 DETECCIÓN DEL RECIPIENTE 10 INDICADOR DE CALOR RESIDUAL 10 FUNCIÓN BOOSTER 11 FUNCIÓN TEMPORIZADOR 11 PROGRAMACIÓN DE LA COCCIÓN AUTOMÁTICA 12 FUNCIÓN PAUSA 13 MEMORIZACI...

Страница 3: ...ransforme ni modifique el aparato La placa de cocción no debe servir como soporte ni como superficie de trabajo La seguridad sólo está asegurada si el aparato está conectado a una toma de tierra de protección conforme a los reglamentos vigentes No utilice alargadoras para la conexión a la red eléctrica El aparato no debe utilizarse encima de un lavavajillas o de una secadora de ropa los vapores de...

Страница 4: ...s o mentales reducidas o que carezcan falta de experiencia y conocimiento del producto si se les ha dado la supervisión instrucción adecuada para el uso del mismo de un modo seguro y entienden de igual manera los peligros que puedan implicar Los niños no deben usar éste electrodoméstico para jugar La limpieza o el uso de éste aparato no debe realizarse por niños sin supervisión Precauciones para n...

Страница 5: ... parte inferior del aparato con el fin de asegurar una buena ventilación No deposite objetos inflamables por ejemplo sprays en el cajón situado bajo la placa de cocción Las eventuales bandejas para cubiertos deben ser de material resistente al calor Precauciones en caso de fallo del aparato Si se constata una avería es necesario desconectar el aparato y desenchufar la línea de alimentación eléctri...

Страница 6: ... funcionamiento Recomendamos pedir información al médico No utilizar aluminio o recipientes con materiales sintéticos podrían fundir las zonas de cocina NO apagar nunca con agua un fuego Apagar la zona de cocción Sofocar con cuidado las llamas con una tapa una tapa extintora u otro medio similar NO UTILIZAR ACCESORIOS EXTERNOS INTERMEDIOS PARA HACER CALENTAR CACEROLAS NO ADAPTADAS A LA INDUCCIÓN R...

Страница 7: ... Ø 90 mm Potencia nominal 1100 W 1100 W Potencia de refuerzo 1400 W 1400 W Categoría estandarizada de utensilios de cocina B B Consumo energético ECcw 177 3 Wh kg 177 3 Wh kg Fogón Derecha Ø 280 mm Ø 200 mm Diámetro mínimo Ø 110 mm Ø 90 mm Potencia nominal 2300 W 1400 W Potencia de refuerzo 3000 W 2000 W Categoría estandarizada de utensilios de cocina D C Consumo energético ECcw 178 1 Wh kg 181 Wh...

Страница 8: ...nas de cocción se combinan Ventilación El ventilador de enfriamiento tiene un funcionamiento totalmente automático Se pone en marcha a velocidad baja a partir del momento en que el calor desprendido por el sistema electrónico sobrepasa un cierto umbral La ventilación activa su velocidad más alta cuando la placa de cocción se usa de forma intensiva El ventilador reduce su velocidad y se para automá...

Страница 9: ...ica Quedan excluidos los recipientes de cobre inoxidable aluminio cristal madera cerámica gres barro cocido inoxidable no ferro magnético La zona de cocción por inducción tiene automáticamente en cuenta el tamaño del recipiente utilizado Con un diámetro demasiado pequeño el recipiente no funciona Este diámetro varía en función del diámetro de la zona de cocción Cuando el recipiente no es adecuado ...

Страница 10: ...aumentar la potencia y aparece el símbolo U en el indicador La U desaparece cuando se coloca una cacerola en la zona de cocción Si en el curso de la cocción se retira el recipiente de la zona de cocción el funcionamiento se interrumpe Aparece el símbolo U en el indicador La U desaparece cuando se coloca de nuevo el recipiente en la zona de cocción La cocción se reemprende en el nivel de potencia s...

Страница 11: ... de calentamiento Durante algunos segundos el indicador de esta zona de cocción parpadea 9 y después queda en el nivel de cocción más alto posible Zona de cocción seleccionada Otra zona de cocción por ej cocción de nivel 9 B está indicado 9 pasa a 6 u 8 según el tipo de placa Función Temporizador El temporizador puede asignarse simultáneamente a varias placas de cocción y con ajustes diferentes de...

Страница 12: ...9 fijo Ajuste de decena deslizar en SLIDER hasta 2 2 parpadear 9 fijo Validar de decena pulsar 29 29 El piloto de control parpadea y pasados algunos segundos se apaga Cuando ha transcurrido el tiempo seleccionado el temporizador lo indica parpadeando 00 y produciendo una señal sonora Para parar el sonido y el parpadea basta pulsar la tecla 00 Programación de la cocción automática Todas las zonas d...

Страница 13: ...te es el siguiente Pulse la tecla A continuación pulse la tecla durante 6 segundos La configuración precedente queda activada Función Mantener caliente Esta función permite alcanzar y mantener automáticamente una temperatura de 70 C Con ello se evitarán los derrames de líquidos sobre la placa y que se peguen en la parte inferior del recipiente Iniciar Detener la función Conservador de calor Acción...

Страница 14: ...ha este Beep repetir el proceso pasos 1 y 2 3 Pulsar nuevamente la misma tecla 0 de la zona de cocción de la derecha 4 Aparecerá seguidamente el símbolo L Lock en las 3 zonas indicando que están bloqueadas Desbloqueo 1 Poner en marcha la placa pulsando la tecla marcha paro en ON 2 Pulsar a la vez la tecla B del cursor y el indicador L de la zona de cocción de la derecha hasta escuchar un leve Beep...

Страница 15: ...oco de agua en una cacerola colocada sobre una zona de cocción por inducción regulada a nivel 9 Este agua debe calentarse en algunos segundos Ponga un imán sobre el fondo externo de la cacerola debe quedarse pegado NOTA El sobrecalentamiento de una olla vacía con un fondo curvado o con logotipo o un hueco estampado en el centro podría dañar el inductor SONIDOS DURANTE EL USO ATENCIÓN El uso de rec...

Страница 16: ...nflar Descongelar Arroz puddings y platos cocinados Legumbres pescados productos congelados 3 a 4 Vapor Legumbres pescados carne 4 a 5 Agua Patatas hervidas sopas pastas Legumbres frescas 6 a 7 Cocer a fuego suave Carnes hígado huevos salchichas Goulasch filetes rellenos callos 7 a 8 Cocer Freír Patatas buñuelos tortas 9 Freír llevar a ebullición Filetes tortillas agua P Freír Llevar a ebullición ...

Страница 17: ...clas táctiles están tapadas Una de las cacerolas está vacía y su fondo se ha sobrecalentado La placa dispone igualmente de un dispositivo de reducción automática del nivel de potencia y de corte automático en caso de sobrecalentamiento La ventilación continúa funcionando después de parar la placa Esto no es un fallo el ventilador continúa protegiendo la electrónica del aparato La ventilación se pa...

Страница 18: ...5 Esperar hasta que las E permanezcan fijas 6 Las E cambiaran automáticamente a C La configuración ha sido anulada VI Como reconfigurar la placa 1 Utilizar un recipiente ferromagnético con un diámetro mínimo de 16cm 2 Seleccionar la zona de cocción presionando la C correspondiente 3 Poner el recipiente sobre la zona a configurar 4 Esperar hasta que la C cambie a La zona de cocción se ha configurad...

Страница 19: ...alaje son ecológicos y reciclables Los aparatos electrónicos están formados por materiales reciclables y a veces de materiales nocivos para el medio ambiente pero necesarios para el buen funcionamiento y la seguridad del aparato No tirar nunca su aparato con los residuos domésticos Llame al servicio de retirada de electrodomésticos o déjelo en los lugares de depósito establecidos por su municipio ...

Страница 20: ... 20mm Si el horno no es de ventilación forzada la distancia de separación deberá ser mayor y seguir los consejos del fabricante del horno La placa de cocción es un aparato perteneciente a la clase de protección Y Cuando se empotre en la parte posterior y en uno de los lados puede haber una pared o un armario alto Pero en el otro lado no debe haber ningún mueble ni aparato que sea más alto que la s...

Страница 21: ...de cocción evite guardar en él objetos inflamables por ejemplo sprays y objetos que no resistan el calor Tener precaución con colocar objetos metálicos como recipientes de cocinado o cubiertos ya que pueden calentarse en exceso y producir quemaduras La distancia de seguridad entre la placa de cocción y la campana de aspiración situada encima debe respetar las indicaciones del fabricante de la camp...

Страница 22: ...xión se encuentra debajo de la placa de cocción Para abrir la tapa utilice un destornillador medio Colóquelo en las 2 ranuras situadas en la parte anterior de las 2 flechas Conexión de la encimera Red Conexión Diámetro del cable Cable Calibre de protección 230 V 50 60 Hz 1 Fase N 3 x 2 5 mm H 05 VV F H 05 RR F 25 A 400 V 50 60 Hz 2 Fases N 4 x 1 5 mm H 05 VV F H 05 RR F 16 A calculado con el coefi...

Страница 23: ...ntervención de personal ajeno a esta empresa no autorizado Problemas derivados por una inadecuada instalación de la placa inducción revisiones de instalación o funcionamiento y limpiezas Manipulación indebida del cableado y conexiones del aparato Averías y desperfectos producidos por anomalías externas o variaciones de suministro eléctrico o desastres naturales como tormentas rayos inundaciones et...

Страница 24: ... DE COMANDO 30 UTILIZAÇÃO DO APARELHOEXIBIÇÃO 30 VENTILAÇÃO 30 CONTROLO DO APARELHO 31 ANTES DA PRIMEIRA UTILIZAÇÃO 31 PRINCIPIO DA INDUÇÃO 31 SENSORES 31 ZONA DE SELECÇAO DE POTENCIA SLIDER E DE REGULATOR 31 COLOCAÇÃO EM FUNCIONAMENTO 32 DETECÇÃO DO RECIPIENTE 32 INDICADOR DE CALOR RESIDUAL 32 FUNÇÃO PROGRAMADOR 33 PROGRAMAÇÃO DO AUTOMATISMO DE COZINHAR GO AND STOP 34 MEMORIZAÇÃO DE FUNÇÕES 35 FU...

Страница 25: ...a só é assegurada se o aparelho estiver ligado uma terra de protecção de acordo com as recomendações em vigor Para a ligação à rede eléctrica não utilize nenhuma extensão O aparelho não deve ser utilizado por cima da máquina de lavar louça ou de um secador de roupa porque os vapores de água libertos poderiam deteriorar a electrónica Este aparelho não foi concebido para ser operado por um temporiza...

Страница 26: ... que compreendam os riscos potenciais Crianças não devem brincar com o aparelho A limpeza e a manutenção não devem ser efetuadas por crianças sem supervisão Objectos metálicos tais como talheres garfos facas ou colheres por exemplo não devem ser colocados na superfície da placa em funcionamento pois podem aquecer Precauções para não deteriorar o aparelho Os tachos com bases brutas ferro fundido nã...

Страница 27: ...desta gaveta e a parte inferior da placa de indução para assegurar uma boa ventilação Não ponha objectos inflamáveis ex sprays na gaveta situada debaixo da placa de indução Os eventuais tabuleiros de talheres situados na gaveta devem ser num material que resista ao calor Precauções em caso de deficiência do aparelho Se notar um defeito deve apagar o aparelho e desligar a corrente de alimentação el...

Страница 28: ...uncionamento Recomendamos que se informe junto do revendedor ou de um médico Não utilize recipientes de material sintético ou de alumínio porque poderiam fundir sobre focos ainda quentes NUNCA tente extinguir um incêndio com água em vez disso desligue o aparelho e cubra a chama por ex com uma tampa ou com um cobertor anti incêndio NÃO UTILIZE ACESSÓRIOS EXTERNOS E INTERMÉDIOS PARA FAZER AQUECER PA...

Страница 29: ...mm Ø 90 mm Posição zona cozinhar 1100 W 1100 W Potência de reforço 1400 W 1400 W Categoria standarizada de cozedura B B Consumo energético ECcw 177 3 Wh kg 177 3 Wh kg Zona de cozinhar direito Ø 280 mm Ø 200 mm Mínimo de detecção Ø 110 mm Ø 90 mm Posição zona cozinhar 2300 W 1400 W Potência de reforço 3000 W 2000 W Categoria standarizada de cozedura D C Consumo energético ECcw 178 1 Wh kg 181 Wh k...

Страница 30: ...ntilador de arrefecimento tem um funcionamento completamente automático Começa a trabalhar a baixa velocidade assim que as calorias libertas pela electrónica ultrapassarem um certo limite A ventilação desencadeia a sua segunda velocidade quando a placa de indução for utilizada de maneira intensiva O ventilador reduz a sua velocidade e pára automaticamente assim que o circuito electrónico tiver arr...

Страница 31: ...magnética Estão excluídos os recipientes de cobre inox alumínio vidro madeira cerâmica grés barro inox não ferromagnético A zona de aquecimento de indução detecta automaticamente o tamanho do recipiente utilizado Com um diâmetro muito pequeno o recipiente não funciona Este diâmetro varia em função do diâmetro da zona de aquecimento Quando o recipiente não estiver adaptado para placa de indução o s...

Страница 32: ...será impossível aumentar a potência do equipamento e no visor aparecerá o símbolo U O U desaparecerá assim que o recipiente for colocado correctamente sobre os discos de aquecimento Se no decurso da utilização o recipiente for retirado da zona de aquecimento o funcionamento da placa será interrompido No visor do equipamento aparecerá o símbolo U O símbolo U desaparecerá assim que o recipiente for ...

Страница 33: ...to Durante alguns segundos o indicador luminoso desta zona pisca 9 e depois fica no nível mais alto possível para cozinhar Zona para cozinhar seleccionada outra zona para cozinhar por ex cozinhar a nível 9 B está indicado 9 passa a 6 ou 8 segundo o tipo de placa Função programador O programador pode accionar se simultaneamente para as 3 zonas para cozinhar e com diferentes ajustes de tempo em minu...

Страница 34: ... intermitente 9 fixo Ajuste dezenas slide sobre SLIDER até 2 2 intermitente 9 fixo Validar dezenas tocar indicator 29 29 O piloto do controle pisca e passados alguns segundos paga se Quando tiver passado o tempo seleccionado o programador indica o piscando 00 e produzindo um sinal sonoro Para parar o som e o piscar basta carregar na tecla 00 Programação do automatismo de cozinhar go and stop Todas...

Страница 35: ...reactivar a configuração precedente é a seguinte Tocar na tecla Depois toque na tecla durante 6 segundos A configuração precedente está activada gravada Função Manter quente Esta função permite às zonas de cozinhar atingirem e manterem automaticamente uma temperatura de 70 C isto para evitar que os líquidos derramem e que as panelas queimem Para ligar a função Manter quente Acção Zona de commandos...

Страница 36: ... bipe não for ouvido repita o processo etapas 1 e 2 3 Tocar de novo indicator 0 do lado direto dos comandos 4 O símbolo L Lock aparecerá nas 3 zonas indicando que estão bloqueados Desbloqueio 1 Ligue a placa pressionando o indicador ON 2 Pressione simultaneamente B e L do lado direto dos comandos até ouvir um leve bipe se esse bipe não for ouvido repita o processo etapas 1 e 2 3 Tocar de novo indi...

Страница 37: ...s produtos são compatíveis com a indução Para verificar se os tachos são compatíveis Ponha um pouco de água num tacho colocado numa zona de aquecimento a indução regulada no nível 9 Esta água deve aquecer em alguns segundos Ponha um íman no fundo externo do tacho ele deve pegar NOTA O sobreaquecimento de uma panela vazia com fundo curvo ou com um logótipo ou cavidade estampada no centro poderá dan...

Страница 38: ...parados 2 a 3 Aquecer Descongelação Arroz pudding e pratos preparados Legumes peixe produtos congelados 3 a 4 Vapor Legumes peixes carne 4 a 5 Água Batatas cozidas sopas massas Legumes frescos 6 a 7 Cozer a lume brando Carnes fígado ovos salsichas Guisado carne enrolada tripas 7 a 8 Cozer Fritar Batatas pastéis panquecas 9 Fritar Levar a ebulição Bifes omeletas água P Fritar Levar a ebulição Levar...

Страница 39: ...cla 1 durante alguns segundos até o símbolo E aparecer a piscar 5 Espere até o símbolo E parar de piscar 6 Após alguns segundos o símbolo E transforma se automaticamente em C A configuração existente foi cancelada Nota Para placas de indução com 3 zonas de cozinhado como a zona direita frontal não existe comece o procedimento com a zona posterior direita b III Segundo passo nova configuração 1 Uti...

Страница 40: ...har depois da desligação da placa não é um defeito o ventilador continua a proteger a electrónica do aparelho o ventilador pára automaticamente Impossível ligar o comando de aquecimento automático a zona de aquecimento está ainda quente H o nível de aquecimento máximo está ligado 9 O símbolo L acende se Consulte o capítulo Bloqueio do painel de comando O simbolo U acende se Ver capítulo Manter que...

Страница 41: ...mbolo E 4 aparece Se qualquer um dos símbolos acima persistir ligue para o serviço PROTECÇÃO DO AMBIENTE Os materiais da embalagem são ecological e recyclable Os dispositivos eletrônicos são compostos de materiais para o ambiente mas de necessário recyclable e às vezes prejudiciais ao corredor bom e à segurança do dispositivo Nunca deitar fora junto com lixo doméstico Chame os serviços de recolha ...

Страница 42: ... distância de 50 mm entre a placa e a parede ou os lados A distância mínima de ventilação entre abase da placa e aparte superior de um forno ventilado o gaveta tem de ser de 20 mm Caso não se trate de um forno com ventilaçã oforçada a distância de separação tem de ser superior de acordo com os conselhos do fabricante do forno vidro medida Corte medida Modelo espessura profundidade largura profundi...

Страница 43: ...para assegurar uma boa circulação do ar de arrefecimento da electrónica Se uma gaveta se encontrar debaixo da placa de indução evitar arrumar nela objectos inflamáveis por exemplo spray ou objectos não resistentes ao calor Tenha cuidado ao colocar objectos metálicos tais como recipientes de cozedura ou cobertos uma vez que estes podem aquecer excessivamente e provocar queimaduras A distância de se...

Страница 44: ...o está situada debaixo da placa de indução Para abrir a tampa utilize uma chave de fenda média Coloque a nas 2 fendas situadas à frente das 2 setas Rede eléctrica Ligação Diâmetro cabo Fio Calibre de protecção 230V 50 60Hz 1 Fase N 3 x 2 5mm H 05 VV F H 05 RR F 25A 400V 50 60Hz 2 Fases N 4 x 1 5mm H 05 VV F H 05 RR F 16A calculado com o coeficiente de simultaneidade segundo standard EN 60 335 2 6 ...

Страница 45: ...tes ou intervenção de pessoal alheio a esta empresa não autorizado Problemas decorrentes de uma instalação inadequada da placa indução revisões de instalação ou funcionamento e limpezas Manuseamento indevido dos cabos e ligações do aparelho Avarias e danos causados por anomalias externas ou variações de fornecimento elétrico ou desastres naturais como tempestades raios inundações etc Danos ao aspe...

Страница 46: ...21316 2 ...

Страница 47: ...INSTRUCTION OF USE NOTICE D UTILISATION BEDIENUNGSANWEISUNG PI3100 PI3400 SERIAL NUMBER LABEL ...

Страница 48: ...USE OF THE APPLIANCE 7 DISPLAY 7 VENTILATION 7 STARTING UP AND APPLIANCE MANAGEMENT 8 BEFORE THE FIRST USE 8 INDUCTION PRINCIPLE 8 SENSITIVE TOUCH 8 POWER SELECTION ZONE SLIDER AND TIMER SETTING ZONE 8 STARTING UP 9 PAN DETECTION 9 RESIDUAL HEAT INDICATION 9 BOOSTER FUNCTION 10 TIMER 10 AUTOMATIC COOKING 11 PAUSE FUNCTION 12 RECALL FUNCTION 12 KEEP WARM FUNCTION 12 CONTROL PANEL LOCKING 13 COOKING...

Страница 49: ...The cooking plate can not be used as surface or as working surface The appliance must be grounded and connected conforming to local standards Do not use any extension cable to connect it The appliance can not be used above a dishwasher or a tumble dryer steam may damage the electronic appliances The appliance is not intended to be operated by means of external timer or separate remote control syst...

Страница 50: ...ance Raw pan bottoms or damaged saucepans not enamelled cast iron pots may damage the ceramic glass Sand or other abrasive materials may damage ceramic glass Avoid dropping objects even little ones on the vitroceramic Do not hit the edges of the glass with saucepans Make sure that the ventilation of the appliance works according to the manufacturer s instructions Do not put or leave empty saucepan...

Страница 51: ...ck Other precautions Make sure that the container pan is always centred on the cooking zone The bottom of the pan must have to cover as much as possible the cooking zone For the users of pacemaker the magnetic field could influence its operating We recommend getting information to the retailer or of the doctor Do not use aluminium or synthetic material containers they could melt on still hot cooki...

Страница 52: ...mm Ø 90 mm Nominal power 1100 W 1100 W Booster power 1400 W 1400 W Standardised cookware category B B Energy consumption ECcw 177 3 Wh kg 177 3 Wh kg Right heating zone Ø 280 mm Ø 200 mm Minimum detection Ø 110 mm Ø 90 mm Nominal power 2300 W 1400 W Booster power 3000 W 2000 W Standardised cookware category D C Energy consumption ECcw 178 1 Wh kg 181 Wh kg The given power may change according to t...

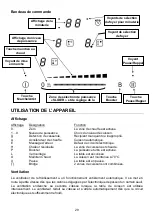
Страница 53: ...C II Stop Go The hob is in pause Bridge 2 cooking zones are combined Ventilation The cooling system is fully automatic The cooling fan starts with a low speed when the calories brought out by the electronic system reach a certain level The ventilation starts his high speed when the hob is intensively used The cooling fan reduces his speed and stops automatically when the electronic circuit is cool...

Страница 54: ...ess steel aluminium glass wood ceramic stoneware The induction heating zone adapts automatically to the size of the pan With a too small diameter the pan doesn t work This diameter is varying in function of the heating zone diameter If the pan is not adapted to the induction hob the display will show U Sensitive touch Your ceramic hob is equipped with electronic controls with sensitive touch keys ...

Страница 55: ...ted to the induction In this case it is impossible to increase the power and the display shows U This symbol disappears when a pan is put on the heating zone If the pan is removed from the heating zone the operation is stopped The display shows U The symbol U disappears when the pan is put back to the heating zone The cooking continues with the power level set before After use switch the heat elem...

Страница 56: ...ous with all 3 heating zones and this with different time settings from 0 to 99 minutes for each heating zone Setting and modification of the cooking time Example for 16 minutes at power 7 Action Control panel Display Zone selection press display 0 selected 0 and control light on Select the power level slide on the SLIDER to 7 7 Select Timer press display CL 00 Set the units slide on the SLIDER to...

Страница 57: ...nough to press the display 00 The hob switches off Automatic cooking All the cooking zones are equipped with an automatic go and stop cooking device The cooking zone starts at full power during a certain time then reduces automatically its power on the pre selected level Start up Action Control panel Display Zone selection press display 0 selected 0 and control light on Full power setting slide on...

Страница 58: ...atic heat up function The recall procedure is following Press the key Then press the key within 6 seconds The precedent settings are activated Keep warm Function This function allows to reach and maintain automatically a temperature of 70 C This will avoid liquids overflowing and fast burning at the bottom of the pan To engage to start the function Keep warm Action Control panel Display Zone selec...

Страница 59: ...splay until you hear Beep If this Beep is not heard repeat the steps 1 and 2 3 Re press 0 from the right zone display 4 The L symbol will appear in the 3 zones indicating that they are locked Unlocking 1 Press ON key 2 Press simultaneously B and L from the right zone display until you hear Beep If this Beep is not heard repeat the steps 1 and 2 5 Re press B 3 The L symbol will disappear in the 3 z...

Страница 60: ... magnet stucks on the bottom of the pan NOTE Overheating of an empty pot with a curved base or a logo or embossed hollow in the centre could damage the inductor cause malfunction or damage to the appliance that would not be covered by the manufacturer s warranty ATTENTION The use of improper containers may Noises during cooking Some kitchen utensils depending on the quality of the ferritic base of...

Страница 61: ...Steamed potatoes soups pasta fresh vegetables 6 to 7 Medium cooking Simmering Meat lever eggs sausages Goulash roulade tripe 7 to 8 Cooking Potatoes fritters wafers 9 Frying roosting Boiling water Steaks omelettes fried dishes Water P Frying roosting Boiling water scallops steaks Boiling significant quantities of water MAINTENANCE AND CLEANING Switch off the appliance before cleaning Do not clean ...

Страница 62: ...s an automatic reduction of power level and breaking Automatic overheating Continuous ventilation after cutting off the hob This is not a failure the fan continuous to protect the electronic device The fan cooling stops automatically The automatic cooking system doesn t start up The cooking zone is still hot H The highest power level is set 9 The control panel displays U Refer to the chapter Keep ...

Страница 63: ...cooking zones are configured once all the displays are turned off Please use the same pot for the whole procedure Never put several pots together on the zones during the setup process If E 4 displaying remains please call the customer care The control panel displays or Er03 An object or liquid covers the control keys The symbol disappears a soon as the area is cleaned or the object has been remove...

Страница 64: ...omposed of recyclable and sometimes harmful materials for the environment but necessary to the good running and the safety of the appliance Don t throw your appliance with the household refuses Get in touch with the waste collection centre of your commune that is adapted to the recycling of the household appliances ...

Страница 65: ...lation of the ventilation air Ensure that there is a distance of 50mm between the hob and the wall or sides The ventilation distance between the plate base and the upper section of a ventilated oven or drawer must beat least 20mm The separation distance for non forced ventilation ovens must be greater in accordance with the oven manufacturer s recommendations Cut size Glass size Model Thickness De...

Страница 66: ...e care when placing metal objects such as cooking pans or cutlery as these may overheat and cause burns Materials which are often used to make worktops expand on contact with water To protect the cut out edge apply a coat of varnish or special sealant Particular care must be given to applying the adhesive joint supplied with the hob to prevent any leakage into the supporting furniture This gasket ...

Страница 67: ...n the cover use a medium screwdriver Place it in the slits and open the cover calculated with the simultaneous factor following the standard EN 60 335 2 6 Connection of the hob Setting up the configurations For the various kinds of connection use the brass bridges which are in the box next the terminal Monophase 230V 1P N Put a bridge between terminal 1 and 2 Attach the earth to the terminate eart...

Страница 68: ...kdowns or damage caused by transport or intervention of personnel from outside this unauthorized company Problems caused by improper installation of the induction plate checks of the installation or operation and cleanings Tampering with the wiring and connections of the device Malfunctions and damage caused by external abnormalities or variations of the power supply or natural disasters such as s...

Страница 69: ...AU DE COMMANDE 29 UTILISATION DE L APPAREIL 29 AFFICHAGE 29 VENTILATION 29 MISE EN ROUTE ET GESTION DE L APPAREIL 30 AVANT LA PREMIERE UTILISATION 30 PRINCIPE DE L INDUCTION 30 TOUCHES SENSITIVES 30 MISE EN ROUTE 31 DETECTION DE RECIPIENT 31 INDICATEUR DE CHALEUR RESIDUELLE 31 FONCTION BOOSTER 32 FONCTION MINUTERIE 32 PROGRAMMATION D AUTOMATISME DE CUISSON 33 FONCTION PAUSE 34 FONCTION RAPPEL 34 F...

Страница 70: ... La table de cuisson ne doit pas servir de support ou de plan de travail La sécurité n est assurée que si l appareil est raccordé à une terre de protection conforme aux prescriptions en vigueur Pour le raccordement au réseau électrique n utilisez pas de rallonge L appareil ne doit pas être utilisé au dessus d un lave vaisselle ou d un sèche linge les vapeurs d eau dégagées pourraient détériorer l ...

Страница 71: ... l utilisation de l appareil en conditions de sécurité et informées des risques susceptibles de se présenter Les enfants ne doivent pas jouer avec l appareil Le nettoyage et l entretien ne doivent pas être confiés à des enfants sans surveillance d adultes Les objets métalliques tels que des couteaux des fourchettes des cuillères et des couvercles ne devraient pas être placés la surface vitrée puis...

Страница 72: ...tiroir et la partie inférieure de l appareil afin d assurer une bonne ventilation Ne déposez pas d objets inflammables ex sprays dans le tiroir placé sous la table de cuisson Les éventuels casiers à couverts doivent être en matériau résistant à la chaleur Précautions en cas de défaillance de l appareil Si un défaut est constaté il faut débrancher l appareil et couper l alimentation électrique En c...

Страница 73: ...du médecin N utilisez pas de récipients en matière synthétique ou en aluminium ils pourraient fondre sur des foyers encore chauds NE JAMAIS essayer d éteindre un incendie avec de l eau mais arrêter l appareil puis couvrir les flammes par exemple avec un couvercle ou une couverture anti feu L UTILISATION DE CASSEROLES NON ADAPTÉES OU D ACCESSOIRES AMOVIBLES INTERMÉDIAIRES POUR FAIRE CHAUFFER DES CA...

Страница 74: ...issance nominale 1100 W 1100 W Puissance du booster 1400 W 1400 W Catégorie de la casserole standard B B Consommation énergétique ECcw 177 3 Wh kg 177 3 Wh kg Foyer arrière droit Foyer droit Ø 280 mm Ø 200 mm Détection minimum Ø 110 mm Ø 90 mm Puissance nominale 2300 W 1400 W Puissance du booster 3000 W 2000 W Catégorie de la casserole standard D C Consommation énergétique ECcw 178 1 Wh kg 181 Wh ...

Страница 75: ...isson sont combinées Ventilation Le ventilateur de refroidissement a un fonctionnement entièrement automatique Il se met en route à petite vitesse dès que les calories dégagées par l électronique dépassent un certain seuil La ventilation enclenche sa seconde vitesse lorsque la table de cuisson est utilisée intensivement Le ventilateur réduit sa vitesse et s arrête automatiquement dès que le circui...

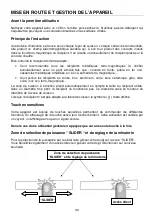
Страница 76: ... inox aluminium verre bois céramique grès terre cuite inox non ferro magnétique La zone de cuisson à induction prend automatiquement en compte la taille du récipient utilisé Avec un diamètre trop petit le récipient ne fonctionne pas Ce diamètre varie en fonction du diamètre de la zone de cuisson Lorsque le récipient n est pas adapté à la table de cuisson le symbole U reste affiché Touches sensitiv...

Страница 77: ...ns ce cas il est impossible d augmenter la puissance et dans l afficheur le symbole U apparaît Le U disparaît lorsqu une casserole est posée sur le foyer de cuisson Si en cours de cuisson le récipient est enlevé de la zone de cuisson le fonctionnement est interrompu Dans l afficheur le symbole U apparaît Le U disparaît lorsque le récipient est remis sur le foyer de cuisson La cuisson reprend au ni...

Страница 78: ...isson d une autre zone de chauffe Durant quelques secondes l afficheur de cette zone de cuisson en clignotant 9 puis affiche le niveau de cuisson maximum possible Zone de cuisson sélectionnée Autre zone de cuisson exemple puissance niveau 9 P est affiché 9 passe à 6 ou 8 suivant le type de foyer Fonction minuterie La minuterie peut être affectée simultanément aux 3 foyers de cuisson et ceci avec d...

Страница 79: ...9 0 clignotant 9 fixe Réglage des dizaines glisser sur le SLIDER jusqu à 2 2 clignotant 9 fixe Valider les dizaines appuyer sur 29 29 La durée est sélectionnée et le décompte démarre Dès que le temps de cuisson sélectionné est écoulé la minuterie affiche en clignotant 00 et un signal sonore retentit Pour stopper le son et le clignotement il suffit d appuyer sur la touche 00 La table s éteint Progr...

Страница 80: ...La procédure de rappel est la suivante Appuyer sur la touche Ensuite appuyer sur la touche en moins de 6 secondes Les réglages précédents sont à nouveau actifs Fonction Maintien au chaud Cette fonction de maintien au chaud permet d atteindre et de maintenir automatiquement une température de 70 C Ceci évitera aux liquides de déborder et aux mets d attacher au fond de la casserole Activer désactive...

Страница 81: ...er bip Si ce bip n est pas entendu répétez les étapes 1 et 2 du processus 3 Appuyez à nouveau sur la même touche 0 de la zone de cuisson de droite 4 Le symbole L verrouillé apparaîtra dans les 3 zones indiquant que la table est verrouillée Déverrouillage 1 Démarrer la plaque en appuyant sur le bouton marche arrêt 2 Appuyez à la fois sur la touche B du bandeau et sur l indicateur L dans la zone de ...

Страница 82: ...euvent faire du bruit lorsqu elles sont placées sur une zone de cuisson à induction Ces bruits ne traduisent en aucun cas un défaut de l appareil et n influent nullement sur son fonctionnement La surchauffe d une casserole vide à fond bombé un logotype ou bien un creux gravé au centre peut endommager l inducteur ATTENTION L utilisation de récipients inadaptés peut provoquer un dysfonctionnement ou...

Страница 83: ... chocolat gélatine Plats pré cuisinés 2 à 3 Gonfler Décongélation Riz pudding et plats cuisinés Légumes poisson produits congelés 3 à 4 Vapeur Légumes poissons viande 4 à 5 Eau Pommes de terre à l eau soupes pâtes Légumes frais 6 à 7 Cuire à feu doux Viandes foie œufs saucisses Goulasch roulades tripes 7 à 8 Cuire Frire Pommes de terre beignets galettes 9 Frire Porter à ébullition Steaks omelettes...

Страница 84: ...hauffe Il s enclenche également lorsque une ou plusieurs touches sensitives sont couvertes Une des casseroles est vide et son fond a surchauffé La table dispose également d un dispositif de réduction automatique de niveau de puissance et de coupure automatique en cas de surchauffe La soufflerie de ventilation continue de tourner après l arrêt de la table Ce n est pas un défaut le ventilateur conti...

Страница 85: ...iennent fixes 6 Les E se transforment ensuite automatiquement en C La configuration est annulée VI Comment reconfigurer la table 1 Prendre un récipient ferro magnétique de diamètre 16cm minimum 2 Sélection la zone de cuisson en appuyant sur le C correspondant 3 Poser le récipient sur la zone à configurer 4 Attendre jusqu à ce que C se transforme en La zone de cuisson est configurée 5 Procéder de l...

Страница 86: ...mballage sont écologiques et recyclables Les appareils électroniques sont composés de matériaux recyclables et parfois de matériaux nocifs pour l environnement mais nécessaires au bon fonctionnement et à la sécurité de l appareil Ne jetez en aucun cas votre appareil avec les déchets ménagers Faites appel au service d enlèvement ou aux sites de dépôt mis en place par votre commune et adaptés au rec...

Страница 87: ...00 4 370 810 340 780 Coller le joint 2 sur le rebord de la table à 2mm du bord externe après avoir ôté la feuille de protection 3 ATTENTION Une installation inadaptée et le fait de ne pas respecter les ventilations peut provoquer un dysfonctionnement ou une panne de l appareil non couverts par la garantie du fabriquant La plaque est équipé e de deux ventilateurs situés en bas Par conséquent les di...

Страница 88: ... avec de petits objets ou papiers car absorbés ils pourraient endommager le ventilateur ou endommager la ventilation Soyez prudent lorsque vous placez des ustensiles en métal tels que des récipients de cuisson ou des couverts car ils peuvent surchauffer et contribuer à augmenter la température de la zone et provoquer des brûlures L écart de sécurité entre la table de cuisson et la hotte aspirante ...

Страница 89: ...e raccordement se situe sous la plaque de cuisson Pour ouvrir le capot servez vous d un tournevis moyen Placez le dans les 2 fentes situées à l avant des 2 flèches Raccordement Réseau Diamètre câble Calibre de protection Câble 3 x 2 5 mm 1 Phase N 230V 50 60Hz H 05 VV F H 05 RR F 25 A 4 x 1 5 mm 2 Phases N 400V 50 60Hz H 05 VV F H 05 RR F 16 A calculé avec le coefficient de simultanéité suivant st...

Страница 90: ...ntervention de personnel étranger à l entreprise non autorisé Problèmes causés par une mauvaise installation de la plaque à induction par des révisions de l installation ou du fonctionnement ou des nettoyages Manipulation incorrecte du câblage et des connexions de l appareil Pannes et défauts produits par des anomalies extérieures ou des variations d alimentation électrique catastrophes naturelles...

Страница 91: ...EN GEFAHREN 49 GERÄTEBESCHREIBUNG 50 TECHNISCHE BESCHREIBUNG 50 BEDIENFELD 51 BEDIENUNG DES KOCHFELDES 51 ANZEIGE 51 BELÜFTUNG 51 INBETRIEBNAHME DES KOCHFELDES 52 VOR DEM ERSTEN AUFHEIZEN 52 INDUKTIONSPRINZIP 52 FUNKTION DER SENSORSCHALTFELDER 52 SLIDER AUSWAHLZONE UND ZEITSCHALTUHR AUSWÄHLUNG 52 KOCHFELD EIN UND AUSSCHALTEN 53 TOPFERKENNUNG 53 RESTWÄRMEANZEIGE 53 BOOSTER FUNKTION 54 ZEITSCHALTUHR...

Страница 92: ...tiketten und Aufkleber des Glases wegnehmen Das Gerät darf nicht abgeändert werden Verwenden Sie das Kochfeld nicht als Arbeits oder Abstellfläche Die Sicherheit ist nur gewährleistet wenn das Gerät mit einem Schutzleiter verbunden ist der den gültigen Vorschriften entspricht Der Anschluß des Gerätes an das Elektronetz darf nicht über ein Verlängerungskabel erfolgen Das Gerät darf nicht über einem...

Страница 93: ...und darüber sowie von Personen mit verringerten physischen sensorischen oder mentalen Fähigkeiten oder Mangel an Erfahrung und Wissen benutzt werden wenn sie beaufsichtigt oder bezüglich des sicheren Gebrauchs des Gerätes unterwiesen wurden und die daraus resultierenden Gefahren verstehen Kinder dürfen nicht mit dem Gerät spielen Reinigung und Benutzer Wartung dürfen nicht von Kindern ohne Beaufsi...

Страница 94: ... Gerätes und dem Schubladeninhalt geachtet werden da sonst die Belüftung des Gerätes nicht gewährleistet ist Legen Sie keine Gegenstände auf dem Kochfeld ab Es dürfen keine brennbaren Gegenstände z B Spraydosen in dieser Schublade aufbewahrt werden Die möglichen Besteckkästen in der Schublade müssen aus hitzebeständigem Material sein Erhitzen Sie keine geschlossenen Behälter z B Konservendosen auf...

Страница 95: ...ntuell den Herzschrittmacher beeinträchtigen würde Wenden Sie sich bitte im Zweifelsfall an den Hersteller des Herzschrittmachers oder an Ihren Arzt Benutzen sie keinen syntetique oder aluminum Bereich Sie könnten auf der kochzone verschmelzen Versuchen Sie nicht einen Brand mit Wasser zu löschen sondern schalten Sie das Gerät aus und bedecken Sie die Flamme mit einem Deckel oder einer Feuerlöschd...

Страница 96: ... Ø 90 mm Nominal Leistung 1100 W 1100 W Booster Leistung 1400 W 1400 W Standardisiertes Kochgeschirr Kategorie B B Energieverbrauch ECcw 177 3 Wh kg 177 3 Wh kg Kochzone rechts Ø 280 mm Ø 200 mm Minimal Topfboden Durchmesser Ø 110 mm Ø 90 mm Nominal Leistung 2300 W 1400 W Booster Leistung 3000 W 2000 W Standardisiertes Kochgeschirr Kategorie D C Energieverbrauch ECcw 178 1 Wh kg 181 Wh kg Diese Le...

Страница 97: ...ause Bridge 2 Kochzonen sind gebrückt Belüftung Der Lüfter funktioniert automatisch Er startet mit kleiner Geschwindigkeit sobald die durch die Elektronik freigesetzten Werte eine gewisse Schwelle überschreiten Die höhere Geschwindigkeit wird eingelegt wenn die Induktionskochmulde intensiv benutzt wird Der Lüfter reduziert seine Geschwindigkeit und schaltet sich automatisch ab sobald die Elektroni...

Страница 98: ...Die Induktionskochzone wird automatisch an die Grösse des Kochgeschirrs angepaßt Das Kochgeschirr darf einen bestimmten Bodendurchmesser nicht unterschreiten da sich die Induktion sonst nicht einschaltet Jeder Topfboden Durchmesser muß je nach Kochzonengröße eine Mindestgröße haben Wenn das Kochgeschirr der Induktion nicht geeignet ist erscheint die Anzeige U Funktion der Sensorschaltfelder Das Ko...

Страница 99: ...der wenn ein nicht für die Induktion geeigneter Topf benutzt wird In diesem Fall kann die Leistungsstufe nicht erhöht werden und das U Symbol erscheint in der Anzeige Das U verschwindet wenn ein Topf auf die Kochzone gesetzt wird Wird der Topf während des Kochens von der Kochzone genommen schaltet sich die Kochzone sofort aus und in der Anzeige erscheint das Zeichen U Das U verschwindet wenn ein T...

Страница 100: ...iner anderen Kochzone wenn die Booster Funktion aktiviert ist Diese Kochzone wird dann blinkend die reduzierte Leistung 9 anzeigen Ausgewählte Kochzone Andere Kochzone z B Leistungsstufe 9 B leuchtet 9 wird auf 6 oder 8 reduziert und blinkt Zeitschaltuhr Mit der integrierten Zeitschaltuhr kann auf allen vier Kochzonen eine Gardauer von 1 bis 99 Minuten eingestellt werden Jede Kochzone kann eine an...

Страница 101: ...nstellung der Zehnerminuten Auf dem SLIDER rutschen 2 blinkend 9 fest bis zu 2 Zehnerminuten Bestätigung Auf 29 drücken 29 Nach einigen Sekunden beendet das blinken die Zeitschaltuhr Leuchte und die Kochzonenleuchten erlischen Nach Ablauf der Zeitschaltuhr erfolgt ein akustisches Signal die Anzeige zeigt blinkend 00 Um den Signalton und das blinken abzuschalten brauchen Sie nur Taste 00 zu betätig...

Страница 102: ... die durch die Zeitmesser programmiert wurden Funktion Ankochautomatik Das Rückrufverfahren ist das folgende Auf dem Anschlag unterstützen Danach auf dem Anschlag in weniger als 6 Sekunden zu unterstützen Die vorhergehenden Einstellungen sind erneut aktiv Warmhaltefunktion Diese Funktion wird Speisen auf 70 C warmhalten Diese Funktion soll Überlauf und Verbrennen vermeiden Ein und ausschalten Betä...

Страница 103: ...chzone 4 Das Symbol L verriegelt erscheint in den 3 Kochzonen was darauf hinweist dass das Kochfeld verriegelt ist 2 3 4 Entriegelung 1 Starten Sie das Kochfeld durch das betätigen der Ein Aus Taste 2 Drücken Sie gemeinsam die Taste B auf dem Bedienfeld sowohl die Anzeige L der rechten Kochzone bis Sie einen leichten Piepton hören Wenn Sie diesen Piepton nicht hören wiederholen Sie die Schritte 1 ...

Страница 104: ...einer Induktions Kochzone gesetzt werden Dieser Lärm setzt in keinem Fall einen Fehler des Gerätes um und beeinflußt keineswegs sein Funktionieren Die Überhitzung eines leeren Topfes mit gewölbtem Boden oder mit Logoaufdruck oder Aussparung im Zentrum könnte den Induktor schädigen ACHTUNG Der Gebrauch ungeeigneter Behältnisse kann zu einem fehlerhaften Betrieb oder einer Störung des Gerätes führen...

Страница 105: ...reitung Saucen Butter Schokolade GelatineYoghurt 2 bis 3 Quellen Auftauen Warmhalten Reis Gefrorene Gerichte Fisch Gemüse 3 bis 4 Dampfgaren Dünsten Fisch Gemüse Obst 4 bis 5 Dünsten Quellen Auftauen Fisch Gemüse Teigwaren Getreide Hülsenfrüchte Tiefkühlkost 6 bis 7 Ankochen Fortkochen Fleisch Leber Eier Wurst Gulasch Rouladen 7 bis 8 Schonendes Braten Fisch Schnitzel Bratwurst Spiegeleier 9 Backe...

Страница 106: ...ch die Leistung reduziert oder auch automatisch abgeschaltet Das Kühlgebläse läuft nach dem Ausschalten weiter Das ist keine Störung das Gebläse läuft so lange bis das Gerät abgekühlt ist Das Gebläse schaltet automatisch ab Die Ankochautomatik schaltet nicht ein Die Kochzone ist noch heiß H Die höchste Leistungsstufe ist eingeschaltet 9 Der Auftrag Anzeige L Finden Sie im Kapitel Verriegelung der ...

Страница 107: ...en Vorgang für jede Kochzone 6 Die Kochzonen sind konfiguriert sobald nichts mehr angezeigt wird Verwenden Sie den gleichen Topf um die gesamte Konfiguration durchzuführen Während der Konfiguration dürfen keine weitere Töpfe auf der Mulde liegen Falls die E4 Anzeige bleibt wenden Sie sich bitte an Ihrem Kundendienst In der Anzeige erscheint oder Er03 Ein Objekt oder eine Flüssigkeit uberdeckt die ...

Страница 108: ...packungsmaterialen sind umweltfreundlich und recyclierbar Elektrische und elektronische Geräte enthalten noch wertvolle Materialen Sie erhalten aber auch noch schädliche Stoffe die für ihrer Funktion und Sicherheit notwendig sind Geben Sie Ihr Altgerät deshalb auf keinen Fall in den Restmüll Nutzen Sie statt dessen die von Ihrer Kommune eingerichtete Sammelstelle zur Rückgabe und Verwertung elektr...

Страница 109: ...es Luftspalts zwischen dem unteren Teil der Kochplatte und dem oberenTeileines Ofensoder eine Schublade muss 20mm betragen Ist der Ofen nichtfremdbelüftet muss der Mindestabstand gemäß den Herstelleranweisungen größer sein Dieses Gerät entspricht bezüglich des Schutzes gegen Feuergefahr dem Typ Y Nur Geräte dieses Typs dürfen einseitig an nebenstehende Hochschränke oder Wände eingebaut werden Aber...

Страница 110: ...oder Besteck diese könnten sich übermäßig erhitzen und zu Verbrennungen führen Zwischen dem Gerät und einer Dunstabzugshaube muß der vom Hersteller angegebene Sicherheitsabstand eingehalten werden Bei fehlenden Angaben muß dieser Abstand mindestens 760 mm sein Es muß sichergestellt werden daß das Anschlußkabel des Kochfeldes nach dem Einbau keinen mechanischen Belastungen z B durch Schublade ausge...

Страница 111: ...hließen Sie immer die Erde mit an Beachten Sie das Anschlußschema Der Anschlußkasten befindet sich auf der Unterseite des Gerätes Um das Gehäuse zu öffnen benutzen Sie einen Schraubenzieher und schieben Sie ihn in den vorgesehenen Schlitzen laut EN 60 335 2 6 Norm Anschluß des Kochfelds Verwenden Sie für die verschiedenen Anschlussmöglichkeiten die Polbrücken aus Messing die sich im Gehäuse befind...

Страница 112: ...en entstehen Bei Problemen die sich aus dem unsachgemäßem Einbau oder Betrieb der Induktionsplatte deren unsachgemäßen Wartung oder Reinigung ableiten Bei unsachgemäßer Handhabung der Verkabelung und Anschlüsse des Gerätes Bei durch externe Anomalien oder Schwankungen der Stromversorgung oder Naturkatastrophen wie Sturm Blitz Überschwemmungen etc verursachten Störungen oder Schäden Bei ästhetische...

Страница 113: ...21924 2 ...

Отзывы: