background image


69 


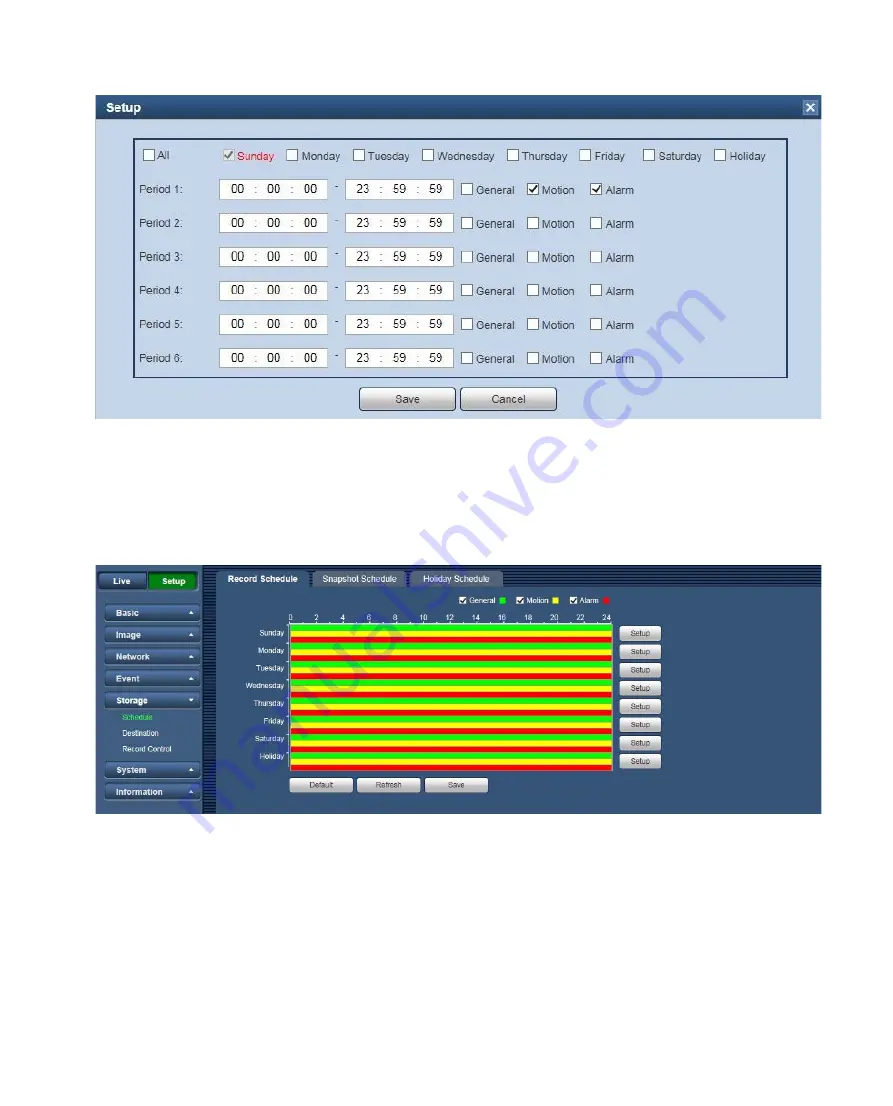
Figure 6-42 

Step 3.  Click on Save, return to record schedule interface. See Figure 6-43.  

  Green color stands for the general record/snapshot. 

  Yellow color stands for the motion detect record/snapshot. 

  Red color stands for the alarm record/snapshot.  


Figure 6-43 

Step 4. In record schedule interface, click on Save. System prompts it is successfully saved.  
 

 Snapshot Schedule 

6.5.1.2
Snapshot setup as: 
Step 1. Click on Snapshot Schedule tab, see Figure 6-44. 
 

Содержание WV-V1330L1

Страница 1: ...Network Camera Operating Instructions Model No WV V2530LK WV V2530L1 WV V1330LK WV V1330L1 Version 1 0 0 ...

Страница 2: ...ck 14 4 1 1 Function of Play 15 4 1 2 Playback File 16 4 1 3 Playback Cut 18 4 1 4 Record Type 18 4 1 5 Progress Bar 18 4 1 6 Assistant Function 19 4 2 Picture Playback 19 4 2 1 Play 20 4 2 2 Playback File 21 4 2 3 Snapshot Type 22 5 Log out 23 6 Setup 24 6 1 Basic 24 6 2 Image Audio 25 6 2 1 Image Audio 25 6 2 2 Image adjust 35 6 2 3 Profile Management 42 6 2 4 Zoom and Focus WV V2530L1 WV V1330L...

Страница 3: ...d Control 74 6 6 System 76 6 6 1 Account User mng 76 6 6 2 Default reset 79 6 6 3 Import Export 80 6 6 4 Auto Maintenance 80 6 6 5 Upgrade 81 6 7 Information 82 6 7 1 Version 82 6 7 2 Log 82 6 7 3 Online User 83 7 Using the CD ROM 84 7 1 About the CD launcher 84 7 2 Installing Panasonic IP Setting Software 85 7 3 Installing the manuals 85 7 4 Installing the Viewer software 86 7 5 Configure the net...

Страница 4: ...rk camera This operation manual is designed to be a reference tool for your system Please open the accessory bag to check the items one by one Depending on the model used the screens shown in the explanations may differ to the actual camera screens ...

Страница 5: ...uration alarm and etc Please follow the steps listed below for network connection Make sure the network camera has connected to the network properly Network camera IP address and PC IP address shall be in the same network segment If there is router please set the corresponding gateway and subnet mask Use order ping network camera address to check connection is OK or not ...

Страница 6: ...p 192 168 0 10 in IE address bar See Figure 2 1 Figure 2 1 The login interface is shown as below See Figure 2 2 Please input your user name and password to have been registered when you access the camera at first Note Please refer to Network Configuration in Installation Guide manual For security reasons please change the password periodically Input your IP address here ...

Страница 7: ...e to login you may see the interface window shown as in Figure 2 3 Figure 2 3 Click on Please click here to download and install the plug in The system pops up warning information to ask you whether run or save this plug in See Figure 2 4 ...

Страница 8: ...4 Figure 2 4 You must either run or save the file to local and install it Follow the following steps See Figure 2 5 Note The displayed screens are different by the security settings on the PC Figure 2 5 ...

Страница 9: ...5 When plug in installation completes the installation page closes automatically The web end will refresh automatically and then you can view video captured by the camera Figure 2 6 ...

Страница 10: ...e Interface After you logged in you can see the live monitor window See Figure 2 7 Figure 2 7 There are three sections Section 1 Encode setup bar Section 2 System menu Section 3 Window function option bar 2 1 3 ...

Страница 11: ...etailed information SN Parameter Function 1 Menu You can switch Live and Setup menu 2 Stream You can switch Main Sub Stream 1 and 2 The compression under distribution is displayed by Stream change 3 Protocol You can select stream media protocol from the dropdown list There are three options TCP UDP Multicast 1 7 2 3 4 5 6 8 ...

Страница 12: ...0LK WV V2530L1 WV V1330L1 8 Logout Click Logout button system goes back to log in interface Image Adjustment 2 3 1 Click Image Adjustment button to open picture setup interface See Figure 2 9 This interface is displayed under a display of Image Adjustment Figure 2 9 Please refer to the following sheet for detailed information Parameter Function Video setup It is to adjust monitor video brightness ...

Страница 13: ...nu System menu is a click Setup as in Figure 2 10 Please refer to chapter 6 1 Basic chapter 6 2 Image Audio chapter 6 3 Network chapter 6 4 Event chapter 6 5 Storage chapter 6 6 System and chapter 6 7 Information for detailed information WV V2530LK WV V1330LK WV V2530L1 WV V1330L1 Figure 2 10 ...

Страница 14: ...face appears on encode setup bar as shown in figure 2 12 WV V2530L1 WV V1330L1 6 Snapshot You can snapshot important video by clicking on this button All images are memorized in system folder picture download default You can go to Setup Image Image Path to modify the local record save path 7 Record For manual record All records are memorized in Setup Image Image Path When connected to Panasonic s ...

Страница 15: ...m and focus interface appears on the encode setup bar as shown in Figure 2 12 please refer to the following sheet for detail information to adjust zoom and focus configuration Note Auto focus after zoom focus adjustment Disable the operation till finishing zoom and focus adjustment Figure 2 12 Parameter Function Zoom Adjust the focal length of the lens by clicking or long pressing buttons or movin...

Страница 16: ...us Click to adjust the image definition automatically Note Other lens operations are not allowed during the process of auto focus Restore All Reset the lens to zero position to eliminate the accumulative error of lens Note Please reset when the image adjustment is not clear or operating zoom focus many times Refresh Synchronize the location of drag slider of lens and zoom focus after hardware zoom...

Страница 17: ...ecords alarm info when SD memory card error happens WV V2530LK WV V2530L1 WV V1330L1 Tampering System alarms when tampering alarm occurs Audio Detection System records alarm when audio detection occurs WV V2530LK External Alarm System records alarm when alarm inputs the device WV V2530LK When alarm is triggered there will be displayed on the Alarm menu and system automatically records alarm info T...

Страница 18: ...ore playback user shall set storage management as in Chapter 6 5 4 1 Playback The playback interface is shown as in Figure 4 1 Figure 4 1 There are four sections Section 1 Function of play Section 2 Playback file Section 3 Play time cut Section 4 Record type Section 5 Progress bar Section 6 Assistant function 2 3 4 1 6 5 ...

Страница 19: ...lay status 2 Stop Click this button to stop playing 3 Next Frame Click on this button to go to next frame Note You shall pause record when you use this function 4 Slow Click on this button to play slowly 5 Fast Click on this button to play quickly 6 Sound When this button displays it means audio is silent Click on this button to switch back to normal 7 Volume Click on left mouse to adjust volume 1...

Страница 20: ...is displays record file progress bar in color While green represents normal record yellow represents motion detect record red represents alarm record and blue represents manual record Step 2 Click on certain time on progress bar playback starts from this time See Figure 4 4 Figure 4 4 Step 3 Click on file list in Figure 4 3 select date file will be displayed in list Step 4 Double click on file in ...

Страница 21: ...ion Search It means records within searched start time and end time on the date Download Record type is mp4 click on download button and download file to path in Chapter 6 5 2 1 Back Click on back button to go to calendar interface ...

Страница 22: ...icon you will be asked to select end time Click on cut icon as finish cutting Step 5 Click on Save button to save file cut to path in Chapter 6 5 2 1 See Figure 4 6 Figure 4 6 Record Type 4 1 4 After checking record file type only selected file will be displayed in progress bar and file list Users can also select the record type to be displayed via the dropdown box which is above the file list See...

Страница 23: ...iginal size click on mouse to restore its original size Click on this button you can scroll to zoom in Snapshot Click on this button you can snapshot video under playback status Snapshot will be saved to path in Chapter 6 5 2 1 4 2 Picture Playback Web client picture playback interface has the following three functions Parameter Function 1 Play function bar 2 Playback file bar 3 Snapshot type bar ...

Страница 24: ...20 Play 4 2 1 Figure 4 11 Default icon is and it means pause or not played picture Click on play button to switch to normal play status Icon become Click on it to pause ...

Страница 25: ...lick on file in list to play this snapshot See Figure 4 13 Parameter Function Search It means all snapshot files within the start time and end time of selected date Download Click on download button to download snapshot file to local Back Click on back button to return to calendar interface and re select time ...

Страница 26: ...22 Figure 4 13 Snapshot Type 4 2 3 After checking snapshot file type in file list only display file of selected type See Figure 4 14 Figure 4 14 ...

Страница 27: ...23 5 Log out Click logout button in Encode setup of Live window system goes back to log in interface See Figure 5 1 Figure 5 1 ...

Страница 28: ...Camera title It is to set device name Date time Set date and time Click Sync PC to set PC time to camera Time display format There are two options 24 H and 12 H Date Time display format Here you can select date format from the dropdown list Time zone The time zone of the device Summer time daylight saving Here you can set daylight saving time begin time and end time You can set according to the da...

Страница 29: ...deo Standard This is to display video standard such as NTSC PAL If this is changed the camera reboots automatically NTP Setup You can check the box to enable NTP function NTP Server You can set the time server address NTP Port It is to set the time server port Update period It is to set the sync periods between the device and the time server 6 2 Image Audio Image Audio 6 2 1 Image 6 2 1 1 The vide...

Страница 30: ...ple resolutions You can select from the dropdown list For each resolution the recommended bit stream value is different Frame rate FPS WV V2530LK WV V1330LK NTSC 1 60fps PAL 1 50fps WV V2530L1 WV V1330L1 NTSC 1 30fps PAL 1 25fps The frame rate may vary due to different resolutions WV V2530L1 WV V1330L1 When using SD card Record the max frame rate is 15 NTSC 12 PAL Transmission Priority There are t...

Страница 31: ...bit stream value is different Frame rate FPS NTSC 1 30fps PAL 1 25fps The frame rate may vary due to different resolutions WV V2530L1 WV V1330L1 When using SD card Record the max frame rate is 15 NTSC 12 PAL Transmission Priority There are two options VBR and CBR Please note you can set video quality in VBR mode Under MJPEG mode only CBR is available Bit Rate In CBR the bit rate here is the max va...

Страница 32: ... list For each resolution the recommended bit stream value is different Frame rate FPS NTSC 1 30fps PAL 1 25fps The frame rate may vary due to different resolutions Transmission Priority There are two options VBR and CBR Please note you can set video quality in VBR mode Under MJPEG mode only CBR is available Bit Rate In CBR the bit rate here is the max value In dynamic video system needs to low fr...

Страница 33: ...mation Parameter Function Snapshot Type There are two modes General schedule and Event activation Image capture size It is the same with the resolution of the Main Stream Quality It is to set the image quality There are six levels Interval It is to set snapshot frequency The value ranges from 1s to 7s There is Customized 1 50000S mode ...

Страница 34: ...30 Overlay 6 2 1 3 The video overlay interface is shown as in Figure 6 4 Figure 6 5 Figure 6 6 and Figure 6 7 Figure 6 4 Figure 6 5 ...

Страница 35: ...e 6 7 Please refer to the following sheet for detailed information Parameter Function Privacy zone Here you can privacy mask the specified video in the monitor video System max supports 4 privacy mask zones See Figure 6 4 ...

Страница 36: ...le You can enable this function so that system overlays time information in video window You can use the mouse to drag the time title position See Figure 6 6 Picture Overlay You can enable this function to display overlay picture Click on disable to turn it off Click on Upload Picture to overlay local picture into monitoring window You can drag the yellow box to move it See Figure 6 7 ...

Страница 37: ...st default is 6 Able to set area block max 4 areas Path 6 2 1 5 The storage path interface is shown as in Figure 6 9 Here you can set snap image saved path and the record storage path The default monitor image path is C Users Admin WebDownload Snapshot The default monitor record path is C Users Admin WebDownload LiveRecord The default playback snapshot path is C Users Admin WebDownload PlaybackSna...

Страница 38: ...se click the Save button to save current setup Figure 6 9 Audio WV V2530LK 6 2 1 6 The audio interface is shown as below See Figure 6 10 Figure 6 10 Please refer to the following sheet for detailed information ...

Страница 39: ... It is 8k by default It can be selected only 8k when selecting G 726 and G 711Mu Audio in type It is to set audio input type it is LineIn by default Noise filter It is to set if it is to enable noise filter function it is disable by default Microphone volume It is to adjust the volume of the microphone the value range is from 0 to 100 Speaker volume It is to adjust the volume of the speaker the va...

Страница 40: ...lue is 50 Saturation It is to adjust monitor window saturation The larger the number the strong the color is This value has no effect on the general brightness of the whole video The video color may become too strong if the value is too high For the grey part of the video the distortion may occur if the white balance is not accurate Please note the video may not be attractive if the value is too l...

Страница 41: ...deo whole brightness can automatically change within the proper exposure range according to the different environments The higher the gain max value is the lower the noise is Gain Priority Fixed aperture is the set value it can auto realize best brightness according to priority drive exposure time to drive gain mode Shutter Priority The image overall brightness can auto adjust according to the adj...

Страница 42: ...ue is 50 Backlight 6 2 2 3 Figure 6 13 Parameter Function Mode BLC The device auto exposures according to the environments situation so that the darkest area of the video is cleared HLC After you enabled HLC function the device can lower the brightness of the brightest section according to the HLC control level It can reduce the area of the halo and lower the brightness of the whole video The valu...

Страница 43: ...on So that you can view these two sections clearly at the same time The value ranges from 1 to 100 When you switch the camera from no WDR mode to the WDR mode system may lose several seconds record video OFF It is to disable the BLC function Please note this function is disabled by default White Balance 6 2 2 4 Figure 6 14 ...

Страница 44: ...quality Auto The auto white balance is on System can auto compensate the color temperature to make sure the vide color is proper Natural The threshold of the white balance is in the Natural mode Stream Lamp The threshold of the white balance is in the Stream Lamp mode Outdoor White balance threshold sets to outdoor mode Manual You can set the gain of the red blue channel The value reneges from 0 t...

Страница 45: ...to output the color or the B W video according to the device feature The general bright of the video or there is IR light or not Black White The device outputs the black and white video D N Sensitivity It is to set sensitivity to change to Day mode and to Night mode You can select High Middle or Low the default is Middle D N Delay It is to set delay time before change to Day mode and to Night mode...

Страница 46: ...anagement 6 2 3 The profile management interface is shown as in Figure 6 17 Figure 6 7 Profile management has three modes normal full time and schedule If you select normal the video will be configured as normal If you select full time you must select either day or night and the video will be configured accordingly If you select schedule you can decide detained time interval Important The setup be...

Страница 47: ...ng 1 5 20 Focus NEAR Press minus key to make the focal plane of the lens move to close shot FAR Press plus key to make the focal lens move to move to long shot Speed Including 1 5 20 Restore all Restore all the value of both zoom and focus are reset as 0 Auto Focus Adjust the focal plane of the lens to make the video image stay the clearest Refresh Acquire the latest status of the zoom and focus ...

Страница 48: ...here are two modes Static mode and the DHCP mode The IP address subnet mask gateway are null when you select the DHCP mode to auto search the IP If you select the static mode you need to set the IP address subnet mask gateway manually If you select the DHCP mode you can view the IP address subnet mask gateway from the DHCP If you switch from the DHCP mode to the static mode you need to reset the I...

Страница 49: ...mask Input subnet mask of the network Default Gateway Input default gateway of the network Primary DNS Sever DNS IP address Secondary DNS Server Alternate DNS IP address Connection 6 3 2 Connection 6 3 2 1 The connection interface is shown as in Figure 6 20 Figure 6 20 Please refer to the following sheet for detailed information Parameter Function Max Connection It is the max Web connection for th...

Страница 50: ...type 1 You need to input the following four items manually username password IP and port The IP is device IP and the port default value is 554 You can leave it in blank if it is the default value HTTPs Set to enable HTTPS protocol HTTPs Port The default value is 443 You can input the actual port number if necessary ONVIF 6 3 2 2 ONVIF Open Network Video Interface Forum this standard describes netw...

Страница 51: ...s even your IP address has changed Figure 6 22 Please refer to the following sheet for detailed information Parameter Function Server Type You can select DDNS protocol from the dropdown list and then enable DDNS function Server Address DDNS server IP address CN99 DDNS Server address www 3322 org NO IP DDNS Server address dynupdate no ip com Dyndns DDNS Server address members dyndns org Host name Y...

Страница 52: ...ilter interface is shown as in Figure 6 23 You can enable IP filter function so that some specified IP MAC user can access the network camera You can add IP address or IP address section If you do not check the box here it means there is on access limit Here you can add IP address and MAC address You must add these addresses before enabling the trusted sites Please note You must set MAC address in...

Страница 53: ...nonymity For the server supports the anonymity function You can auto login anonymously You do not need to input the user name password and the sender information Username The user name of the sender email account Password The password of sender email account Sender Sender email address Authentication Encryption mode You can select SSL TLS or None Title Subject Input email subject here Attachment S...

Страница 54: ...ion is very useful when there are too many emails activated by the abnormity events which may result in heavy load for the email server Health Mail Please check the box here to enable this function Update Period interval This function allows the system to send out the test email to check the connection is OK or not Please check the box to enable this function and then set the corresponding interva...

Страница 55: ...k the Details button and then check the Internet Gateway Device Discovery and Control client and UPnP User Interface Please click OK to begin installation Enable UPnP from the Web If your UPnP is enabled in the Windows OS the network camera can auto detect it via the My Network Places Under manual mode you can modify external port Under auto mode select idle port for auto port mapping without user...

Страница 56: ...52 Figure 6 26 Figure 6 27 ...

Страница 57: ...fined the authentication access control and the management relationship between one proxy and one group of the managers Please make sure the device and the proxy are the same The read community will read write access all the objects the SNMP supported in the specified name The default setup is written Trap Address The destination address of the Trap information from the proxy program of the device...

Страница 58: ... Only when SNMP version is SNMP v3 you shall config this parameter You can select either MD5 or SHA The default is MD5 Authentication Password Only when SNMP version is SNMP v3 you shall config this parameter Password requires min of 8 characters Encryption Type Only when SNMP version is SNMP v3 you shall config this parameter The default is CBC DES Encryption Password Only when SNMP version is SN...

Страница 59: ...is function also depends on the relationship of the group member and group of the outer Here you can set multicast address and port You also need to go to Live interface to set the protocol as Multicast Figure 6 28 Please refer to the following sheet for detailed information Parameter Function Enable Select to enable multicast function Multicast Address The range of multicast address of Main Strea...

Страница 60: ...ontrol it to access to the Local Area Networks or not It supports the ability to authenticate to calculate fee to ensure security and to maintain requirements See Figure 6 29 Figure 6 29 Please refer to the following sheet for detailed information Parameter Function Authentication PEAP protected EAP protocol Username It needs the username to login which is authenticated by the server Password Plea...

Страница 61: ...ces Code Point of the IP to distinguish the data packet so that the router or the hub can provide different services for various data packets It can select the different queues according to the priority of the packets and select the bandwidth of the each queue It can also discard at the different ratio when the broad bandwidth is jam Figure 6 30 Please refer to the following sheet for detailed inf...

Страница 62: ...ile not release left mouse Anti Dither System only memorizes one event during the anti dither period The value ranges from 0s to 100s VMD area Here you can set motion detection region and its sensitivity and area The higher the sensitivity is the easier to trigger motion detect the smaller the area the easier to trigger motion detect The default covers all regions You must click on save before ena...

Страница 63: ...rm occurs WV V2530LK Alarm Delay System can delay the alarm output for specified time after alarm ended The value ranges from 10s to 300s WV V2530LK Send Email If you enabled this function System can send out email to alert you when alarm occurs and ends Snapshot You need to check the box here so that system can backup VMD snapshot file See Figure 6 32 Figure 6 32 ...

Страница 64: ...r with high sensitivity You can set up to four areas The range is 0 100 The recommenced value is 30 70 The default is 60 Threshold It is to check target object area related to detection area The lower the area threshold the easier to trigger VMD You can set up to four areas The range is 0 100 The recommenced value is 10 50 Waveform Red means motion detect is triggered Green means motion detect is ...

Страница 65: ...e tampering interface is shown as in Figure 6 34 and Figure 6 35 Figure 6 34 Figure 6 35 Please refer to the following sheet for detailed information Parameter Function Enable You need to check the box to enable this function ...

Страница 66: ...y System can delay the record for specified time after alarm ended The value ranges from 10s to 300s Relay out Enable alarm activation function You need to select alarm output port so that system can activate corresponding alarm device when alarm occurs WV V2530LK Alarm Delay System can delay the alarm output for specified time after alarm ended The value ranges from 10s to 300s WV V2530LK Send Em...

Страница 67: ...al Check Enable Input Abnormal and it will activate alarm when detecting audio input abnormal Enable Intensity Change Check Enable Intensity Change and it will activate alarm when detecting audio intensity change surpass threshold Sensitivity 1 100 level adjustable only when the volume change of input sound surpasses the volume of continuous environment then it can be judged as audio abnormity whe...

Страница 68: ...Figure 6 37 Please refer to the following sheet for detailed information Parameter Function Enable After enabled relay activation will work Check it and enable the PIR alarm Working period This function becomes activated in the specified periods There are six periods in one day Please draw a circle to enable corresponding period Select date If you do not select current setup applies to today only ...

Страница 69: ... alarm output port so that system can activate corresponding alarm device when alarm occurs Alarm delay System can delay the alarm output for specified time after alarm ended The value ranges from 10s to 300s Send Email After this function is enabled system can send out email to alert you when alarm occurs and ends Snapshot After you enabled snapshot the system will automatically snapshot if alarm...

Страница 70: ...and Capacity Warning Enable Check to alarm when SD card is abnormal Relay out Enable alarm activation function You need to select alarm output port so that system can activate corresponding alarm device when alarm occurs WV V2530LK Alarm Delay System can delay the alarm output for specified time after alarm ended T value ranges from 10s to 300s WV V2530LK ...

Страница 71: ...n the system can send out email to alarm the specified user This function is invalid when network is offline or IP conflict occurs SD Card Capacity Limit User can set SD card capacity that is left free When SD card space left is smaller than this limit alarm occurs ...

Страница 72: ...schedule steps Step 1 Click on Record Schedule see Figure 6 41 Figure 6 41 Step 2 From Monday to Sunday select record time click on setup on the right see Figure 6 42 Set period according to actual need There are six periods available each day By checking or unchecking you can add or delete three types of record schedule General Motion and Alarm Note Period setup can be done by dragging in record ...

Страница 73: ...l record snapshot Yellow color stands for the motion detect record snapshot Red color stands for the alarm record snapshot Figure 6 43 Step 4 In record schedule interface click on Save System prompts it is successfully saved Snapshot Schedule 6 5 1 2 Snapshot setup as Step 1 Click on Snapshot Schedule tab see Figure 6 44 ...

Страница 74: ...iods available each day By checking or unchecking user can add or delete three types of snapshot schedule General Motion and Alarm Note Period setup can be done by dragging in snapshot schedule interface while not releasing left mouse Figure 6 45 Step 3 Click on Save return to snapshot schedule interface See Figure 6 46 Green color stands for the general record snapshot ...

Страница 75: ...te as holiday Step 1 Click on Holiday Schedule tab see Figure 6 47 Figure 6 47 Step 2 Select date to set as holiday The selected date will be highlighted in yellow Step 3 Check Record Snapshot click on Save System prompts it is successfully saved Step 4 Check Record Schedule Snapshot Schedule interface click on setup next to Holiday refer to setup of Monday to Sunday Step 5 Complete setup of holid...

Страница 76: ...terface Please check the box to enable the save functions Note Only device supports SD card has local Figure 6 48 Please refer to the following sheet for detailed information Parameter Function Event Type It includes scheduled motion detect and alarm Alarm WV V2530LK Local It saved in the SD card except WV V1330LK FTP It saved in the FTP server Local except WV V1330LK 6 5 2 2 The local interface i...

Страница 77: ...wap upon the SD card Click Format to realize formatting upon the SD card FTP 6 5 2 3 The FTP interface is shown as in Figure 6 50 You need to check the box to enable the FTP function When network disconnect occurred or there is malfunction Emergency storage can save the record snapshot picture to the local SD card except WV V1330LK Figure 6 50 ...

Страница 78: ... to the directory of FTP server Emergency Local Click it and it will store to local SD card when FTP storage abnormity occurs except WV V1330LK Record Control 6 5 3 The record control interface is shown as in Figure 6 51 Figure 6 51 Please refer to the following sheet for detailed information Parameter Function Pack Duration Here you can select file size Default setup is 8 minutes Note The limitat...

Страница 79: ... n seconds record Disk Full There are two options stop recording or overwrite the previous files when SD is full Stop Current working SD is overwriting or current SD is full it will stop record Overwrite Current working SD is full it will overwrite the previous file Record Mode There are three modes Auto Manual Off It starts recording when selecting manual mode it records within the range of sched...

Страница 80: ...ser shall be included in only one group Currently logged in user cannot change his her own right User Name 6 6 1 1 In this interface you can enable anonymity login add remove user and modify user name See Figure 6 52 Figure 6 52 Enable anonymity login Enable anonymity login and input IP No username or password is required you can log in by anonymity with limited rights You can click logout to end ...

Страница 81: ...the user password You need to input the old password and then input the new password twice to confirm the new setup Please click the Save button to save Please note the password ranges from 8 digit to 32 digit It shall include the number and letter only For the user who has the account rights he can modify the password of other users Figure 6 54 ...

Страница 82: ... 55 Figure 6 55 Add Group It is to add group and set its corresponding rights See Figure 6 56 Please input the group name and then check the box to select the corresponding rights It includes preview playback record control and etc Figure 6 56 Modify group Click the modify group button you can see an interface is shown as in Figure 6 57 ...

Страница 83: ...ormation such as remarks and rights Figure 6 57 Default reset 6 6 2 The default reset interface is shown as in Figure 6 58 Please note system cannot restore some information such as network IP address and Username Password Figure 6 58 ...

Страница 84: ...rt the local setup files to the system Export It is to export the corresponding system setup to your local PC Auto Maintenance 6 6 4 The auto maintenance interface is shown as in Figure 6 60 Here you can select auto reboot and auto delete old files interval from the dropdown list If you want to use the auto delete old files function you need to set the file period Figure 6 60 ...

Страница 85: ...ld Files Check it and set period within 1 31 days Upgrade 6 6 5 The upgrade interface is shown as in Figure 6 61 Please select the upgrade file and then click the Upgrade button to begin firmware update Important Improper upgrade program may result in device malfunction Figure 6 61 ...

Страница 86: ...face is shown as in Figure 6 62 Here you can view system hardware features software version release date and etc Please note the following information is for reference only Figure 6 62 Log 6 7 2 Here you can view system log See Figure 6 63 Figure 6 63 ...

Страница 87: ...from the drop down list and then click search button to view the list You can click the stop button to terminate current search operation Detailed Information You can select one item in the list to view the detailed information Clear You can click this button to delete all displayed log files Please note system does not support clear by type Backup You can click this button to backup log files to ...

Страница 88: ...OM the following actions can be performed No Parameter Function 1 Install The Panasonic IP Setting Software can be installed on the PC 7 2 Installing Panasonic IP Setting Software 2 Run Settings related to the camera s network can be set from the Panasonic IP Setting Software 7 5 Configure the network settings of the camera using the Panasonic IP Setting Software 3 Install The manuals can be insta...

Страница 89: ...ng Software is installed 3 Specify which folder on the PC to install the Panasonic IP Setting Software to 4 Click the Install button to start the installation Note To uninstall the Panasonic IP Setting Software delete the shortcut icon from where you specified it to be installed the default is on the desktop during installation and the EasyIPConfig folder from the folder the default is C Panasonic...

Страница 90: ...nuals delete the shortcut icon from where you specified it to be installed the default is on the desktop during installation and the Manual folder from the folder the default is C Panasonic you specified during installation 7 4 Installing the Viewer software The Viewer software Plug in Software must be installed on the PC in order to display camera images On the CD launcher window click the Instal...

Страница 91: ...y enhancements in IP Setting Software Network Settings of the camera to be configured cannot be changed when around 20 minutes have passed after turning on the power of the camera When the effective period is set to 20min in the Easy IP Setup accommodate period However settings can be changed after 20 minutes for cameras in the initial set mode 1 To start the Panasonic IP Setting Software click th...

Страница 92: ...ork Settings button is clicked the Network Settings screen is displayed and network settings can be changed For further information refer to Changing Network Settings 3 When Please click here to download and install the plug in in the Live page is displayed follow the on screen instructions to install the software The Live page of the camera is displayed If the viewer software Plug in software can...

Страница 93: ... clicking the Save button The settings may be invalidated when the LAN cable is disconnected before completing the upload In this case perform the settings again When using a firewall including software allow access to all UDP ports Note This manual is for reference only Slight difference may be found in user interface All the designs and software here are subject to change without prior written n...

Отзывы: