manualshive.com logo in svg
background image

7

Preset map-shot:

8 thumbnail images of the preset

position 1-8 (

Setup Instructions) will be displayed

orderly on a newly displayed window. When a
thumbnail image is clicked, the camera moves to the
respective position and live images will be displayed
on the "Live" page.

Notes:

• Do not operate the browser until all the thumbnail

images are displayed and the camera returns to the
original position (where the camera was when "360°
map-shot" or "Preset map-shot" was carried out).

• When "360 map-shot" is carried out while the cam-

era is moving (panning/tilting), images captured
while panning/tilting may be displayed as the thumb-
nail display. In this case, stop the current operation
and carry out "360 map-shot" again.

• When "Preset map-shot" is carried out with an

unregistered preset position (among preset position
1-8), the thumbnail image of the preset position
before the unregistered preset position will be dis-
played.
In this case, the camera will not move when the
thumbnail image is clicked. (For example, when pre-
set position 3 is unregistered, the thumbnail image
of preset position 2 will be displayed as the thumb-
nail image of preset position 3. The camera will not
move when the thumbnail image of preset position 3
is clicked.)

• The camera will not always returns to the exactly

same position where it was before "360° map-shot"
or "Preset map-shot" was carried out. (It may some-
times be slightly different.)

• The window on which the thumbnail images are dis-

played will close when Clicking the following buttons
that can switch the camera channel or reload
images.
[Live] button, multi-screen buttons, image type but-
tons ([MPEG-4]/[JPEG]), image capture size buttons
([VGA]/QVGA), full screen button, [Setup] button 
(

pages 5 - 7)

To display the thumbnail images again, carry out
"360° map-shot" or "Preset map-shot" again.

Patrol 1:

Performs the registered patrol 1 operation. 

Patrol 2:

Performs the registered patrol 2 operation. 

Patrol 3:

Performs the registered patrol 3 operation. 

Patrol 4:

Performs the registered patrol 4 operation. 

!2

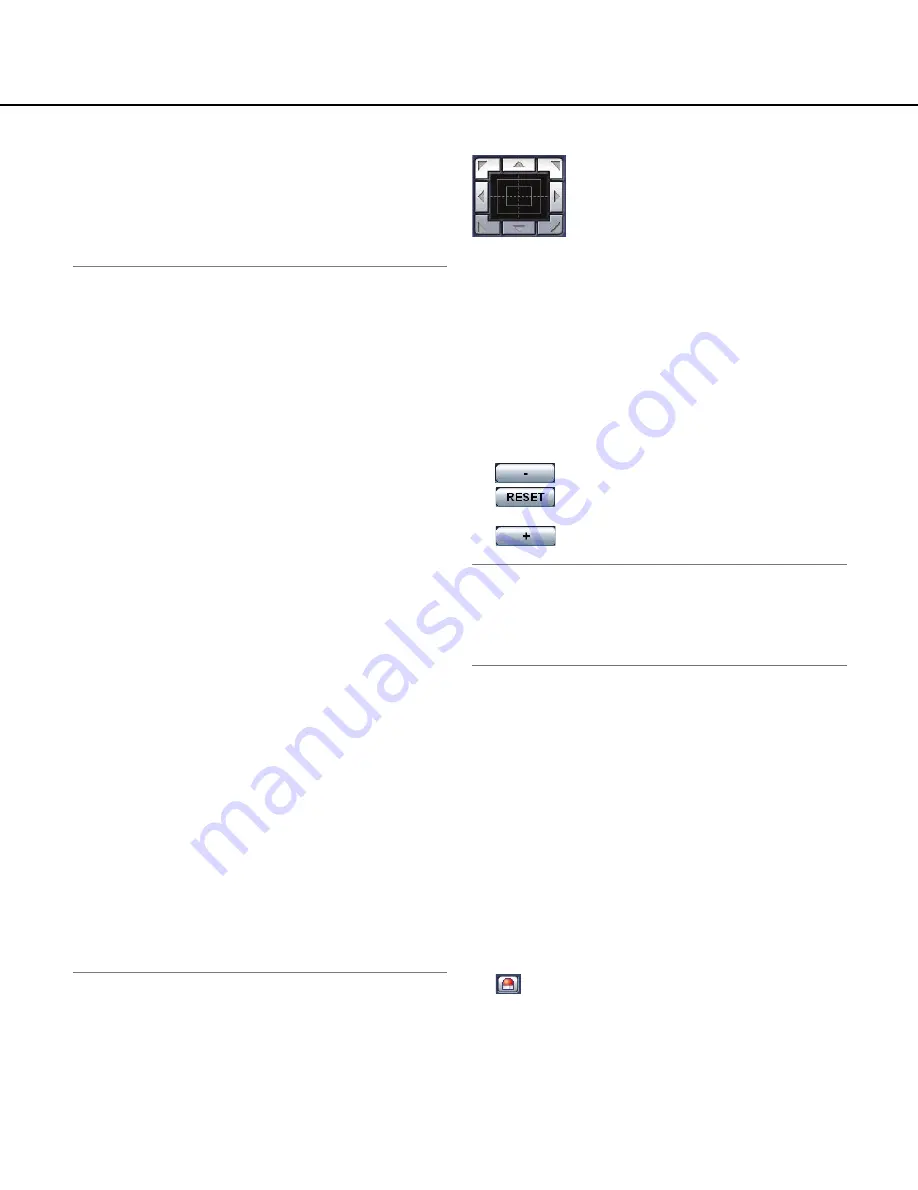
Control pad/buttons (*2)

:

Left-click on the control pad to adjust
the horizontal/vertical position of the
camera (panning/tilting).
Panning/tilting speed will be faster if a
clicked point gets farther from the cen-
tre point of the control pad.

It is also possible to pan/tilt the camera by dragging the
mouse.
Zoom and focus can be adjusted by right-clicking. When
an upper/lower area of the control pad is right-clicked,
the displayed image will be zoomed in/out on. When a
left/right area is right-clicked, the focus will be adjusted
to the NEAR/FAR side.
Zoom can also be adjusted using the mouse wheel.

!3

BRIGHTNESS buttons (*2)

:

The displayed image will be darker.

:

The adjusted brightness will return to the
default brightness.

:

Image will be brighter. 

Note:

When the BRIGHTNESS buttons are clicked while
the camera is at the preset position, the adjusted
brightness will automatically be registered for the
current preset position.

!4

PRESET (*2)

Select a preset position from the pull-down menu
and click the [GO] button. The camera will move to
the selected preset position (

Setup Instructions).

"H" next to the preset position number indicates the
home position. When "Home position" is selected,
the camera will move to the home position.
When the preset ID is registered for a preset posi-
tion, the registered preset ID will be displayed next
to the preset position number.

!5

Camera title

The camera title entered for "Camera title" on the
[Basic] tab will be displayed. (

Setup Instructions)

!6

Alarm occurrence indication button (*2)

This button will be displayed and will blink when an
alarm has occurred. When this button is clicked, the
alarm output terminal will be reset and this button
will disappear. (

Setup Instructions)

Содержание WV-NS950/G

Страница 1: ...d these instructions carefully and save this manual for future use The model number is abbreviated in some descriptions in this manual Network Camera Operating Instructions Model No WV NS950 G WV NS954E WV NW960 G WV NW964E WV NS950 G WV NS954E WV NW960 G WV NW964E ...

Страница 2: ... Transmit images onto an FTP server 12 Transmit an alarm image at an alarm occurrence Alarm image transmission 12 Transmit images at a designated interval or period FTP periodic transmission 12 Save images on the SD memory card when images fail to transmit using the FTP periodic transmission function 13 Display the log list 14 Playback of images saved on the SD memory card 17 About the network sec...

Страница 3: ...orated in the United States and or other countries SD logo is a trademark mini SD is a trademark Other names of companies and product contained in these operating instructions may be trademarks or regis tered trademarks of their respective owners Viewer software Images will not be displayed when the viewer software Network camera View3 is not installed on the PC This software can be installed dire...

Страница 4: ...s will not be limited to access When ON is selected for MPEG 4 transmission Setup Instructions an MPEG 4 image will be displayed When OFF is selected a JPEG image will be displayed It is possible to display a JPEG image even when ON is selected for MPEG 4 transmission In this case the refresh interval will be limited The refresh interval for MPEG images is limited to 15 fps at the maximum even whe...

Страница 5: ...will be displayed t Image capture size buttons These buttons will be displayed only when a JPEG image is displayed The letters VGA will turn green and images in the main area will be displayed in VGA size The letters QVGA will turn green and images in the main area will be displayed in QVGA size w Live button e Multi screen buttons q Setup button r Image type buttons t Image capture size buttons y...

Страница 6: ...hen an action that is to be taken according to the settings for Self return Setup Instructions or for Camera motion on alarm Setup Instructions starts Auto track Automatically tracks an object in the shooting area Notes The auto track function works only when the size of the object is larger than 1 48 of the main area and also the contrast ratio between the object and the background is more than 5...

Страница 7: ... 360 map shot or Preset map shot again Patrol 1 Performs the registered patrol 1 operation Patrol 2 Performs the registered patrol 2 operation Patrol 3 Performs the registered patrol 3 operation Patrol 4 Performs the registered patrol 4 operation 2 Control pad buttons 2 Left click on the control pad to adjust the horizontal vertical position of the camera panning tilting Panning tilting speed will...

Страница 8: ...ansmission button is inop erable for other users Possible duration of audio transmission is up to 5 minutes per transmission When 5 minutes have passed the audio transmission function will be can celed and the audio reception function will automati cally be turned on To turn the audio transmission function on click the transmission button again When the camera is restarted the adjusted volume leve...

Страница 9: ...instructions when dis playing on a 4 split screen q To display images on a single screen click the Live button w Click a camera title Live images from the camera corresponding to the clicked camera title will be dis played on the Live page of the newly opened win dow When MPEG 4 image is being displayed it may take time to display the frame border indicating an area selected by dragging the mouse ...

Страница 10: ...lay the Live page page 5 Step 2 Click the SD button in the SD memory card box The SD recording window will open Step 3 Click the START button to start recording images on the SD memory card The SD recording status indicator will light red while images are being recorded on the SD memory card The save interval frame rate can be configured on the SD memory card tab of the Basic setup page Setup Inst...

Страница 11: ...d in the Alarm output terminal section of the Alarm tab of the Alarm setup page Setup Instructions Transmit an image onto a server automatically An alarm image can be transmitted at an alarm occurrence to the server designated in advance The settings required to transmit an alarm image to a server can be configured in the Alarm image setup section of the Alarm tab of the Alarm setup page Setup Ins...

Страница 12: ...Instructions Note Depending on the network traffic the number of the transmitted images may not reach the set number of images to be transmitted Transmit images at a designated interval or period FTP periodic transmission Images can be transmitted at a designated interval or period To transmit images at a designated interval or period it is necessary to configure the settings in advance The settin...

Страница 13: ...Panasonic s network disk recorder select OFF for FTP peri odic transmission Setup Instructions and FTP error for Save trigger Setup Instructions We make no guarantee for any damages of files on the SD memory card incurred by malfunction or error occurrence in files saved in the SD memory card regardless of what the cause may be Save images on the SD memory card By configuring the following setting...

Страница 14: ... when ON is selected for Save logs on the LOG tab of the Basic setup page Setup Instructions respectively Step 1 Display the Live page page 4 Step 2 Click the List button The log list will be displayed in a newly opened win dow log list window Important Only a single user can operate the log list window Other users cannot access the log list window Step 3 Click the desired log type listed below LO...

Страница 15: ... date when each log has been filed will be dis played Notes When OFF is selected for Time display Setup Instructions time and date of alarm occurrence will be displayed in 24 hour format Alarm log Alarm occurrence time and date will be filed as a log Manual log Time and date when recording of images onto the SD memory card started will be filed as a log When recording are performed sequentially lo...

Страница 16: ...16 Download button Click this button to download all logs of the selected log list as a file onto the PC CLOSE button Click this button to close the log list window ...

Страница 17: ...e SD memory card with selected value for the Interval setting on the FTP tab Setup Instructions is 1 min or less Before removing the SD memory card make sure that Not use is selected for SD memory card Setup Instructions Playback reverse playback will be performed without being affected by the Frame rate settings of images recorded on the SD memory card About the playback page Number of the listed...

Страница 18: ...eleased will be displayed FF REW buttons Fast playback fast reverse playback will be performed Each time the button is clicked the playback speed will change When the PLAY REV PLAY button is clicked during fast playback fast reverse playback the playback speed will be x1 TOP button The first image will be displayed LAST button The last image will be displayed Download button The selected image wil...

Страница 19: ...ess restrictions by changing the HTTP port It is possible to prevent illegal access such as port scanning etc by changing the HTTP port number Setup Instructions Note When user authentication authentication error has failed to pass 8 times within 30 seconds using the same IP address PC access to the camera will be denied for a while Important Design and enhance security countermeasures to prevent ...

Страница 20: ...creen Step 1 Click the Setup button The setup screen is displayed Clicking an underlined item win display the Help pop window If is possible to configure the settings while displaying the Help pop up window Step 2 Click the Help button The Help screen is displayed Step 3 Click the desired item to display a detailed explanation for the corresponding operation ...

Страница 21: ...porter s name and address to follow EU rules Panasonic Testing Centre Panasonic Marketing Europe GmbH Winsbergring 15 22525 Hamburg F R Germany Panasonic System Networks Co Ltd 2010 N0309 1010 3TR005307CZB Printed in China ...

Отзывы: