background image

19

 7.  Use the joystick to point the camera at the location to 

be masked, and then press the CAM (SET) button. 

    This  registers  the  camera  position  and  returns  to 

the zone setting menu. 

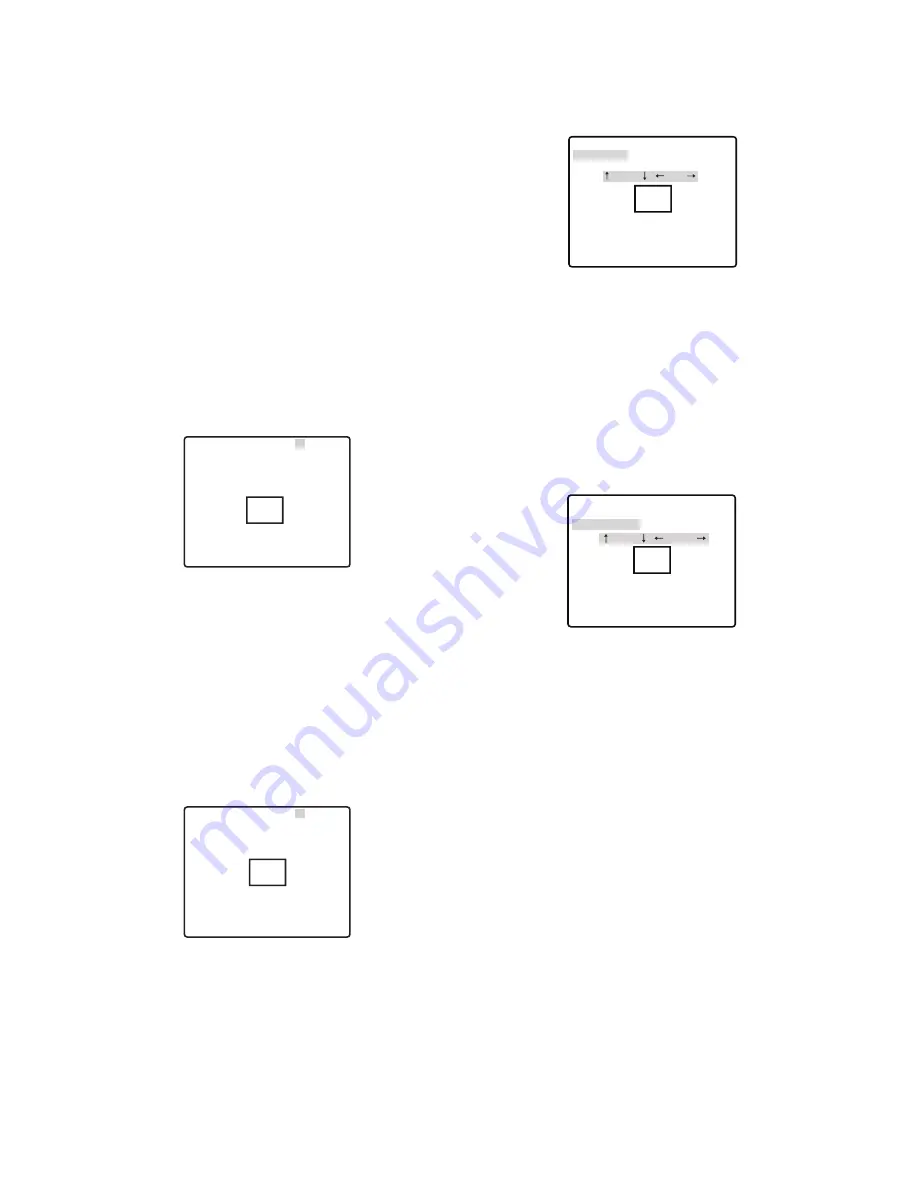
 8.  Move the cursor to 

PUSH SET to the right of ZOOM/

FOCUS, and then press the CAM (SET) button. 

    This will display the ZOOM/FOCUS setting menu. 
 9.  Move the joystick left, right, up and down to adjust 

the  position  of  the  lens  focus,  and  then  press  the 
CAM (SET) button.  

    This  completes  the  adjustment  procedure  and 

returns to the zone setting menu. 

    Privacy zone should be set under low magnification. If 

the privacy zone is set under high magnification, it 
may shift.

 10. Move the cursor to ZONE SCALE, and then tilt the 

joystick left or right to change the size of the zone 
frame. 

    Shifting  the  setting  towards  the  -  side  makes  zone 

frame  smaller,  while  shifting  towards  the  +  side 
makes  it  larger.  Note,  that  the  aspect  ratio  of  the 
zone frame is always 3:4. Also, the size of the zone 
frame  that  can  be  set  changes  according  to  the 
zoom ratio. 

 11. Move  the  cursor  to  SET,  and  then  press  the  CAM 

(SET) button. 

    This completes the privacy zone setting procedure 

and returns to the zone number selection menu. 

    Selecting DEL instead of SET deletes the zone settings 

and returns to the zone number selection menu. 

9

  Image Hold Setting (IMAGE HOLD)

Image hold causes the current picture to be frozen until 
the  camera  finishes  moving  to  a  preset  position.  This 
function comes in handy when using a network interface 
unit for monitoring of camera images over a network. 
 1.  Move the cursor to IMAGE HOLD, and then tilt the 

joystick left or right to toggle it ON and OFF. 


ON 

:

 Maintains the last image until the camera 

finishes moving to a preset position. 

 1.  Move the cursor to PRIVACY ZONE, and then tilt the 

joystick left or right to select a privacy zone setting.


ON (1)  : 

Turns on the privacy zone function. (Grey)


ON (2)  :

 Turns on the privacy zone function. (Mosaic)


OFF 

:

 Turns off the privacy zone function.

    The factory default setting is OFF.
    Use the following steps to configure privacy zones. 
 2.  When the camera is set to "ON (2)", after accessing 

the zone setting menu by following the instructions 
in step 3 to 5, move the cursor to ZONE LEVEL, and 
then  tilt  the  joystick  left  or  right  to  change  the 
concentration of the  private zone .

     To set private zone by operating steps after step 3.
 3.  When PRIVACY ZONE is set to "ON (1)" or "ON (2)", 

move the cursor to PRIVACY ZONE, and then press 
the CAM (SET) button. 

    This will display the ZONE NUMBER selection menu. 

The  picture  will  be  wide  angle  (WIDE)  if  there  is  no 
privacy zone defined for the current zone number. 

 4.  Move  the  cursor  to  ZONE  NUMBER,  and  then  tilt 

the joystick left or right to select the zone number (1 
to 8) you want to configure.  

    An asterisk (*) to the right of the a number indicates 

that it already has a privacy zone configured for it. 
Selecting such a zone number zooms the picture to 
the zoom setting that was in effect when its privacy 
zone settings were configured. 

 5.  Press the CAM (SET) button. 
    This  will  display  the  zone  setting  menu.  The 

appearance of the menu depends on zone settings.

    The  currently  configured  zone  frame  will  appear  in 

the centre of the picture. 

    Performing  the  remaining  steps  of  this  procedure 

will  delete  the  current  zone  frame  and  replace  it 
with the new zone frame that you configure. 

 6.  Move the cursor to 

PUSH SET to the right of PAN/

TILT, and then press the CAM (SET) button. 

    This will display the PAN/TILT setting menu. 

  **ZONE NUMBER  1 /8** 

 RET TOP

PUSH SET

PUSH SET

 •••

I

•••

128

 -     +

PAN/TILT

ZOOM/FOCUS

ZONE SCALE

 ••

I

•••

2

ZONE LEVEL

 SET DEL

 RET TOP

  **ZONE NUMBER  1 /8**


ZOOM


/  FOCUS

PUSH SET

PUSH SET

 •••

I

•••

128

 -     +

PAN/TILT

ZOOM/FOCUS

ZONE SCALE

 ••

I

••••

2

ZONE LEVEL

 SET DEL

 RET TOP

  **ZONE NUMBER  1 /8**


TILT


/  PAN

PUSH SET

PUSH SET

 ••

I

••••

2

 •••

I

•••

128

 -     +

PAN/TILT

ZOOM/FOCUS

ZONE LEVEL

ZONE SCALE

 SET DEL

 RET TOP

  **ZONE NUMBER  1 /8**

Содержание WV-CW590G

Страница 1: ...hese instructions carefully and save this manual for future use The model number is abbreviated in some descriptions in this manual Operating Instructions Color CCTV Camera Model No WV CW590 G WV CW59...

Страница 2: ...set Position Settings 6 n Language Setting 8 n Advanced Menu Settings 8 Camera settings 9 n Using the Camera Setup Menu 9 Pan tilt settings 14 n Using the Pan Tilt Setup Menu 14 Alarm settings 22 n Us...

Страница 3: ...alled on the PC download the latest Adobe Reader from the Adobe web site and install it The model number is abbreviated in some descriptions in this manual The screens used in these operating instruct...

Страница 4: ...ng is 1 7 Move the cursor to XON XOFF and then tilt the joystick left or right to select an XON XOFF setting NOT USE Disables XON XOFF data flow control USE Enables XON XOFF data flow control The fact...

Страница 5: ...t or right to toggle camera ID display ON and OFF 2 Select ON or OFF and then press the CAM SET button The factory default setting is OFF 3 Use the joystick to move the cursor the character you want t...

Страница 6: ...CAM SET button 2 Move the cursor to the number you want to select and then press the CAM SET button This registers the position number setting and displays the preset setting menu this page To select...

Страница 7: ...then upload it to the camera with the damaged data l Preset ID Setting PRESET ID The preset ID is a series of alphanumeric characters that indicate the location of the camera 1 Move the cursor to PRE...

Страница 8: ...ng Instructions show English display messages 3 Move the cursor to SET and then press the CAM SET button The item that was set flashes when the language is being changed and stops flashing when the la...

Страница 9: ...er area to become washed out SUPER D6 digitally combines an image that is set up for a clear view of bright areas with an image that is set up for a clear view of dark areas creating a final image tha...

Страница 10: ...d down and left and right to move the cursor to a cell you want to mask 2 Press the CAM SET button to mask the cell Moving the cursor to a cell that is already masked causes the blinking pattern of th...

Страница 11: ...main highlighted on the display If this happens it could mean that the color temperature is outside the supported range or that illumination is too low 2 Select ATW1 ATW2 and AWC then press the CAM SE...

Страница 12: ...UTO in step 1 move the cursor to LEVEL and then tilt the joystick left to select the threshold illuminace level for switching between the color mode and the black and white mode The illuminace shown b...

Страница 13: ...rate This is the factory default setting The factory default setting is OFF Notes The stabilizer may not be effective for the following subjects Example Objects illuminated with low lighting Single co...

Страница 14: ...position number in the range of 033 to 064 move the cursor to 33 64 in the lower left corner of the menu and then press the CAM SET button Preset numbers set subsequently are the same l Position Setti...

Страница 15: ...he sequence shown below unit sec min The factory default setting is 10S l Scene File Setting SCENE FILE Up to 10 scene files each of which contains camera settings for a specific location scene can be...

Страница 16: ...automatic return to a particular mode if a certain amount of time elapses without any operation being performed 1 Move the cursor to SELF RETURN and then tilt the joystick left or right to select a s...

Страница 17: ...ctory default setting is 1 2 MIN Notes The auto mode is exited automatically whenever manual PAN TILT or ZOOM FOCUS is performed if AUTOPAN is operating and PAN TILT does SEQ SORT PATROL or AUTOTRACK...

Страница 18: ...reaches 0S Notes Selecting LEARN to teach the camera a patrol routine causes the following parameters to be stored along with the camera movements 1 Parameters at the Beginning of the Routine PAN TIL...

Страница 19: ...acy zone setting ON 1 Turns on the privacy zone function Grey ON 2 Turns on the privacy zone function Mosaic OFF Turns off the privacy zone function The factory default setting is OFF Use the followin...

Страница 20: ...to track objects passing directly under the camera more smoothly The picture is flipped vertically and horizontally when the camera is at an angle of around 135 1 Move the cursor to DIGITAL FLIP and...

Страница 21: ...ploads or downloads the preset data This protects against the download or upload failure due to start up of the cleaning process 5 Move the cursor to POSI and then press the CAM SET button This will d...

Страница 22: ...detector to monitor for movement To mask screen areas use the same procedure as step 5 under SUPER D6 Super Dynamic 6 on page 9 After configuring mask settings press the MON ESC button to return to t...

Страница 23: ...y accidents that occur or any losses incurred while this product is being used When in the preset position the preset position settings are in effect 2 Preset Alarm Setting PRESET ALM Turning on the p...

Страница 24: ...the picture quality settings according to alarm input for PATROL 1 S to 4 S the settings are applied to the camera settings and are kept even after the camera is turned on again PATROL1 S 4 S display...

Страница 25: ...The factory default setting is ALARM The names and types of displays for the alarm display are shown in the table below Notes Use a shortcut page 29 to switch between displaying or not displaying the...

Страница 26: ...ress the F3 button The refresh function corrects the camera position when it starts to deviate from the preset positions 5 Returning Camera Settings to Their Defaults CAMERA RESET 1 To reset the camer...

Страница 27: ...he factory default password is 123 4 Press the CAM SET button This returns to the setup menu and toggles PASSWORD LOCK on or off The password input screen will reappear if you press the CAM SET button...

Страница 28: ...ain for verification Note that you cannot register the new password by pressing the MON ESC button 6 Input the new 3 digit password again by moving the cursor to each of the applicable numbers along t...

Страница 29: ...FLIP OFF 8 0 CAM FUNCTION PROPO P T ON 8 1 CAM FUNCTION PROPO P T OFF 8 4 CAM FUNCTION SUPER D6 ON 8 5 CAM FUNCTION SUPER D6 OFF 8 6 CAM FUNCTION AF MODE AUTO 8 8 CAM FUNCTION Performs auto focus 8 9...

Страница 30: ...AUTO switching time 10 seconds 1 9 2 CAM FUNCTION BW AUTO switching time 30 seconds 1 9 3 CAM FUNCTION BW AUTO switching time 60 seconds 1 9 4 CAM FUNCTION PATROL2 PLAY 1 9 5 CAM FUNCTION PATROL3 PLAY...

Страница 31: ...orter s name and address to follow EU rules Panasonic Testing Centre Panasonic Marketing Europe GmbH Winsbergring 15 22525 Hamburg F R Germany Panasonic System Networks Co Ltd 2011 sC1011 1101 3TR0068...

Отзывы: