background image

Replacing Consumable Roller Modules

38

6

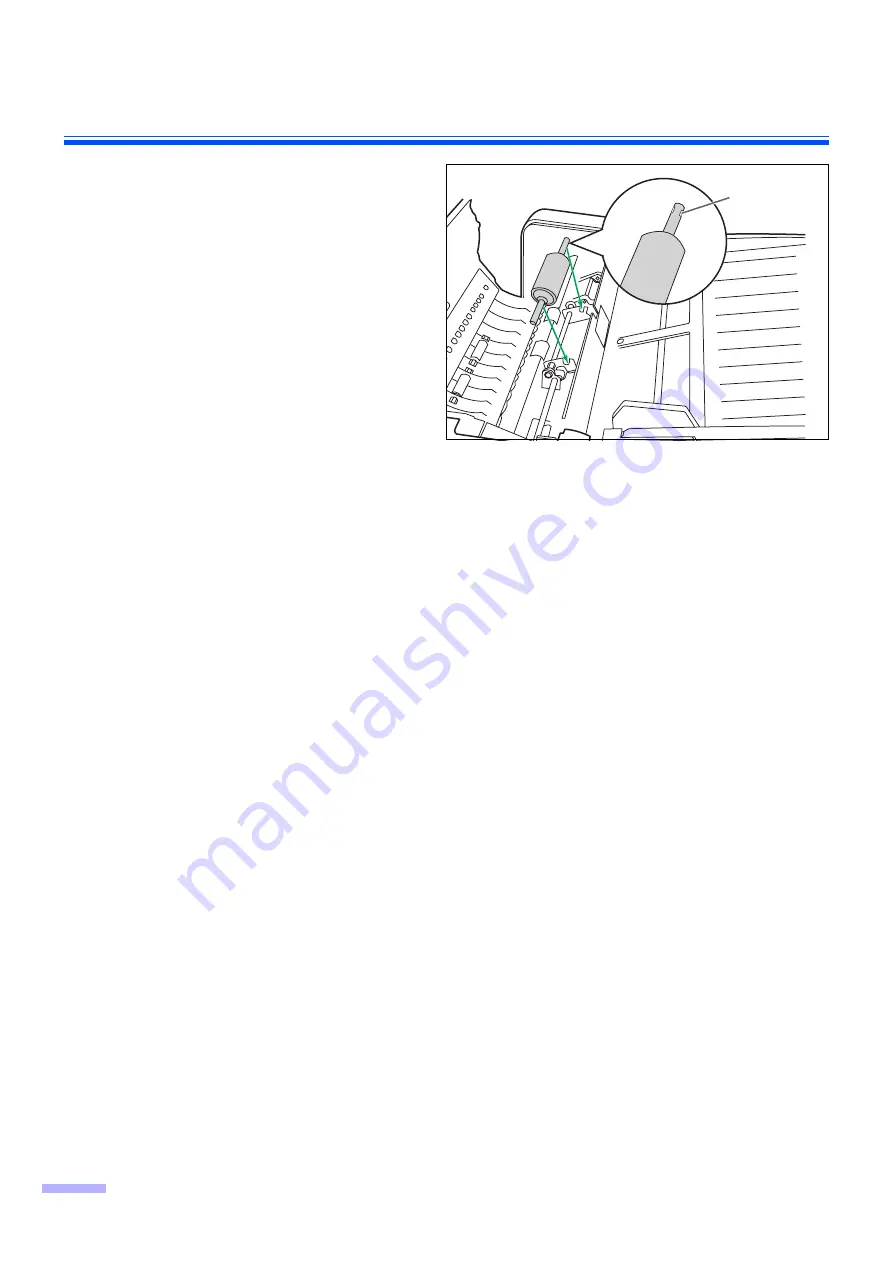
Install the new retard roller by matching
the groove of its shaft with the groove
of the metal holder.

7

Close the retard cover.

8

Close the ADF door.

When you close the ADF door, close it
securely until it is locked.

9

Clear the roller replacing counter with
User Utility.

Click [Clear Counter] button for [After
Replace Roller] with User Utility.

Groove

Содержание Workio KV-S7065C

Страница 1: ...on manual enclosed with this unit Please carefully read these instructions the enclosed installation manual and maintenance manual Keep all documentation in a safe place for future reference Keep the CD ROM in the protective case Do not expose the CD ROM to direct sunlight or extreme heat and do not scratch or smudge the surface of the CD ROM ...

Страница 2: ...ft Corporation in the United States and or other countries Windows 98 is Microsoft Windows 98 operating system Windows Me is Microsoft Windows Me operating system Windows NT is Microsoft Windows NT operating system Windows 2000 is Microsoft Windows 2000 operating system Windows XP is Microsoft Windows XP operating system ISIS is a registered trademark of Pixel Translations a division of Captiva So...

Страница 3: ...eder 24 Removing paper jams from the exit path 25 Cleaning the Unit 26 Outside of the scanner 26 Inside the scanner 26 Cleaning the paper feed roller separation roller and retard roller 27 Cleaning the drive rollers and free rollers 29 Cleaning the drive rollers free rollers and exit roller 30 Cleaning the reference plates and ADF glasses 31 Cleaning the paper and waiting sensors double feed detec...

Страница 4: ...orrect the interference at his own expense FCC Warning To assure continued FCC compliance the user must use only shielded interface cable and the provided power supply cord Also any unauthorized changes or modifications to this equipment would void the user s authority to operate this device English WARNING TO PREVENT FIRE OR SHOCK HAZARD DO NOT EXPOSE THIS PRODUCT TO RAIN OR ANY TYPE OF MOISTURE ...

Страница 5: ...severe electrical shock if the cut off plug is inserted into any 13 amp socket If a new plug is to be fitted please observe the wiring code as shown below If in any doubt please consult a qualified electrician WARNING This appliance must be earthed IMPORTANT The wires in this mains lead are coloured in accordance with the following code Green and Yellow Earth Blue Neutral Brown Live As the colours...

Страница 6: ...o sensitive skin Please use protective gloves Do not use the roller cleaning paper near a heater or open flame Do not store the roller cleaning paper in direct sunlight or in a place with temperature over 40 oC 104 oF Only use the roller cleaning paper to clean the rollers and scanning area If you need more information about the roller cleaning paper please refer to the Material Safety Data Sheet ...

Страница 7: ...ds near the unit Accidental spillage of liquid into the unit may cause severe dam age If this occurs turn the unit off unplug the power cord and call for service Do not place books paper or other items on the unit Do not place the unit in an area where there is a lot of smoke dust chemical fumes or vibration Do not leave the power cord plugged into the AC outlet if the unit will not be used for an...

Страница 8: ... operate or place the unit in a vertical position Do not place the unit near a heating appliance or an air conditioning vent Do not place the unit in a room with extremely high or low humidity Do not place the unit near other appliances which gen erate large electrical noise Do not place the unit on a carpet Static electricity can cause the unit to malfunction Do not drink or inhale the included r...

Страница 9: ...surface of the disc Do not leave the disc out of its protective case Do not leave the disc in direct sunlight or near heat sources Do not place heavy objects on the disc case or drop the case To clean the disc hold the disc by its edges and wipe it from the center to the edges with a dry soft cloth ...

Страница 10: ...topper Exit stopper Document cover Power switch STOP START button Exit tray When the power is turned on the green indicator lights When an error occurs the indicator will change to red and light steadily or flash Used to stop or start scanning a document Exit door AC inlet Imprinter door Power cord Top cover SCSI connector FAN exhaust vent USB connector ...

Страница 11: ...Component Identification 11 Flatbed sheet Flatbed glass Exit door release ADF glass B Reference plate F Reference plate B ADF glass F ...

Страница 12: ...d on About LED LED indicates the status of the scanner as follows 1 The rollers need to be cleaned or replaced Refer to Maintenance Manual or Operating Instructions CD ROM for the way of cleaning or replacing the rollers 1 2 Check the status of the scanner using the User Utility The User Utility is included in the CD ROM LED light Status Green Ready to scan or scanning Green flashing Sleep mode Or...

Страница 13: ...anner to a SCSI chain using a SCSI cable perform the SCSI ID setting correctly The scanner is provided with a DIP switch for the SCSI ID No setting SCSI ID Setting ID No Switch Remarks 2 1 0 0 OFF OFF OFF 1 OFF OFF ON 2 OFF ON OFF 3 OFF ON ON 4 ON OFF OFF 5 ON OFF ON 6 ON ON OFF Default setting 7 ON ON ON ...

Страница 14: ...mooth or shiny paper or paper that is highly textured Paper with carbon Carbonless paper If a paper jam or double feeding occurs clean the rollers When a jam occurs at the document feeder reduce the number of sheets loaded on the hopper to about 20 Types of documents to avoid OHP sheets other plastic films cloths or metallic sheets Paper with irregularities such as tabs staples paste etc Documents...

Страница 15: ...her as in a file folder will need to be separated 1 Fan the stack of documents to separate all the edges 2 Hold both ends and bend the documents as shown in the illustration 3 To flatten the documents hold firmly and pull them apart as shown in the illustration Repeat these steps as necessary 2 Carefully align the documents 3 Adjust the document guides slightly larger than the actual size of the d...

Страница 16: ...ctor to AUTO 5 When using long paper pull out the hopper extension tray from the hopper Then raise and adjust the exit stopper to the position a little longer than the actual length of the document Manual feed selector Hopperextension tray Hopper Exit stopper ...

Страница 17: ...ceed the limit mark on the document guide This may cause a paper jam or skew 7 Adjust the document guide to the size of the document to be scanned Adjust the exit stopper to the size of the document to be output When scanning the document with the length between 420 mm A3 size or 432 mm 17 in and 635 mm 25 in close the exit stopper Fill indicator Limit mark Portrait Landscape Document guide Exit s...

Страница 18: ...ts may cause a paper jam or damage the unit so please scan using the flatbed 1 Set the manual feed selector to MANUAL 2 Match the document guide with the size of the document 3 Insert the document into the paper slot one page at a time 4 Adjust the document guide with the size of the document when the document guide does not suit the size of the document Adjust the exit stopper to the size of the ...

Страница 19: ...and magnetic strips When scanning with the flatbed 1 Raise the hopper tray 2 Open the document cover 3 Place the scanning side of the document face down on top of the flatbed glass towards the upper left corner If the document is bent or folded straighten it 4 Match the shorter side of the document with the left edge of the flatbed glass 5 Match the longer side of the document with the standard ma...

Страница 20: ... the document cover before use After scanning open the document cover and remove the document Scanning thick documents When scanning thick documents such as a book please note the following items Please note that areas of the document which are not touching the flatbed glass will not be scanned properly If the document moves during scanning please note that it will not be scanned properly When sca...

Страница 21: ...red depends on the control sheet Print out control sheets from the provided CD ROM Cautions Use the same size control sheet as the scanning document When printing the control sheet if the pattern falls in the area from the top side of the document to 25 mm adjust the printer Also copy the control sheet so that the pattern lies in the center of the copy Be careful not to get the control sheet dirty...

Страница 22: ...ent must be performed Please refer to page 39 for more information regarding the shading adjustment ADF reference plate setting 1 Turn off the scanner 2 Pull the exit door release to open the exit door 3 Using your finger turn the reference plate B over Confirm that the reference plate has changed and is locked in its proper posi tion 4 Using your finger turn the reference plate F over Confirm tha...

Страница 23: ...e Flatbed sheet setting 1 Turn off the scanner 2 Fold the hopper tray in the direction of the arrow 3 Open the document cover 4 Turn the flatbed sheet over The flatbed sheet is attached to the docu ment cover with magnets Set the flatbed sheet to the left Hopper tray Document cover Flatbed sheet ...

Страница 24: ...he ADF door 2 Pull the jammed document towards the document feeder When the jammed paper cannot be removed remove it from the exit path Refer to page 25 When only the bottom end of jammed paper is visible open the exit door while leaving the ADF door open to remove the jammed paper Pulling the jammed paper with the ADF door closed may damage the document 3 Close the ADF door When you close the ADF...

Страница 25: ...ay 2 Pull the exit door release open the exit door and pull the jammed document When the jammed paper cannot be removed remove it from the document feeder Refer to page 24 3 Close the exit door When you close the exit door close it securely until it is locked Hopper tray Exit stopper Exit door Exit door release ...

Страница 26: ...s and document cover detector Refer to page 34 If the documents you scan are dirty then the scanner components will also become dirty To maintain proper scanning clean the scanner components frequently When scanning with the flatbed and black dots or white patches occurs open the document cover and clean the flatbed glass and flatbed sheet using the accessory roller cleaning paper Roller cleaning ...

Страница 27: ... and separation roller Note When wiping off the dirt on the roller surfaces hold the rollers to prevent them from rotating and wipe the roller all the way around them proceeding from one end to the other in the direction of the arrows shown in the figure 4 Open the retard cover in the direction of the arrow shown in the figure by using the indent on the back side ADF door ADF door release Paper fe...

Страница 28: ...m proceeding from one end to the other in the direction of the arrows shown in the figure 6 Close the retard cover in the direction of the arrow shown in the figure 7 Close the ADF door When you close the ADF door close it securely until the door is locked 8 Clear the roller cleaning counter with User Utility After cleaning the above rollers click Clear Counter button for After Clean Roller with U...

Страница 29: ...e way around them proceeding from one end to the other in the direction of the arrows shown in the figure 4 Use the roller cleaning paper KV SS03 to remove the dirt from the surfaces of the 4 free rollers When wiping off the dirt on the roller surfaces hold the rollers to prevent them from rotating and wipe the roller all the way around them proceeding from one end to the other in the direction of...

Страница 30: ...t them from rotating and wipe the roller all the way around them proceeding from one end to the other in the direction of the arrows shown in the figure 4 Use the roller cleaning paper KV SS03 to remove the dirt from the surfaces of the 6 free rollers When wiping off the dirt on the roller surfaces hold the rollers to prevent them from rotating and wipe the roller all the way around them proceedin...

Страница 31: ...anner 2 Pull the exit door release to open the exit door 3 Clean the ADF glass F and reference plate B with the roller cleaning paper KV SS03 4 Clean the ADF glass B and reference plate F with the roller cleaning paper KV SS03 5 Close the exit door When you close the exit door close it securely until it is locked Reference plate B ADF glass F Reference plate F ADF glass B ...

Страница 32: ...rface of the paper sensor and waiting sensor with an accessory blower 4 And also blow off the dirt on the surface of the reflector sheet for the waiting sensor with the accessory blower 5 Blow off the dirt from the double feed detector G and double feed detector R with the accessory blower 6 Close the ADF door When you close the ADF door close it securely until it is locked Blower Sensor or detect...

Страница 33: ...e of the starting skew L skew R and ending sensors with the accessory blower 4 And blow off the dirt from the reflector sheets for the starting skew L skew R and ending sensors with the blower 5 Close the exit door When you close the exit door close it securely until it is locked Blower Sensor or detector Ending sensor Skew L sensor Skew R sensor Starting sensor Reflector sheet for skew R sensor R...

Страница 34: ...KV SS03 to remove the dirt Also clean up the surface of the flatbed sheet as required 5 Blow off the dirt from the document cover detector 6 Close the document cover and put back the hopper tray to the original position How to clean sensors detectors and reflectors Remove the brush from the accessory blower and blow off the dirt with the blower Hopper tray Document cover Flatbed sheet Flatbed glas...

Страница 35: ... the power off 2 Push the ADF door release to open the ADF door 3 Pull down the paper feed roller module in the direction of the arrow 4 Remove the paper feed roller module as shown on the figure 5 Open the optional roller exchange kit KV SS015 and take out the new paper feed roller module ADF door ADF door release ...

Страница 36: ...tall the new paper feed roller module 7 Push up the new paper feed roller module in the direction of the arrow so that it is locked by the magnets on both sides 8 Close the ADF door When you close the ADF door close it securely until it is locked ...

Страница 37: ...oor 3 Open the retard cover in the direction of the arrow shown in the figure by using the indent on the back side 4 Remove the retard roller pulling up the shaft in the direction of the arrow 5 Take out the new retard roller in the optional roller exchange kit KV SS015 ADF door ADF door release Retard roller Retard cover Indent ...

Страница 38: ...e of its shaft with the groove of the metal holder 7 Close the retard cover 8 Close the ADF door When you close the ADF door close it securely until it is locked 9 Clear the roller replacing counter with User Utility Click Clear Counter button for After Replace Roller with User Utility Groove ...

Страница 39: ... be absolutely sure to thoroughly clean the ADF glass F area ADF glass B area reference plate F and reference plate B as well as the transport path and drive rollers of the scanning unit If the shading adjustment is carried out while these parts are still dirty it will not be possible to eliminate the lines that form on the scanned images Shading adjustment procedure 1 Start the User Utility 2 Cli...

Страница 40: ...r the unit The scanner should be handled in the correct horizontal position Materials Required Original scanner carton packing materials Shipping tape and scissors 1 Turn the power switch off and disconnect your scanner from the electrical outlet and the interface cable 2 Remove the hopper tray and attach the protective sheets with tapes 3 Pack the scanner Power cord USB2 0 cable CD ROM Operating ...

Страница 41: ...ation Invert White level from paper Paper Size for Flatbed 297k432 mm 11 7k17 in Size for ADF Scanning size 48k70 mm 1 9k2 8 in 297 mm 11 7 in k635 mm 25 in Thickness for ADF 0 05 to 0 15 mm 2 0 to 5 9 mils Business card Thicker than 0 15 mm 5 9 mils Note 1 mil 1 1000 in Weight for ADF 40 to 127 g m2 10 6 to 34 lbs Business card Thicker than 127 g m2 34 lbs Hopper capacity 200 sheets 64 g m2 17 lb...

Страница 42: ...l on page 17 The same ID number is used for the scanner and the other device Use the different SCSI ID numbers for each devices See page 13 The scanner was turned on after the computer was turned on Turn the computer OFF Turn the scanner ON and then turn the computer ON again USB connection The USB interface of the computer is not installed correctly Check the computer whether the USB interface of...

Страница 43: ... be scanned was loaded face down upside down Load the document correctly See page 17 Vertical lines appear on the scanned document The ADF glasses and flatbed glass are dirty Clean the ADF glasses and flatbed glass See page 31 The reference plate and flatbed sheet are dirty Clean the reference plate and flatbed sheet See page 31 and page 34 The scanning density is uneven The ADF glass reference pl...

Страница 44: ...feed detector 32 Drive rollers 29 30 E Ending sensors 33 Energy Star 2 Exit door 10 22 25 Exit door release 11 22 33 Exit rollers 30 Exit stopper 10 Exit tray 10 14 External dimensions 41 F FAN exhaust vent 10 Fan exhaust vent 26 Flatbed 19 23 41 Flatbed glass 11 26 34 Flatbed sheet 11 23 34 Free rollers 29 30 H Hopper 10 16 Hopper extension tray 10 16 Hopper tray 10 14 19 I Image control 41 Impri...

Страница 45: ...ence plate 11 22 31 Repacking 40 Replacing Consumable 35 Retard cover 27 28 37 Retard roller 27 37 Roller cleaning paper 6 26 S SCSI Connection 2 SCSI connector 10 SCSI ID setting 13 Separation roller 27 Shading 39 43 Specifications 41 Starting sensor 33 STOP START button 10 System requirements 2 T Top cover 10 Troubleshooting 42 U USB connection 2 12 13 USB connector 10 USB hub 2 42 User utility ...

Страница 46: ...orporation of America Two Panasonic Way Secaucus New Jersey 07094 Panasonic Canada Inc 5770 Ambler Drive Mississauga Ontario L4W 2T3 Matsushita Electric Industrial Co Ltd http www panasonic co jp global 2004 Panasonic Communications Co Ltd All Rights Reserved E 040406 ...

Отзывы: