background image

30

Step 7

Click the [Next] button.


IP address will be given to the cameras newly con-
nected, replaced or added, and the images from the 
camera will be displayed on the operational screen.

Note:

• 

On "Easy Start", it is impossible to register the camera in 
a different network via the same router.

• 

For the security enhancement, changing of the IP 
address of the camera will become impossible when 20 
minutes have passed after the power is turned on. 
Perform the camera detection within 20 minutes, or turn 
off the power of the camera and turn it on again if more 
than 20 minutes has passed. Refer to the operating 
instructions of the camera for further information.


When 20 minutes have passed after the power of the 
camera is turned on, "ONVIF" may be detected depend-
ing on the models of Panasonic cameras. In such a 
case, turn off the power of the camera and turn if on 
again to perform the camera detection.

• 

When "On" is selected for the "DHCP" setting of the 
detected cameras, the recorder will forcibly change the 
setting to "Off" to give the IP addresses automatically.

• 

When the [Cancel] button is clicked, the top screen of 
"Easy Start" (the menu to set the date & time) without 
applying the camera detection result will be displayed.
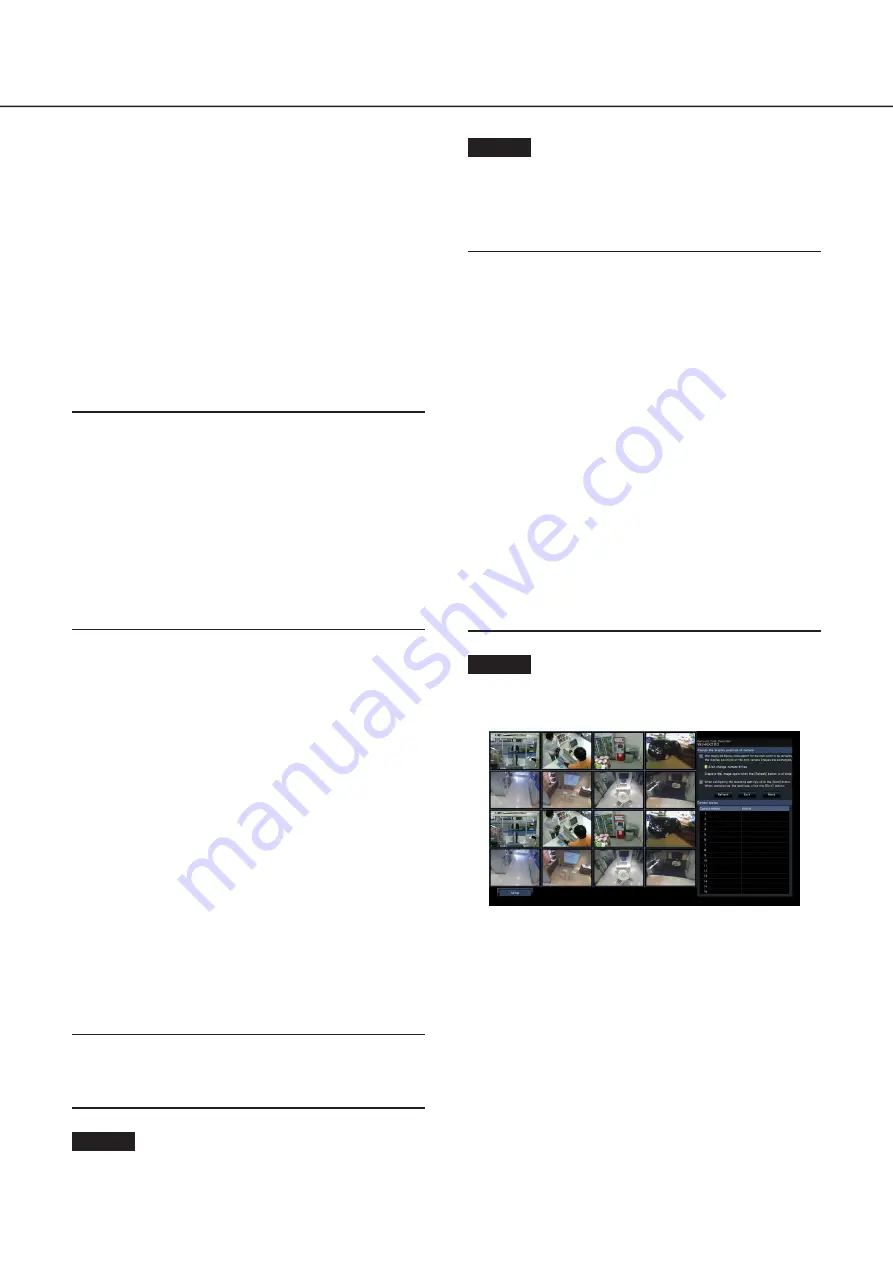
Step 8

When you wish to change the registered camera numbers, 
it is possible to change the order of the camera numbers.

Images from the cameras will be displayed on the monitor 
from the upper left corner to the right in order of the camera 
number (1, 2 ... 16). (When the camera configuration is set 
to 16 or less, images are displayed on the 16-screen. If it is 
set to 32, images are displayed on two 16-screen.)
To interchange camera numbers, drag the camera image to 
be moved with the mouse and drop on the desired position.
If the camera titles are to be interchanged as well, mark the 
"Also change camera titles" checkbox.

[Camera status]

The model numbers and statuses of each camera will be 
displayed in a list.

Displaying image: Displays the images from the camera 

using the IP address that is newly registered or that 
has already been registered.

[New] button

Usually use it with no camera registered in the recorder.
Detects all the connected cameras.
The models and results of the detected cameras will be displayed.
Make sure that the model numbers of all the connected 
cameras are being displayed.

[Addition] button

Usually use it when there are added or replaced cameras 
during operation.
Detects only the added or replaced cameras.
The models and results of the detected cameras will be displayed.
Make sure that the model numbers of all the added or 
replaced cameras are being displayed.

Important:

• 

When there are cameras in use, the system can overwrite 
the registered information and assign new IP addresses 
to all connected cameras (including cameras currently in 
use) by clicking the [New] button.

• 

Cameras newly added after the operation start will be 
registered in the default settings. To conform the set-
tings to those of the registered cameras, perform the 
settings for the added cameras.

• 

For the video encoder (WJ-GXE500), only the camera 
connected to CH1 will be detected. The channels CH2 
to CH4 are needs to be registered from the setup menu.

[Camera]

After the license is registered (

☞ 

Page 27), 9, 16, 24 or 32 

cameras can be connected.

[Model]

When Panasonic cameras are used, the model numbers will 
be displayed.

[Results]

New: Displayed when the camera is newly connected to 

the recorder.

Replaced: Displayed when the camera has been 

replaced by another one.

Added: Displayed when the camera connection is added 

to the recorder.

Registered: Displayed when the camera has already 

been registered.

Lost: Displayed when the registered camera is not detected.
Blank: No camera is detected.
*: Administrator not registered

Note:

• 

If "Lost" is displayed or the column is left blank, check if 
the power of the camera is turned on, and make sure 
that cables are properly connected.

Step 6

Enter a user name and a password to register for a camera 
with "*" in the results.

Configure the minimum settings [Easy Start]

 (continued)

Содержание WJ-NX200K/G

Страница 1: ... save this manual for future use The model number is abbreviated in some descriptions in this manual Installation Guide Network Disk Recorder Model No WJ NX200K G Network Disk Recorder WJ NX200 The Operating Instructions PDF is on the Panasonic support website https security panasonic com download ...

Страница 2: ... the hard disk drives 13 When replacing the hard disk drives 14 3 Rack mounting 15 Installation procedure 15 4 Connections 16 Connection of cameras and a mouse 16 Connection of monitors 17 Connection of a PC 18 How to use the terminals of the ALARM CONTROL 20 Connection example for emergency recording 20 Time and polarities of the ALARM CONTROL connector 24 5 Turn on the devices 25 Turn on the pow...

Страница 3: ...rding events REC event Advanced setup Configure the settings relating to monitors Monitor Configure the settings relating to network Network Configure the settings relating to the user management User management Configure the settings relating to maintenance Maintenance Manage the hard disk drives HDD management Configure the settings relating to the extra functions Extra function Lists of the set...

Страница 4: ...ed in these operating instructions indicate the WJ NX200K G Refer to readme txt on the provided CD ROM for further information about the optional dedicated software compatible network cameras hereinafter cameras and their versions Refer to the Panasonic support website https security panasonic com support for latest information about the compatible cameras and functions to be added or changed by f...

Страница 5: ...ries or property damage resulting from failures arising out of improper installation or operation inconsistent with this documentation Do not place this product in the following places Locations exposed to direct sunlight Locations subject to having strong vibration or impact Locations near magnetic field sources such as a televi sion or speakers Locations near the devices that emit large sound an...

Страница 6: ...lace far from the source Grounding Confirm that the wire is connected from the SIGNAL GND terminal to earth ground A grounding connection must be made before connecting the power plug or this product to the main power supply When disconnecting the grounding wire make sure that the power plug of this product is disconnected from the main power supply For BNC cable connection Use only the recommende...

Страница 7: ... changed using the mouse wheel When no operation is made for 10 seconds or more the mouse cursor will be hidden The mouse cursor will be dis played again when the mouse is moved This section explains operation of a mouse and the soft keyboard and setting screen only The recorder can be operated using the mouse provided connected to the mouse connection port either on the front or the rear side of ...

Страница 8: ...field A a button This button changes the characters to be entered between capital letters and small letters Next button Changes the keys to be displayed for character entry The displayed keys are changed as follows Keys for the language selected by the language selec tion pull down menu Combination characters Special characters Enter button Determines the entered characters and closes the on scree...

Страница 9: ...setup pages Easy Start button It is possible to configure the minimum settings required to operate the recorder such as date time and cam era registration Basic setup Setup page buttons Each Basic setup page will be displayed Advanced setup button The buttons to open the corresponding setup pages of the Advanced setup menu will be displayed When clicking this button again the buttons will be hidde...

Страница 10: ...ge 15 Go to step 4 when not installing it in the rack Connect the camera and monitor to this product Turn on the power to launch in the following order Turn on the power of the camera and the monitor Turn on the power of the recorder Register the Registration Key of the recorder If necessary register the Registration Key for each Additional kit Important Be sure to register the Registration Key of...

Страница 11: ...Register the date time and cameras on Easy Start When it is not necessary to change other default settings it is possible to start operations If necessary perform the detailed settings for each function When the camera image is displayed on the main monitor or the web browser on the PC and can be recorded or played the recorder is ready for operation Operations flow continued ...

Страница 12: ...e registration key number of the additional secure license according to the Secure Communication Kit option To use the business intelligence function get the registration key of the additional business intelligence license according to the additional business intelligence kit option Each additional kit is the Activation Key Card with the recorder ID number activation ID number for the applicable a...

Страница 13: ...isk drive hold the both sides of the hard disk drive Do not touch the circuit board or the connectors to prevent the hard disk drive from damaging by static electricity Contact your dealer for hard disk drives that works on the recorder Please be forewarned that operation with any hard disk drive other than the specified models is not guaranteed under any circumstances When using multiple hard dis...

Страница 14: ... the removal process of the hard disk drive Operating Instructions PDF Step 2 Turn off the power of the recorder Page 26 Step 3 Pull out the HDD bracket from the rear panel of the recorder by referring to Step 2 of Install the hard disk drives Page 13 Step 4 Install the hard disk drive into the HDD bracket by referring to Step 3 of Install the hard disk drives Page 13 Step 5 Insert the HDD bracket...

Страница 15: ...ws locally procured to install the recorder in a rack The illustration on this page is schematic Details of the shape are omitted Installation procedure Step 1 Remove the four rubber feet from the bottom of the recorder using a flathead screwdriver Use a screwdriver to remove the screws holding the rubber feet Remove rubber feet Step 2 Place the provided rack mount brackets WV Q202 option on both ...

Страница 16: ... Connect the provided mouse to the mouse connection port on the front or rear side of the recorder Recorder Ethernet cable locally procured category 7 straight for WJ NX200K G Mouse provided PoE hub Network camera x 32 max When 3 licenses are used for the additional camera kit Note Make sure to use the wired network to connect with the recorder even for the cameras equipped with the wireless LAN f...

Страница 17: ...tor BNC Main monitor HDMI HDMI cable option When outputting audio Connect a powered speaker Sub monitor HDMI Note Use High Speed HDMI Cable When the main monitor is used in 4K 25P 30P use a 10 2 Gbps compatible HDMI cable To maintain the stable performance without deteriorating the image quality use an HDMI cable whose length is 5 m or less Audio will be output from the monitor when the monitor is...

Страница 18: ...b Recorder Network PoE hub Network camera 32 max When 3 licenses are used for the additional camera kit PC IP address 192 168 0 250 Subnet mask 255 255 255 0 Default gateway 192 168 0 1 Ethernet cable locally procured category 7 straight for WJ NX200K G IP address 192 168 0 1 Subnet mask 255 255 255 0 IP address 192 168 0 x except 0 1 250 and 255 Subnet mask 255 255 255 0 Default gateway 192 168 0...

Страница 19: ...200K G Ethernet cable locally procured category 7 straight for WJ NX200K G Camera PC port IP address 192 168 0 250 Subnet mask 255 255 255 0 PC port IP address 192 168 1 250 Subnet mask 255 255 255 0 Default gateway 192 168 1 1 PC IP address 192 168 1 x except 0 1 250 and 255 Subnet mask 255 255 255 0 Default gateway 192 168 1 1 Note Cameras shall be connected to the camera PC port If the camera i...

Страница 20: ...other device the time of the recorder will be adjusted to the hour based on the input time In addition the signal is output at the setting time of the recorder and the time of other equipment is adjusted to the time of the recorder Input Non voltage make contact input 3 3 V pull up Approx 23 kΩ Output Open collector output 24 V DC max 200 mA max B4 Network error output A signal will be output upon...

Страница 21: ... Language on the setup menu is set to Slave When a signal output from the other device is supplied to the time adjustment I O B3 terminal and the time difference between the recorder and the other device is 29 minutes or less the clock of the recorder will be set to the time set for the other device When a signal output is supplied to the recorder 29 minutes before after the hour the clock of the ...

Страница 22: ...inal on the terminal plug Tight the screw when the cable is fully inserted into the terminal hole Mount the terminal plug with the cable connected on the alarm input terminal socket on the back Terminal plug 11 pin ALARM CONTROL connector A socket A Pin array Pin No Signal Operation Remarks A1 Alarm input 1 Event action will be performed according to the settings Non voltage make contact input 3 3...

Страница 23: ...action will be performed in accordance with the settings When an alarm device such as a buzzer a lamp etc is installed outside connect them to the Alarm output terminal pin no A10 Alarming device Relays etc Attached when necessary Sensor Signal ground Door security switch Alarm input 2 Signal ground Alarm input 1 A2 A10 B10 A1 A11 4 Connections continued ...

Страница 24: ... the period selected for Error out put duration has passed or the camera reset L active Recorder error output At an error occurrence until the period selected for Error out put duration has passed L active Alarm output The set time on the setup menu L active Time adjustment I O Input 100 ms or more Output The set time on the setup menu Input Output L active The error output duration is configured ...

Страница 25: ...splayed on the main monitor Important Never turn off the power of the recorder during startup Insert the power cord fully into the power supply terminal so that it will not loosen or come out Fix the power cord firmly at 15 cm to 20 cm from the plug with the provided power cord clamp to prevent the cable from unplugging How to prevent power cord disconnection Fix a 15 cm 20 cm space from the power...

Страница 26: ...stration Key will be displayed after the completion of the system check and the administrator registration If the Registration Key for the recorder has not been regis tered yet register the Registration Key by following the procedures on page 27 Note If the Registration Key for the recorder is once regis tered the message asking you to register the Registration Key will not be displayed from the n...

Страница 27: ...en the license of the additional camera kit or the additional business intelligence kit is added The added cameras shall be registered on Easy Start Page 29 or on the Camera registration tab Each setting value is the default Configure each setting according to your needs Step 1 Obtain the Registration Key for the recorder by fol lowing the instructions on the provided Activation Key Card To use ea...

Страница 28: ... 3 fields under Additional camera on the Registration of license page shown in step 5 To use the business intelligence function enter the Registration Key following How to register the license in the user manual of the additional business intelligence kit To use the secure function click the Setup button of Registration of license Security under the system management screen shown in Step 4 and the...

Страница 29: ...date time camera registration recording can be config ured on the setup menu the Quick setup menu Easy Start First configure the minimum settings on Easy Start and to configure more advanced settings go to each setup page Available settings on Easy Start Step 1 Click the Easy Start button on the top screen of the setup menu Refer to Basic operations Page 7 for how to display the setup menu The set...

Страница 30: ...splayed in a list Displaying image Displays the images from the camera using the IP address that is newly registered or that has already been registered New button Usually use it with no camera registered in the recorder Detects all the connected cameras The models and results of the detected cameras will be displayed Make sure that the model numbers of all the connected cameras are being displaye...

Страница 31: ... current setting value with Advanced in Recording setup All cameras Image quality Selects the image quality of recorded images NQ Normal Standard quality FQ Fine High quality SF Super Fine Super fine quality XF Extra Fine Extra fine quality Default FQ Important For a camera whose compression method is MJPEG XF cannot be set If a camera whose compression method is MJPEG is included MJPEG camera is ...

Страница 32: ...his phenomenon is caused by dispersion of display area on the monitor This is not a malfunction When a function to automatically enlarge the images in the con nected monitor is enabled some part of the images may not be displayed depending on the photographic subject Image is blurred Is the lens of the camera soiled with dirt or dust Check whether the lens of the camera is clean Cannot open the se...

Страница 33: ...th To keep the correct recording set the time periodically or enable the auto time adjustment function on the rear panel terminal or configure the system using the NTP function so as to keep the cor rect current time HDD indicator lights blinks red The hard disk drive is faulty Contact your dealer The error indicator blinks red A system error occurred Contact your dealer Authentication error of th...

Страница 34: ...34 ...

Страница 35: ...35 ...

Страница 36: ...t be mixed with general household waste For proper treatment recovery and recycling of old products and used batteries please take them to applicable collection points in accordance with your national legislation By disposing of them correctly you will help to save valuable resources and prevent any potential negative effects on human health and the environment For more information about collectio...

Отзывы: