23
Install the HDD unit in extension unit
The illustration on this page is schematic. Details of the shape are omitted.
It is possible to install the HDD unit without stopping the operation (except when RAID5 or RAID6 mode is in operation).
When the extension unit has the "HDD unit holding bracket" attached at the factory before shipment, remove it before STEP 2.
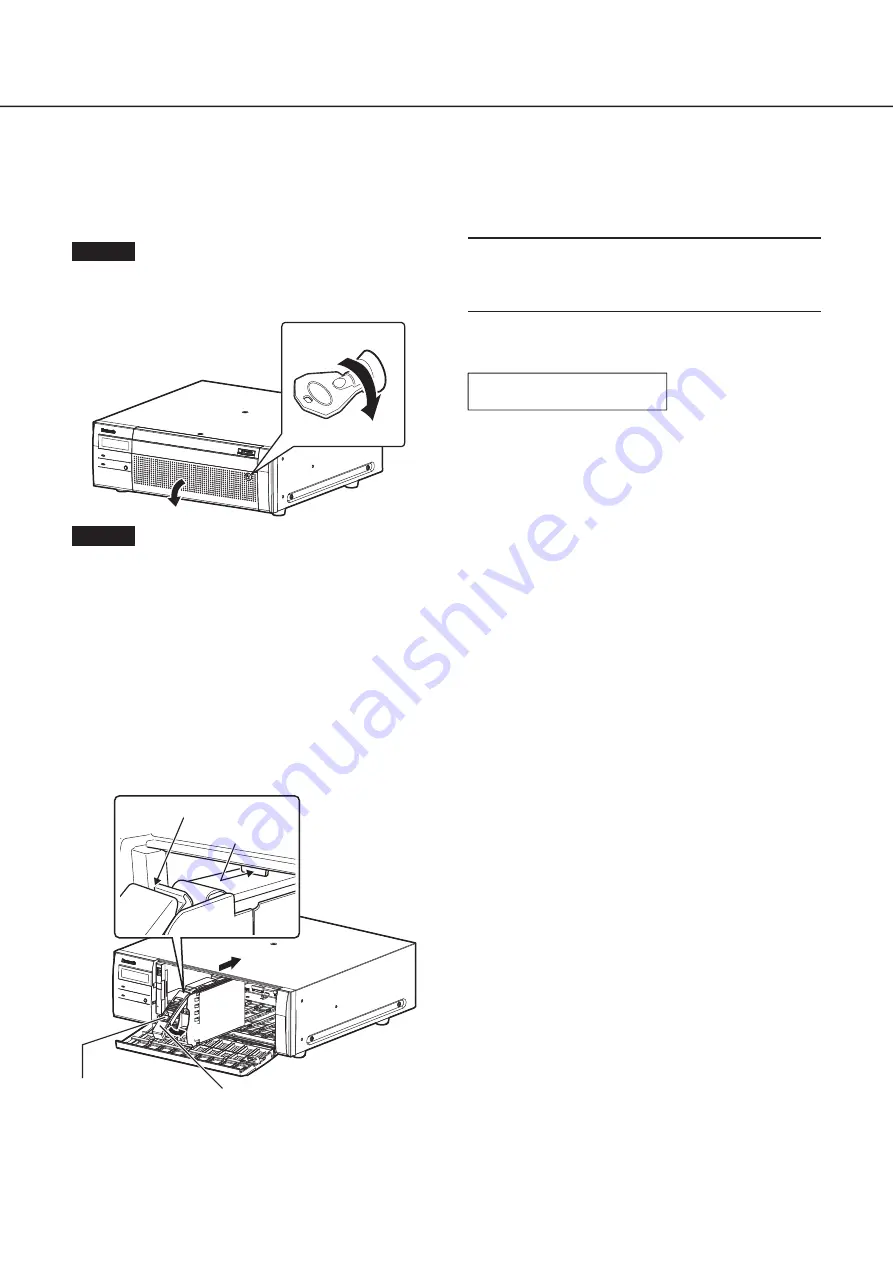
Step 1
After inserting the key (provided) into the key hole on
the front cover, push and turn it to the right to open
the front cover.
➀
➁
Step 2
Insert the HDD units into the HDD slots in order start-
ing from HDD1.
①
Lift up the lever on the HDD unit while holding down the
removal knob, and then insert the HDD unit all the way
into the HDD slot.
Insert the HDD unit carefully without knocking it against
anything (and without knocking against HDD units which
are already inserted).
②
Push the upper part of the lever securely until it hits the
protruding section at the back side of disk slot top and
then turn down the lever.
③
The removal knob fits into position with a "click" sound
when turning down the lever.
➁
➀
Removal knob
Lever
Upper part of lever
Protruding section
at back side
➂
Important:
• Insert the HDD units in order from the disk slot number 1.
• When mounting the HDD unit, be careful not to pinch
your fingers with the lever.
④
The following is displayed on the LCD of the correspond-
ing recorder.
EXTx-y
NEW
HDD
DETECT
* x is a unit number, y is a slot number
LCD display
HDD operation mode and temperature of HDD unit are dis-
played at the first line of LCD.
The status of HDD unit is displayed at the second line of LCD.
In normal status
:No indication
During 1DOWN
:
1DOWN
During 2DOWN
:
2DOWN
During 3DOWN
:
3DOWN
Waiting for RAID recovery start:
RCV START WAIT
RAID recovering
:
RECOVERING cc%
(cc: progress rate)
RAID recovering (verifying) :
VERIFYING cc%
(cc: progress rate)
4
HDD unit
(continued)
Содержание WJ-HXE400
Страница 27: ...27 ...


