background image

13

About Your Phone

*

1

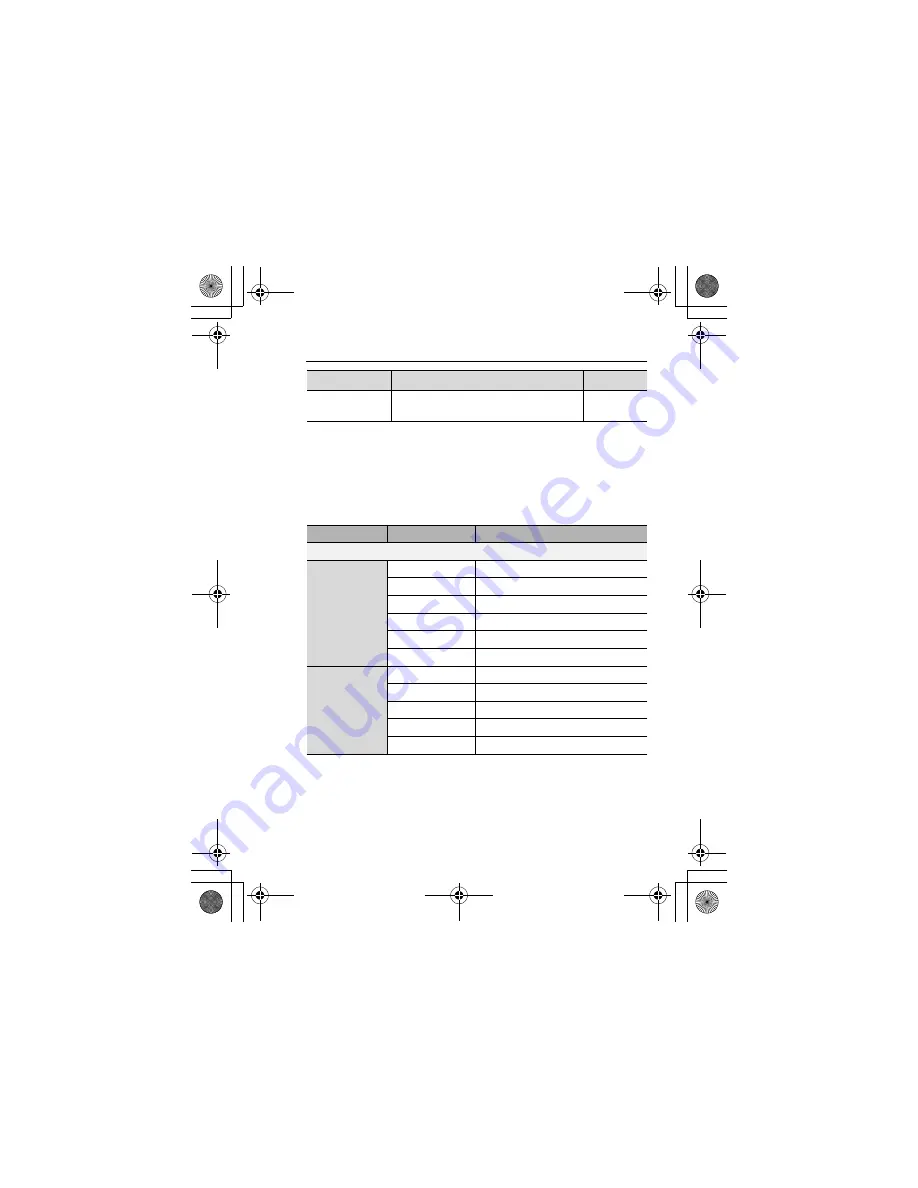
The key icons given in the table represent the actual keys on the phone.

*

2

Located on the right side of the phone.

Quick keys

You can easily access features instead of navigating through the 
menus.

Multi Function 
key*

2

Take a picture or record a video clip in 
Camera mode. Perform Alert mute.

[

U

]

Key

Function

In standby mode

Short press

[

0

]

Open Main menu/Keyguard off

[

5

]

Open Messages menu

[

6

]

Open Browser

[

1

]

9

[

2

]

9

[

3

]

9

[

4

]

Open the shortcut menu

[

q

]

Open Call log

[

O

]

9

[

P

]

Increase/decrease the volume

Long press

[

0

]

Keyguard on

[

A

]

Dial your voice mailbox

[

S

]-[

K

]

Speed dial

[

r

]

Silent mode on/off

[

U

]

Switch to Picture mode

Key name

Function

Key icon*

1

VS7̲AAA.book  Page 13  Wednesday, August 3, 2005  5:10 PM

Содержание VS7

Страница 1: ...sonic is not responsible for damage caused by using non Panasonic accessories Do not expose charging adapters to moisture water or the weather Do not use an adapter with a damaged cord When using a DC adapter in an automobile a small amount of electricity flows through the adapter even if the phone is turned off Remove the plug from the cigarette lighter whenever the phone will be left in the vehi...

Страница 2: ...tructions of the equipment for the correct connection and safety precautions If connecting the phone to an external source verify that the phone is compatible with the product to which you are connecting it Availability of service This phone like any wireless phone operates using radio signals wireless and landline networks and user programmed functions Because of this connection in all conditions...

Страница 3: ...ed to operate at multiple power levels so as to use only the power required to reach the network In general the closer you are to a wireless base station antenna the lower the power output Before a phone model is available for sale to the public it must be tested and certified to the FCC that it does not exceed the limit established by the government adopted requirement for safe exposure The tests...

Страница 4: ... using your phone while driving Give full attention to driving driving safely is your first responsibility Use handsfree operation if available Pull off the road and park before making or answering a call if driving conditions so require Electronic devices Most modern electronic equipment is shielded from RF signals However certain electronic equipment may not be shielded against the RF signals fr...

Страница 5: ...in a blasting area or in other areas posted Turn off two way radio Obey all signs and instructions Potentially explosive atmospheres Turn your phone OFF when in any area with a potentially explosive atmosphere and obey all signs and instructions Sparks in such areas could cause an explosion or fire resulting in bodily injury or even death Areas with a potentially explosive atmosphere are often but...

Страница 6: ...tion is subject to the 2 this device must on other antenna or e pursuant to Part ment generates uses nstructions may cause ...

Страница 7: ...29 e will not occur in a ception which can be nterference by one or more connected re not expressly B digital complies with ...

Страница 8: ...ay from your primary responsibility driving safely 6 Dial sensibly and assess the traffic if possible place calls when you are not moving or before pulling into traffic Try to plan calls when your car will be stationary If you need to make a call while moving dial only a few numbers check the road and your mirrors then continue 7 Do not engage in stressful or emotional conversations that may be di...

Страница 9: ...ications 26 Basic Operations 27 Making calls 27 Answering calls 29 Silent mode 31 Voicemail 31 In call operations 32 Multiple calls operations 34 Text entry 36 Contacts 41 Contacts menu structure 41 Viewing the Contacts list 42 Making a call from Contacts 43 Adding contacts 44 Editing a Contacts card 46 Call log 47 Speed dial 48 Groups 49 Advanced 49 Service numbers 52 Messages 53 Messages menu st...

Страница 10: ...alculator 124 Calendar 125 Browsing Calendar 125 Creating Calendar events 127 Managing Calendar events 129 My Media 131 My Media menu structure 131 Pictures 132 Sounds 136 Videos 139 Games 140 Text templates 141 Memory status 142 Games 143 Games menu structure 143 Games 144 Download games 146 Settings 147 Information 147 Appendix 148 Accessories 148 CD ROM 152 Changing the X Changeable CoverTM 153...

Страница 11: ...s to legal requirements regarding the use of cellular phones Power This equipment should only be charged with approved charging equipment to ensure optimum performance and avoid damage to your phone Other usage will invalidate any approval given to this apparatus and may be dangerous Ensure the voltage rating of the Travel charger is compatible with the area of use when travelling abroad A Travel ...

Страница 12: ...oth Do Not Use It is advised not to use the equipment at a refuelling point Users are reminded to observe restrictions on the use of radio equipment in fuel depots chemical plants or where blasting operations are in progress Never expose the battery to extreme temperatures in excess of 60 C Driving It is imperative that the driver exercises proper control of the vehicle at all times Do not hold a ...

Страница 13: ... of your phone and its battery Your phone has the capability of storing and communicating personal information It is recommended that you take care to ensure that any personal or financial information is stored separately from your phone You should use security features such as the SIM lock to protect information held in your phone Panasonic accepts no liability for any and all losses howsoever ar...

Страница 14: ...arty rights when using the camera You must comply with any applicable international or national law or other special restrictions governing camera use in specific applications and environments This includes not using the camera in places where the use of photographic and video equipment may be prohibited Panasonic accepts no liability for any and all losses howsoever arising from any infringement ...

Страница 15: ...ed to use in hospitals aircraft whilst driving and any other restricted uses Some of the contents described in this manual are subject to change without notice Care and maintenance Pressing any of the keys may produce a loud tone Avoid holding the phone close to the ear while pressing the keys Extreme temperatures may have a temporary effect on the operation of your phone This is normal and does n...

Страница 16: ...touched with a conductive material i e metal jewellery keys etc Always charge the battery in a well ventilated area not in direct sunlight between 5 C and 35 C It is not possible to recharge the battery if it is outside this temperature range When connecting the phone to an external source read the operating instructions of the equipment for the correct connection and safety precautions Ensure the...

Страница 17: ... only be available on a subscription basis Graphics The graphic elements in this manual are for illustrative purposes and may differ from the actual phone and or graphic elements displayed on the phone Panasonic reserves the right to change the information in this manual without prior notice Keys Keys in this manual may differ from the actual keys on your phone Refer to page 12 for the icons that ...

Страница 18: ... function is SIM card dependent For other symbols refer to page 7 d Menu navigation Before following the steps you need to enter Main menu then move through the sub menus described next to the d icon means scroll through the menu and select VS7 AAA book Page 8 Wednesday August 3 2005 5 10 PM ...

Страница 19: ... also select Fixed dial by pressing D Now you can continue onto the step 1 1 Press Navigation key up down to scroll to Enable or Disable then press Navigation key centre or Left Soft key Select 1 2 Enter the PIN2 code 4 8 digits then press Navigation key centre or Left Soft key Ok 1 1 The word is shown in the lower left hand corner of the display indicating a command that the key gives to the phon...

Страница 20: ...t Soft key Navigation key Main Display Earpiece Silent Mode key Power End key Microphone Left Soft key Call key Asterisk key One Push Auto Open button Charging Indicator Macro Mode Switch VS7 AAA book Page 10 Wednesday August 3 2005 5 10 PM ...

Страница 21: ...de up key Infrared Port Side down key Speaker Indicator Illumination Light Multi Function key Front display Personal Handsfree Connector Charging Connector Data Transmission Connector VS7 AAA book Page 11 Wednesday August 3 2005 5 10 PM ...

Страница 22: ...answer a call q Power End key Press and hold to switch the phone on off End or reject a call Return to standby mode Y Numeric keys Enter numbers and characters Press and hold S K for Speed dialling Press and hold L to enter the international prefix L to K Asterisk key Enter e In text entry mode press to change the letter case or press and hold to change the input method e Silent Mode key Enter r P...

Страница 23: ...ure or record a video clip in Camera mode Perform Alert mute U Key Function In standby mode Short press 0 Open Main menu Keyguard off 5 Open Messages menu 6 Open Browser 1 9 2 9 3 9 4 Open the shortcut menu q Open Call log O 9 P Increase decrease the volume Long press 0 Keyguard on A Dial your voice mailbox S K Speed dial r Silent mode on off U Switch to Picture mode Key name Function Key icon 1 V...

Страница 24: ...se the volume U Start stop sound recording q Switch between hold and unhold on one call or switch between one active and one held call In Menu list Short press A K Select Menu A K e Select Menu e L Select Menu L r Select Menu r Key Function VS7 AAA book Page 14 Wednesday August 3 2005 5 10 PM ...

Страница 25: ...ndby display You can change the position of the operator name See Operator name on page 96 Wallpaper Battery charge level icon Left Soft key selection area Right Soft key selection area Date Time Signal strength icon External Wallpaper Battery charge level icon Signal strength icon VS7 AAA book Page 15 Wednesday August 3 2005 5 10 PM ...

Страница 26: ...y charge level Battery is charging GPRS is available Silent profile is active Meeting profile is active Outdoor profile is active Car profile is active SMS message storage area is full MMS message storage area is full JavaTM application is suspended Unread SMS message Unread MMS message Unread WAP Push message Call diverts is on Infrared is active Bluetooth is active VS7 AAA book Page 16 Wednesday...

Страница 27: ...nly or specified number of times To check the status of your rights e g expiration date or number of times it can be used see Details setting on page 133 137 and 144 For further information contact your service provider Bluetooth headset or handsfree is connected USB connection is available New voicemail received All tones are off Vibration alert is on Alarm is set Non secure CSD connection Secure...

Страница 28: ...essage When you receive a WAP Push message Flash or beam in the selected colour When you are having a conversation When the flip is closed When the battery is charging Flash in the specified colour When data is being transferred Schedule notification Beam in the specified colour See Creating Calendar events on page 127 or Setting the alarm on page 121 Alarm Note If the Indicator Illumination Light...

Страница 29: ...Inserting removing the SIM card See Inserting removing the battery on page 20 to remove the battery cover and the battery Inserting the SIM card Position the SIM card as shown with gold contacts facing down and the notched corner turned to the right Carefully slide the SIM card into the SIM card pocket until the card is all the way seated Removing the SIM card Place a finger on the bottom edge of ...

Страница 30: ...e 3 gold pins in the phone 2 Replace the cover on the phone Make sure the cover clicks into place Removing the battery 1 Place your finger on the small bar at the top of the cover Slide the cover slightly toward the bottom of the phone then lift the cover off the phone 2 Place your finger on the tab at the base of the battery Lift the battery off the compartment VS7 AAA book Page 20 Wednesday Augu...

Страница 31: ...nect the charger from the outlet before removing the plug from the phone Then hold the connector cover and press and hold the release buttons on both sides of the connector s end and pull gently to disconnect the charger from the phone After you have removed the Charging Connector replace the connector cover over the socket Note DO NOT force the connector as this may damage the phone and or the ch...

Страница 32: ...r is low a Battery low message is displayed and a warning tone sounds The phone automatically switches off after the tone Fully recharge the battery If you receive the low battery warning during a conversation charge your phone to continue with the conversation While charging Charging complete VS7 AAA book Page 22 Wednesday August 3 2005 5 10 PM ...

Страница 33: ... the flip Switching the phone on off 1 Press and hold Y for several seconds to switch the phone on A greeting may be displayed and the phone enters standby mode 2 Press and hold Y for several seconds to switch the phone off Note If your SIM card is PIN protected your PIN code will be requested Enter the PIN code and 0 9 5 Ok See Security on page 117 DO NOT switch off the phone while resetting down...

Страница 34: ...cts list 42 Add contact 44 Call log 47 Speed Dial list 48 View groups 49 Advanced 49 Service numbers 1 2 52 Calendar 125 Browser PANASONIC BOX 81 Settings Phone settings 90 Display settings 96 Sounds alerts 99 Calls 101 Connectivity 105 Security 117 Games Games 144 Download 1 146 Settings 147 Information 147 Camera Picture 71 Video 77 Tools SIM tool kit 2 121 Alarms 121 Sound recorder 123 Calculat...

Страница 35: ...ions See Main menu structure on page 24 2 1929394 to scroll to the required menu 7 0 9 5 Select To go back to Main menu 1 6 Back repeatedly until Main menu screen appears Shortcut To jump to and open one of the 9 application items simply press the Numeric key corresponding to the required item s location The numbering system is 1 2 3 4 5 6 7 8 9 VS7 AAA book Page 25 Wednesday August 3 2005 5 10 PM...

Страница 36: ...veral ways to select items by using center Navigation key or Left Soft key or by entering the required number e or r given to the item Example To select Warning tone in the display shown above 192 to scroll to Warning tone 7 0 192 to scroll to Warning tone 7 5 Select Press the menu number G Keys corresponding to the menu numbers A K Menu A K e Menu e L Menu L r Menu r Note Direct access keys to th...

Страница 37: ...rtain conditions such as no answer destination number is busy network busy or some connection errors When your call is rejected 1 Auto redial 7 5 Yes to start Auto redial 2 To stop Auto redial while redialling Y 9 6 Cancel Note There are several ways to select items from menu lists See Menu selection method on page 26 Note To erase a digit 6 Clear To increase the earpiece volume 1 9 4 9 O To decre...

Страница 38: ... 1 q 2 394 to switch to Dialled numbers Answered calls or Missed calls screen 3 192 to scroll to the required number 7 q International dialling The international prefix and the destination country region code should be entered followed by the area code and phone number 1 Press and hold L until is displayed 2 Enter the country region code 3 Enter the area code and phone number 7 q Note Many countri...

Страница 39: ... When the phone is ringing and or vibrating 1 q 9 5 Accept Rejecting calls When the phone is ringing and or vibrating 1 Y 9 6 Cancel Note Most countries support the international emergency number 112 If you find the number does not work on your phone contact your service provider Note If Any key answer is set to On see page 102 you can answer a call by pressing any key except Y 0 6 Cancel U O and ...

Страница 40: ...en the phone is closed U 9 O 9 P When the phone is open 0 2 q to answer the call Answering a second call When on an active call you may receive another call To enable this service Call waiting must be active See Call waiting on page 102 If you hear an alert tone during a call 1 q 9 5 Accept The first call is placed on hold 2 q to switch between the two calls if required To reject another call 1 6 ...

Страница 41: ...vate the Silent mode Voicemail Voicemail is a network service which allows callers who could not reach you to leave voice messages You may need to subscribe to this service through your service provider For further details see Voicemail on page 66 Retrieving stored voice messages When a new voice message is stored an alert sounds and appears on the display and you receive an SMS notification 1 Pre...

Страница 42: ...Hold call and Resume OR 5 Options 7 Select Hold call or Resume Hold call Resume Put or resume a call on hold From contacts Access the Contacts list Create SMS Create a new SMS message Inbox SMS Access Inbox SMS Calendar Access Calendar Speaker mode Handheld mode Bluetooth mode Switch to Speaker Handheld or Bluetooth talking mode Record Record the conversation The sound clip is saved to My Media VS...

Страница 43: ...il paging and computerised home banking For example you may need to enter a number to remotely access voicemail messages A phone number may be stored in the Contacts card together with a DTMF sequence allowing the number to be dialled upon recall and the DTMF sequence to be sent automatically To send DTMF during a call 1 Enter digits L K e or r Pause dial Using pauses allows you to send DTMF autom...

Страница 44: ...than one call the following options are available 1 5 Options 7 Select the required option Swap Switch between one active and one held call Merge Enable multi party conversation when two calls are connected one active one on hold See Conference on page 35 From contacts Access the Contacts list Create SMS Create a new SMS message Inbox SMS Access Inbox SMS Calendar Access Calendar Speaker mode Hand...

Страница 45: ...wer an incoming call 3 5 Options 7 Select Merge To end the Conference call 4 Y To split the caller from the Conference call and talk privately During a Conference call 1 5 Options 7 Select Conference call 2 192 to scroll to the required caller you wish to talk to 3 5 Options 7 Select Split The remaining callers can continue with the Conference call 4 To end the private call and rejoin the Conferen...

Страница 46: ...ive text entry system You can enter a word with fewer key presses Multi tap A traditional way to type in a letter Press a key several times until the required letter appears Numeric You can enter numbers 0 9 e r and Input method Icon Letter case T9 T9y Automatic T9u Upper case T9 Lower case Multi tap Abc Automatic ABC Upper case abc Lower case Numeric 123 VS7 AAA book Page 36 Wednesday August 3 20...

Страница 47: ... e repeatedly until the icon for the required letter case mode appears Auto capital change When the letter case is set to Automatic T9y and Abc the first character is entered as upper case and subsequent letters as lower case When one of the following characters Period is entered the next character is entered as upper case VS7 AAA book Page 37 Wednesday August 3 2005 5 10 PM ...

Страница 48: ...rd is reached 3 Select the required word OR If the required word is not in the dictionary is displayed after the word 5 Spell 7 Enter the correct word 7 0 9 5 Add The word is added to the internal dictionary automatically For example to enter Hello press keys as follows My dictionary Words that you enter in My dictionary are added to the internal dictionary so that they are suggested next time To ...

Страница 49: ...tions 7 Select Paste Options When entering text the following options may be available by pressing 5 Options 1 Depends on each application 2 Not available in Chinese T9 mode Use contacts 1 Access Contacts menu to use Contacts data Copy Cut Paste See Copying cutting pasting text on page 39 Add symbol Show the Symbol list from which you can select any symbol available on your phone Input method Sele...

Страница 50: ...δ ε ζ é è ê 3 F G H I 4 g h i 4 G H I 4 Θ Í g h i 4 η θ ι ì í 4 G J K L 5 j k l 5 J K L 5 Λ j k l 5 κ λ µ 5 H M N O 6 m n o 6 M N O 6 Ξ Ñ Ó g Ö Ø Ô Õ m n o 6 ν ξ ó h ñ ö ø ò ô õ 6 I P Q R S 7 p q r s 7 P Q R S 7 Π Σ p q r s 7 π ρ l σ ß 7 J T U V 8 t u v 8 T U V 8 Φ Ú j Ü t u v 8 τ υ φ ú k ü ù 8 K W X Y Z 9 w x y z 9 W X Y Z 9 Ψ Ω w x y z 9 χ ψ ω 9 e Letter case change e Press and hold Input method...

Страница 51: ... list 42 Add contact 44 Phone 44 SIM 46 Call log 47 Dialled numbers 47 Answered calls 47 Missed calls 47 Speed Dial list 48 View groups 49 Advanced 49 Synchronisation 49 My number 50 Display by 51 Memory status 51 Copy all from SIM 51 Copy all to SIM 51 Delete all 52 Service numbers 1 52 1 VS7 AAA book Page 41 Wednesday August 3 2005 5 10 PM ...

Страница 52: ...ntacts card 0 Options In the Contacts list the following options are available by pressing 5 Options View View the selected Contacts card Call Call the selected contact Create message Create an SMS or MMS and send it to the selected contact See Creating a new message on page 54 Edit Edit the selected contact See Editing a Contacts card on page 46 Search Search a contact by entering characters Add ...

Страница 53: ...s stored 192 to scroll to the required number 7 0 9 5 Call Speed dial Assign the selected contact to a Speed dial See Assigning speed dial keys on page 48 Copy to phone SIM Copy the selected contact to the phone or the SIM card Send via Send the selected contact to another device via infrared or Bluetooth See Infrared on page 105 or Bluetooth wireless technology on page 107 VS7 AAA book Page 43 We...

Страница 54: ...n 7 0 To enter characters see Text entry on page 36 3 When entries are completed 5 Save First name 1 Enter the first name Last name 1 Enter the last name Mobile number 1 Enter the phone numbers Home number 1 Work number 1 Mobile email 1 Enter the e mail addresses Personal email 1 Work email 1 Birthday Enter the contact s birthday Postal address Enter Additional info No street Postal code City Stat...

Страница 55: ...lluminations Select Default or the required illumination colour Picture Select the required picture Group Select the required group Note If a picture in My Media is attached to a Contacts card it appears on the screen when the contact calls you When the picture is set to be attached to a Contacts card the phone saves the picture resized for the Contacts card if the picture is larger than the displ...

Страница 56: ... Call log See Saving a phone number from Call log on page 47 Editing a Contacts card d Main menu Contacts Contacts list 1 Highlight the required Contacts card See Searching for a contact on page 42 2 5 Options 7 Select Edit 3 Edit the required entry 7 5 Save Name Enter the name Tel number Enter the phone number Note The length of name and number and the total amount of data are SIM dependent VS7 A...

Страница 57: ...er from Call log d Main menu Contacts Call log 1 394 to move to Dialled numbers Answered calls or Missed calls 2 192 to scroll to the required phone number 3 5 Options 7 Select Add to contacts 4 Select New or Add 5 If New is selected Enter other information If Add is selected Highlight the required contact 7 5 Select 7 If there is no empty field Would you like to replace 7 0 9 5 Yes 7 Select the n...

Страница 58: ... the required key 7 5 LookUp 2 Highlight the required contact 7 5 Select 3 If the card has several phone numbers stored 192 to scroll to the required number 7 0 9 5 Select Using the speed dial keys In standby mode 1 Press and hold a speed dial key S K 7 5 Call Call Call the selected number Create message Create an SMS or MMS message to the selected number Add to contacts Store the selected number ...

Страница 59: ...me 7 0 Advanced Synchronisation You can synchronise your Contacts list with your network server You can just send changes or send all your records to the network server For further details see Synchronisation on page 112 To send only changes to the network server d Main menu Contacts Advanced Synchronisation Modified contacts The phone confirms completion To send all your records to the network se...

Страница 60: ...e profile is empty 0 9 5 Create When the profile has the stored number s 5 Options 7 Select Create 2 Repeat steps 1 3 in Storing a contact in your SIM card on page 46 Options When viewing My number the following options are available by pressing 5 Options 1 Available only for SIM profile Edit Edit the profile Create 1 Create a new profile Delete Delete the profile Send via Send the profile via inf...

Отзывы: