background image

10

Operating the TV

Turn on the TV.

Switch 

[VHS/TV/DVD]

 to “TV”.

When you operate the TV, always select “TV” with the 

[VHS/TV/DVD]

 switch.

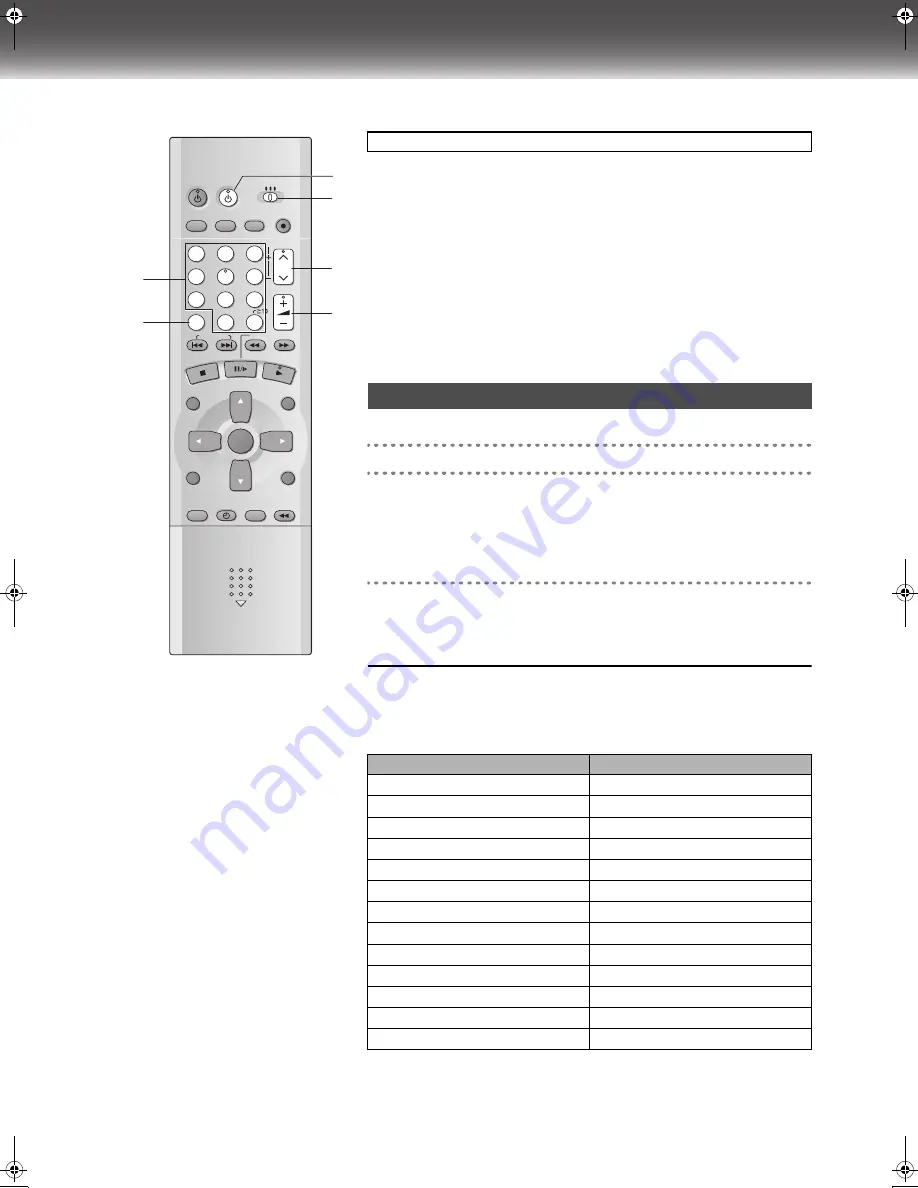
(1)

Numeric buttons (0–9, – /– –)

Selects the TV channel.

(2)

Television input mode selector (AV)

Selects desired AV input on the TV.

(3)

TV power button (TV

Í

)

Press to switch the TV from on to standby mode or vice versa.

With some TV models, it may only be possible to switch the TV to the standby mode 
using this button. In this case, use 

[AV]

[CH]

IJ

 or the numeric buttons to switch 

the TV on.

(4)

VHS/TV/DVD switch (VHS/TV/DVD)

(5)

Channel up/down buttons (CH

IJ

)

Selects the required TV channel.

(6)

TV volume up/down buttons (VOLUME, 

r

N


s

)

Adjusts the volume of the TV.

You can operate the TVs of the manufacturers listed below with the remote control after 
setting it.

[1] 

Refer to the chart below for the code of your TV.

[2] 

Aim the remote control at the TV and

While holding down [TV

Í

], use the numeric buttons 

to enter the two-digit code.

Example: “1”; [0]

l

[1]

The remote control outputs the on/off signal. If the code is correct, the TV turns on 
or off.

[3] 

Check whether the TV can be operated properly.

When a manufacturer has multiple codes in the following chart, try entering other 
codes if the TV operations cannot be performed properly, and then select the 
optimal code.

Notes:

If you are using a Panasonic TV, this setting has already been made, you do not need to 
perform the above procedure. However, this remote control may not work on some 
Panasonic TVs.

Some TV models cannot be operated by this remote control (including all TVs non-
remote compatible).

VHS/DVD/TV

VHS/DVD QUICK REPLAY DUBBING

REC

CH

VOLUME

TV

TV

VHS

DVD

1

2

3

7

8

9

0

4

5

6

SLOW/SEARCH

NAVI

TOP MENU

MENU

RETURN

PROG/CHECK

PROG PLAY

DISPLAY

JET REW

TIMER

ENTER

PLAY
 LIST

INDEX/SKIP

OUTPUT

TRACKING/V-LOCK

AV

DIRECT

 NAVIGATOR

VHS/DVD

-/- -

(1)

(2)

(3)

(4)

(5)

(6)

TV OPERATION

TV Maker Setting

Brand

Code

Panasonic/National

01-04

SONY

05

TOSHIBA

06

JVC

07

HITACHI

08

MITSUBISHI

09, 10

SHARP

11

PHILIPS, SAMSUNG

12

NEC

13

SANYO

14

GOLDSTAR/LG

15, 16

SAMSUNG

17, 18

SANYO

19

VP31GCGCS.book  10 ページ   2 0 0 3 年 7 月 3 0 日   水曜日   午後 8 時 2 8 分

Содержание VP-31GN

Страница 1: ...VP 31GN DVD Player Video Cassette Recorder Operating Instructions Model No NV VP31 Series Before attempting to connect operate or adjust this product please read these instructions completely VQT0F32 ...

Страница 2: ...ET 22 SYSTEM 23 OPTION 24 Various indications in on screen display 25 Changing audio 25 Playing Discs basic play 26 Position Memory function 27 Chapter Review 27 Convenient Functions 28 Starting play from a selected item 28 Selecting groups to play 28 QUICK REPLAY 28 Rotating Pictures 29 Repeat Play 29 Changing Play Sequence 30 Program Play 30 Random Play 30 Playing the Programmes or Play Lists on...

Страница 3: ...ted room The unit is suddenly brought from cool surroundings such as an air conditioned room or car to a place which is hot and humid Note In any of the above mentioned conditions do not operate the unit for at least 1 hour This unit is not equipped with a dew sensor NV VP31GC Middle East model NV VP31GCS Asia Malaysia model Please check and identify the supplied accessories 1 pc Remote Control 1 ...

Страница 4: ...t dirty pictures will not be recorded or played back clearly See the following conditions If this happens insert and eject a cassette 5 10 times successively to remove the dirt from the video heads If the problem still persists after performing above contact a service personnel Heads mainly become dirty because of scratched or dirty tapes use of the unit under high temperature and humidity or unde...

Страница 5: ...d pictures on HighMAT discs ªDVD RAM discs The DVD RAM you can play on this unit are those recorded with DVD video recorders DVD video cameras personal computers etc using Version 1 1 of the Video Recording Format a unified video recording standard Remove discs from their cartridges before use and return them when you are finished making sure that the labels of the disc and cartridge face the same...

Страница 6: ...n display Disc play counter Timer recording end time Disc type lpage 5 Miscellaneous messages etc ªVHS section 1 VHS selector indicator Lights up when the VHS section is active It flashes for about 5 seconds immediately after selection is made 2 Operation status of VHS section Lights up when a cassette is inserted Flashes when recording or timer recording is attempted with no cassette inserted Dis...

Страница 7: ...page 12 3 QUICK REPLAY button lpage 28 4 Numeric buttons 0 9 S10 lpage 27 28 5 Skip buttons 9 SKIP lpage 26 6 Stop button lpage 26 7 Still button D lpage 26 8 TOP MENU and DIRECT NAVIGATOR button lpage 31 32 9 Cursor buttons 342 1 ENTER button lpage 37 40 10 On screen menu icon button DISPLAY lpage 37 11 SUBTITLE button lpage 34 12 Advanced Surround button A SRD lpage 35 13 MUSIC WITH PICTURE butt...

Страница 8: ...rder to achieve high fidelity in reproducing colours The description of the component video input terminals depends on the TV or monitor e g Y PB PR Y B Y R Y Y CB CR Connect to terminals of the same colour To enjoy progressive video lpage 13 Video cable Not supplied Television For better video from DVD These connections are for the DVD section only Carry out the Basic Connections described above ...

Страница 9: ... 480P 480I PAL 576I Y PB PR R AUDIO L VIDEO VHS DVD OUT DVD OUT AV1 IN DVD only terminal DVD OUT Output common to VHS and DVD VHS DVD OUT To enjoy sound through other audio equipment R AUDIO L VIDEO OPTICAL RF AC IN DIGITAL AUDIO PCM BITSTREAM R AUDIO L VIDEO S VIDEO IN OUT COMPONENT VIDEO NTSC 480P 480I PAL 576I Y PB PR R AUDIO L VIDEO VHS DVD OUT DVD OUT AV1 IN AUX IN L R R AUDIO L OPTICAL DVD I...

Страница 10: ...to enter the two digit code Example 1 0 l 1 The remote control outputs the on off signal If the code is correct the TV turns on or off 3 Check whether the TV can be operated properly When a manufacturer has multiple codes in the following chart try entering other codes if the TV operations cannot be performed properly and then select the optimal code Notes If you are using a Panasonic TV this sett...

Страница 11: ...ead and then reconnect it Turn on the unit Plug in Auto Tuning restarts To set the channels manually lpage 23 ªTo restart Plug in Auto Tuning Turn the unit on Make sure there is no video cassette in the unit 1 Keep both CH I and J on the unit pressed simultaneously for 3 seconds or more until the channel on the unit s display changes to 1 2 Disconnect the mains lead and then reconnect it 3 Turn on...

Страница 12: ...00 1 Display the CLOCK SET screen 2 When the current clock display on the unit is between 11 58 00 and 12 01 59 press MENU as soon as you hear the 12 00 00 time tone This resets the time to 12 00 00 LANGUAGE CLOCK SET TUNER PRESET SYSTEM OPTION SELECT END ENTER MENU VHS MENU SELECT END MENU LANGUAGE ENGLISH Y M D H M 2003 1 1 0 00 CLOCK SET ªTo switch to the desired video You can set the unit so t...

Страница 13: ...age 8 Video will not be displayed correctly if connected to an incompatible TV 1 Select Enable NTSC Disc Only in Progressive Out Component lpage 41 2 Change Video output mode to 480P in the on screen menu lpage 39 3 Press PROGRESSIVE on the unit before or during play All Panasonic TVs that have 480P input terminals are compatible Consult the manufacturer if you have another brand of TV To check wh...

Страница 14: ...re and the sound may be unstable However these are not malfunctions VHS DVD TV VHS DVD QUICK REPLAY DUBBING REC CH VOLUME TV TV VHS DVD 1 2 3 7 8 9 0 4 5 6 SLOW SEARCH NAVI TOP MENU MENU RETURN PROG CHECK PROGPLAY DISPLAY JET REW TIMER ENTER PLAY LIST INDEX SKIP OUTPUT TRACKING V LOCK AV DIRECT NAVIGATOR CANCEL RESET ANGLE PAGE INPUT SELECT MUSIC w PICTURE PICTURE SPEED AUDIO POSITIONMEMORY SETUP ...

Страница 15: ...s You can also adjust the tracking and vertical with CH IJ on the unit Tapes recorded in the NTSC system can be played back via a PAL system TV To record in the NTSC system set NTSC INPUT SELECT OPTION lpage 24 Select on PAL TV in NTSC PB SELECT to view the NTSC recording in colour OPTION lpage 24 On some TVs the playback picture may roll up or down If your TV has V HOLD control or equivalent func...

Страница 16: ... While recording switch VHS TV DVD to DVD 2 If OUT VHS DVD is set to MANUAL lpage 12 press VHS DVD OUTPUT to switch to DVD 3 Insert the disc and press 1 PLAY to start play lpage 26 You can record the present date and time on the same screen as the picture Set OSD REC to ON OPTION lpage 24 and start recording This function is also activated for OTR recording lpage 17 and Timer recording lpage 18 Th...

Страница 17: ...ding Press You can delete all contents in a cassette s the picture the sound and the Jet Navigator data 1 Insert a cassette that you want to delete the cassette s contents 2 Press TAPE REFRESH for 5 seconds or more The unit puts on tape refresh standby 3 Press TAPE REFRESH for 2 seconds or more The tape refresh function starts The tape is rewound to the beginning and it is fast forwarded with eras...

Страница 18: ...ressing VHSÍ If timer recording is executed while the unit is turned on the power will stay on after the timer recording is completed The power will not be automatically turned off To make further timer programmes Repeat steps 1 4 To stop recording Press TIMER When is flashing Check the timer recording details again lpage 19 VHS DVD TV VHS DVD QUICK REPLAY DUBBING REC CH VOLUME TV TV VHS DVD 1 2 3...

Страница 19: ...e current tape speed during the stop mode is displayed Tape Speed Auto Change Function During a timer recording performed in SP mode this function automatically changes the tape speed if the unit determines that the remaining tape time is insufficient to record the entire programme If the remaining tape time is still not sufficient even in LP EP mode the programme cannot be recorded to the end The...

Страница 20: ...n 50 programmes The new item is added and the oldest item is deleted REMAINING CASSETTE 0 FOR JET NAVIGATOR DELETE JET NAVIGATOR DATA appears when you try to store items for more than 20 tapes Programmes recorded without deleting data as instructed are not registered in the list The list does not appear when playing tapes recorded on other equipment When recording over the same location on a tape ...

Страница 21: ...following cases When a recording is started by pressing REC When REC on the remote control is pressed during recording When timer recording is activated You can find a timer recorded programme with One touch operation and play it back easily Set timer recording for the programme you wish to view Press PROG PLAY As soon as the timer recorded programme is found playback starts automatically To cance...

Страница 22: ...to 5 or more minutes to complete When Auto Tuning is completed the on screen display disappears and programme position 1 is selected To stop partway through Press MENU If the unit is not correctly tuned by Auto Tuning Follow the procedure on page 23 Channel plan VHS DVD TV VHS DVD QUICK REPLAY DUBBING REC CH VOLUME TV TV VHS DVD 1 2 3 7 8 9 0 4 5 6 SLOW SEARCH NAVI TOP MENU MENU RETURN PROG CHECK ...

Страница 23: ... also set the programme position directly by entering the number with the numeric buttons lbelow 6 Press MENU repeatedly until the setting screen disappears 1 Press 34 to select CH and select the channel with 2 1 2 Select FINE with 34 then press 2 1 to obtain the best tuning condition Press ENTER to return the tuning to its former state 3 Press MENU until the setting screen disappears Set the Colo...

Страница 24: ...C 3 58 system cannot be recorded correctly at this position NTSC PB SELECT Select the colour TV system of the TV used to play back a tape recording NTSC signals on PAL TV TVs that can receive PAL signals 4 43 TVs that can receive NTSC 4 43 signals 3 58 TVs that can receive NTSC 3 58 signals JET NAVIGATOR lpage 20 ON Jet Navigator data automatically registered OFF Data not registered If you select ...

Страница 25: ...pear L The L indicator appears R The R indicator appears Normal Neither the L nor R indicator appears 3 Operation status display 4 Shows the time and tape counter Pressing DISPLAY once makes the on screen display appears After that press the button repeatedly to change the display as follows Present time Tape counter Remaining tape time Present time during Index search S 01 to S 20 is displayed du...

Страница 26: ... NAVI TOP MENU MENU RETURN PROG CHECK PROGPLAY DISPLAY JET REW TIMER ENTER PLAY LIST INDEX SKIP OUTPUT TRACKING V LOCK AV DIRECT NAVIGATOR CANCEL RESET ANGLE PAGE INPUT SELECT MUSIC w PICTURE PICTURE SPEED AUDIO POSITIONMEMORY SETUP ZOOM REPEAT PLAY MODE A SRD CINEMA SUBTITLE VHS DVD DVD VHS TV DVD POSITION MEMORY MENU TOP MENU SUBTITLE Numeric buttons ENTER PROG PLAY MUSICWITH PICTURE QUICK REPLA...

Страница 27: ...a disc for which the position is memorized and Press 1 PLAY Play starts from the memorized position and the position is cleared When playing DVD Video see Chapter Review lbelow Notes If you set up 6 positions or more the oldest position memory is replaced This function may not work while playing some DVDs or play lists on DVD RAM DVD V When the Resume function is active you can review the first fe...

Страница 28: ...ack picture number and press ENTER You can also select the group and track picture number with the numeric buttons DVD V RAM VCD CD MP3 WMA Skip back a few seconds within the current item programme track or title JPEG Skip back a few pictures During play press QUICK REPLAY Note This may not work on some parts of a disc or some kind of discs VHS DVD TV VHS DVD QUICK REPLAY DUBBING REC CH VOLUME TV ...

Страница 29: ...is displayed All ªTo repeat playing in the order programmed Press REPEAT during program play lpage 30 Notes You can also repeat play of content and group on HighMAT discs This may not work on some discs If a DVD has 2 or more titles it is not allowed to repeat the whole disc This does not work during menu play of a Video CD with playback control Rotating Pictures Rotate left Rotate right Rotate le...

Страница 30: ...screen reverts to the play mode display The programme is cleared when you turn the unit off open the disc tray select another source VHS DVD TV VHS DVD QUICK REPLAY DUBBING REC CH VOLUME TV TV VHS DVD 1 2 3 7 8 9 0 4 5 6 SLOW SEARCH NAVI TOP MENU MENU RETURN PROG CHECK PROGPLAY DISPLAY JET REW TIMER ENTER PLAY LIST INDEX SKIP OUTPUT TRACKING V LOCK AV DIRECT NAVIGATOR CANCEL RESET ANGLE PAGE INPUT...

Страница 31: ...lists with the numeric buttons Example 03 3 10 S10 l 1 l 0 3 Press ENTER to start play To skip scenes press backwards or 9 forwards To clear the play list screen Press PLAY LIST or RETURN Note Up to 99 play lists can be displayed VHS DVD TV VHS DVD QUICK REPLAY DUBBING REC CH VOLUME TV TV VHS DVD 1 2 3 7 8 9 0 4 5 6 SLOW SEARCH NAVI TOP MENU MENU RETURN PROG CHECK PROGPLAY DISPLAY JET REW TIMER EN...

Страница 32: ...are IS09660 level1 and level 2 except extended format Finalize the disc after recording A disc that is not finalized may not be played back This unit is compatible with multi session lpage 47 but if there are a lot of sessions it takes more time for play to start Keep the number of sessions to a minimum to avoid this VHS DVD TV VHS DVD QUICK REPLAY DUBBING REC CH VOLUME TV TV VHS DVD 1 2 3 7 8 9 0...

Страница 33: ...eturn to the menu above the current one Press RETURN To change the menu background Press DISPLAY The background changes to the one recorded on the disc 1 During play press MENU PLAY LIST 2 Press 2 then 34 to switch between the play list group and content lists 3 Press 1 then 34 to select an item and press ENTER To exit the list screen Press MENU PLAY LIST To use the tree screen to find a group MP3...

Страница 34: ... select OFF or ON with 34 During play press ANGLE PAGE The angle number changes each time you press the button To erase the icon for soundtracks subtitles or angle view Press RETURN Note j or j j is displayed instead of the language number in circumstances such as when no language is recorded on the disc VHS DVD TV VHS DVD QUICK REPLAY DUBBING REC CH VOLUME TV TV VHS DVD 1 2 3 7 8 9 0 4 5 6 SLOW S...

Страница 35: ... Each time you press the button the indication changes 4 3 Standard European Vista 16 9 Standard Cinemascope2 Cinemascope1 American Vista ªMaking fine adjustments to the zoom ratio While the ZOOM icon is displayed press 34 The ratio changes in 0 01 units between 1 00 and 1 60 and in 0 02 units between 1 60 and 2 00 To restore the original ratio Press ZOOM until the ratio returns to 1 00 Notes The ...

Страница 36: ... VP31GC only IMPORTANT If the equipment you connected cannot decode the signal the setting must be changed to PCM If not signals the equipment cannot process will be output by this unit causing high levels of noise which can damage your hearing and the speakers VHS DVD TV VHS DVD QUICK REPLAY DUBBING REC CH VOLUME TV TV VHS DVD 1 2 3 7 8 9 0 4 5 6 SLOW SEARCH NAVI TOP MENU MENU RETURN PROG CHECK P...

Страница 37: ...re Menu Audio Menu Display Menu J English ON 1 Disc information e g DVD V RAM PG Programme number PL Play list number DVD V T Title number C Chapter number VCD CD T Track number WMA MP3 G Group number T Track number in group JPEG G Group number P Picture number in group Audio mode RAM VCD lpage 34 Soundtrack language DVD V RAM lpage 34 39 B Audio signal type l page 39 A Karaoke vocal on off Karaok...

Страница 38: ...o standby This feature doesn t work while using a play list This feature doesn t work during program and random play Markers added with this unit clear when you turn the unit off change the source or open the disc tray Progress indicator a Current position b Condition play pause or slow search c Changing the time display DVD V RAM VCD CD Press 34 to show the elapsed play time or remaining time for...

Страница 39: ...pling period Current bitrate Average bitrate Picture mode N Normal mode C1 Mellows images and enhances detail in dark scenes C2 Sharpens images and enhances detail in dark scenes U1 U2 User mode l right ªTo change the user mode Define your favorite picture quality 1 Press 1 while U1 or U2 is highlighted 2 Press 34 to select 1 or 2 U1 User mode 1 Video output mode 480I Interlace video 480P Progress...

Страница 40: ...dures Entering a password Ratings Now when you insert a DVD Video that exceeds the ratings limit you set a message appears on the TV Follow the on screen instructions Disc SELECT Audio Subtitle Menus Ratings English English Automatic Level 8 SETUP TAB ENTER RETURN Language code list Abkhazian 6566 Afar 6565 Afrikaans 6570 Albanian 8381 Ameharic 6577 Arabic 6582 Armenian 7289 Assamese 6583 Aymara 6...

Страница 41: ... output Disable For TVs not supporting progressive output Enable NTSC Disc Only Still Mode Specify the type of picture shown when paused Automatic Field Less blurred field stills are shown Select if jittering occurs when Automatic is selected Frame Sharper frame stills are shown Select if small text or fine patterns cannot be seen clearly when Automatic is selected NTSC Disc Output Choose PAL 60 o...

Страница 42: ... Insert the disc containing the programme to be copied lpage 26 This function allows you to record a whole content on a disc automatically Confirm that the remaining tape time is sufficient for recording While stopped press and hold DUBBING for 5 seconds or more When the disc is played all of a content or the tape reaches its end this unit automatically stops dubbing The message is displayed on TV...

Страница 43: ...ormal mode the audio is automatically input through the AV2 IN socket Video is switched to DVD When the external input is not used you can also select the audio of a video cassette or a TV programme with CH IJ Video stays on DVD While in the MUSIC WITH PICTURE mode VHS DVD OUTPUT does not work MUSIC WITH PICTURE Each time you press MUSIC w PICTURE the indication changes as follows MUSIC WITH PICTU...

Страница 44: ...in the VHS MENU and select the desired language for menus Go to Disc in the SETUP menu and select the preferred language for Menus 12 41 On Screen Menu Icon is only partially displayed on the TV Press 34 while the rightmost icon is highlighted to move them down 37 No sound Distorted sound Check the connections Check the volume on the equipment you have connected Ensure that the input settings on t...

Страница 45: ...ake sure the TV is on Ensure the video exclusive channel or AV input is selected Also adjust the channel on the TV Also refer to the instructions for the TV 8 The picture shown on the TV is not normal The sides of the picture are cut off the picture is stretched horizontally or black bands appear at the top and bottom of the screen Go to Video in the SETUP menu and change TV Aspect to suit your TV...

Страница 46: ...ls If the audio in particular parts such as speech is set to a low or high level it may be recorded on a video cassette at a high or low level respectively Error Messages PLEASE PUT IN A VIDEO CASSETTE REC or TIMER has been pressed without a video cassette inserted Insert a video cassette with an intact erasure prevention tab 16 18 PLEASE STOP THE TAPE TUNER PRESET has been selected during playbac...

Страница 47: ...A field still is not blurred but it has only half the information of a frame still so picture quality is lower ID3 tag An MP3 file has an area in which the character based information referred to as ID3 tag is stored The information of the track such as the title artist name etc can be stored here The information can be displayed on players supporting the ID3 tag when a track is played back Howeve...

Страница 48: ...8 kbps and 192 kbps WMA JPEG Exif Ver 2 1 JPEG Baseline files Maximum number of pictures and groups recognizable 3000 pictures and 300 groups Picture resolution between 320k240 and 6144k4096 pixels sub sampling is 4 2 2 or 4 2 0 HighMAT Level 2 Audio and image VIDEO Signal System PAL NTSC Output Level Composite video 1 0 Vp p 75 ohm S VIDEO Y output level 1 0 Vp p 75 ohm PAL C output level 0 300 V...

Страница 49: ...G 36 MP3 32 MUSIC WITH PICTURE 43 ªN NTSC 15 24 41 ªO On screen display 22 25 On Screen Menu Icon 37 Option 24 OTR 17 ªP PCM Down Conversion 36 Picture 15 39 Play list 31 Play speed 38 Plug in Auto Tuning 11 Position Memory function 27 Program play 30 Progressive 8 13 41 ªQ Quick Replay 28 Quick Setup 13 ªR Random play 30 Ratings 40 41 Recording 16 Remaining tape time 25 Repeat 14 29 Resume functi...

Страница 50: ...Matsushita Electric Industrial Co Ltd Web Site http www panasonic co jp global ...

Отзывы: