background image

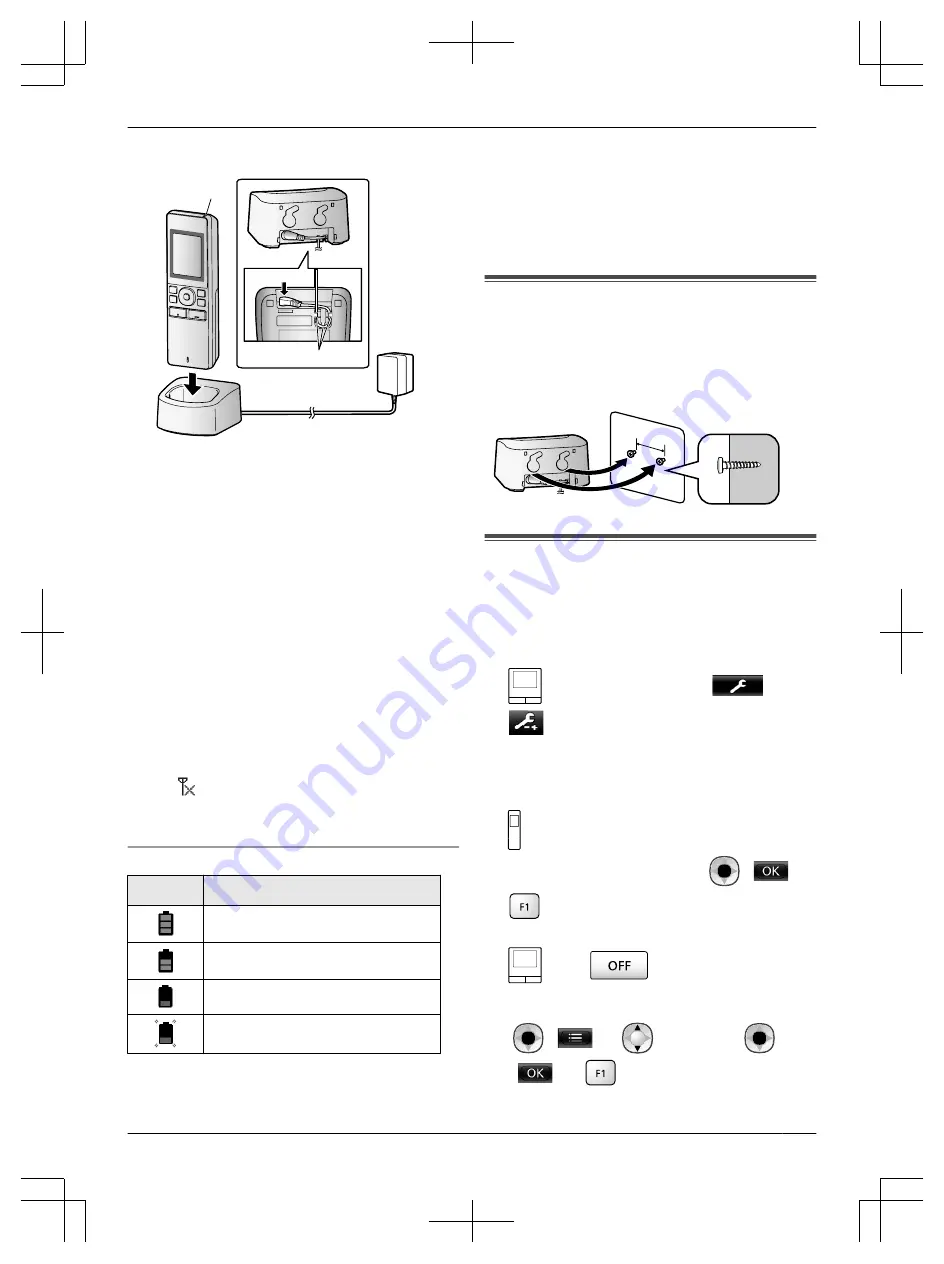
AC adaptor connections


A

*1

B

*1 Press plug firmly.

R

Connect the charger to the power outlet, and then
place the sub monitor in the charger to charge it.
Charging usually takes about 8 hours.

A

 Charge indicator

– when charging: lights
– when charging is completed: off

B

 Hook

R

Charge the sub monitor for at least 15 minutes before
registering it to the main monitor. Make sure to
completely charge the sub monitor after the
registration is completed.

R

Charging may take longer in the following situations.
– When the operating temperature is low. (

®

page 6)

– When the sub monitor is picked up off the charger

or used during charging.

– When the sub monitor’s signal is out of range

(

).

R

The sub monitor does not overcharge even if it is
continuously placed in the charger.

Battery level

Icon

Battery level

High

Medium

Low

Needs charging

R

See page 6 for a guide on operating times for the
sub monitor.

Note:

R

When the sub monitor is off the charger or the AC
adaptor is disconnected for 1 week or more, remove
the batteries in order to maintain battery performance
and prevent the batteries from discharging.
– Recharge the batteries before using the sub

monitor again.

Wall mounting

Note:

R

Make sure that the wall and the fixing method are
strong enough to support the weight of the unit.

R

Drive the screws (locally procured) into the wall.

25 mm

Registering the product to the
Video Intercom System

The operations described here are based on the
VL-SWD501BX series main monitor. See the Operating
Instructions of the Video Intercom System for more
information.

1

: From the top menu, touch 


®


®

 [Register/Cancel] 

®

 [Register] 

®

 [Sub

monitor station] 

®

 select the number of the sub

monitor to be registered.

R

After this, use the sub monitor and complete the
following steps within about 2 minutes.

2

*1

When "Please register the device." is displayed

on the sub monitor screen, press 

 (

®

 (Yes).

R

"Registering completed" is displayed.

3

: Press 

.

*1 To re-register cancelled sub monitors:

 (

®


: "Register" 

®


(

®


 (Yes)

5

Содержание VL-WD613AZ

Страница 1: ...r safety 3 Important safety instructions 4 Other important information 4 Battery installation 4 Charging the sub monitor 4 Wall mounting 5 Registering the product to the Video Intercom System 5 Cleaning 6 Specifications 6 Thank you for purchasing a Panasonic product Please read this manual before using the product and save it for future reference ...

Страница 2: ...X Accessory information Supplied accessories Accessory item Quantity AC adaptor PNLV226AL 1 Rechargeable batteries 1 2 Charger 1 1 Please read the Operating Instructions of the Video Intercom System for information about replacement batteries Note R You will need the following additional items locally procured to install the charger on the wall Screws x 2 for wall mounting Prepare the screws accor...

Страница 3: ...and contact an authorised service centre R Hold the main body not the metal parts of the AC adaptor when unplugging it Unplugging the AC adaptor while holding its cord or the cord s plugs may result in fire electric shock or injury Preventing accidents R Do not use the product in health care facilities if any regulations posted in the area instruct you not to do so Hospitals or health care facilit...

Страница 4: ...ards to using the product and the installation environment R Operating the product near electrical appliances may cause interference Move away from the electrical appliances Caution R Risk of explosion if battery is replaced by incorrect types Dispose of used batteries according to the instructions Repairing transferring disposing or returning the product Requesting repairs for the product R Note ...

Страница 5: ... sub monitor Note R When the sub monitor is off the charger or the AC adaptor is disconnected for 1 week or more remove the batteries in order to maintain battery performance and prevent the batteries from discharging Recharge the batteries before using the sub monitor again Wall mounting Note R Make sure that the wall and the fixing method are strong enough to support the weight of the unit R Dri...

Страница 6: ...pprox 100 m line of sight distance from the main monitor 1 When used fully charged in an operating temperature of 20 C 2 When the operating temperature is 20 C The charging time may increase when the operating temperature is lower than this 3 When registered to the main monitor Charger Power source AC adaptor PNLV226AL Input 220 240 V AC 0 1 A 50 60 Hz Output 5 5 V DC 0 5 A Power consumption Stand...

Страница 7: ...7 Notes ...

Страница 8: ...1 62 4 chome Minoshima Hakata ku Fukuoka 812 8531 Japan http www panasonic net Panasonic System Networks Co Ltd 2014 PNQX7102ZA C0814MM0 ...

Отзывы: